
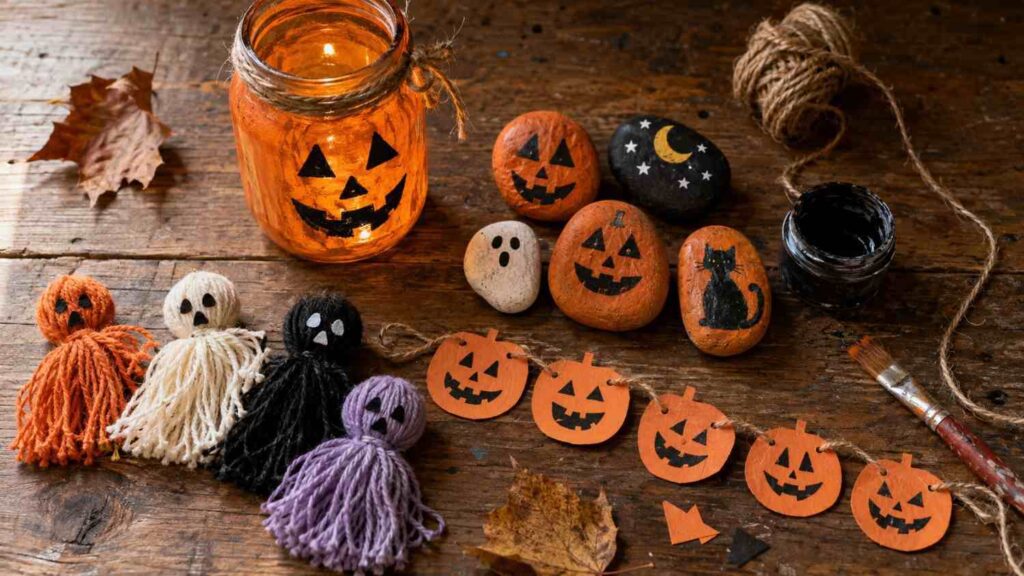
October has a way of sneaking up on you — one day it’s still summer-warm, and the next you’re reaching for a sweater and lighting your first candle of the season. There’s a particular kind of magic in that shift, and it’s the same feeling we wanted to capture with this list. Not the fake cobwebs and store-bought skeletons kind of Halloween, but the quieter, cozier version — the one that smells like dried leaves, glows like candlelight in an old mason jar, and feels handmade in the best possible way.
Every craft on this list comes together with things you probably already have tucked away at home — a few jars, some paint, a handful of pipe cleaners. Whether you’ve got a whole evening free or just twenty quiet minutes with a cup of tea, there’s something here worth making. So pull up a chair, grab your scissors, and let’s turn your home into the cozy-magical space it’s meant to be this fall.
Easy Halloween Crafts Ideas
1. Halloween Paper Snowflake (Jack-O’-Lantern Style)
Remember making paper snowflakes as a kid? This craft gives that same nostalgic activity a spooky, Halloween-ready twist — perfect for kids and adults alike.
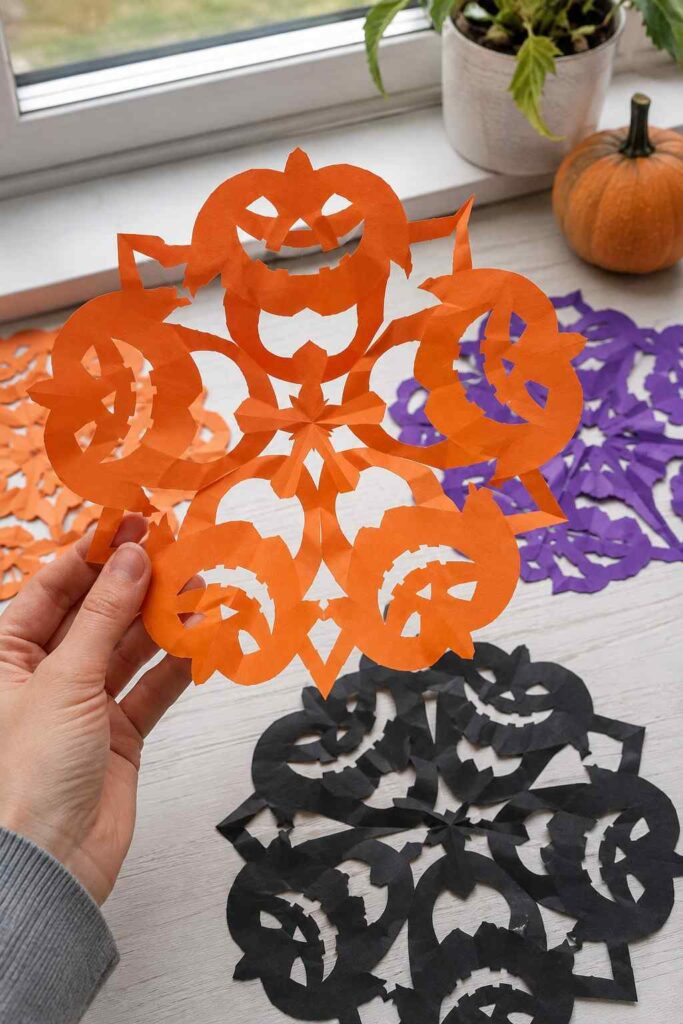
What you’ll need
One sheet of orange or black construction paper (or any paper you already have at home), scissors, a pencil, and a hole punch if you want a neat little eye detail.
How to make it
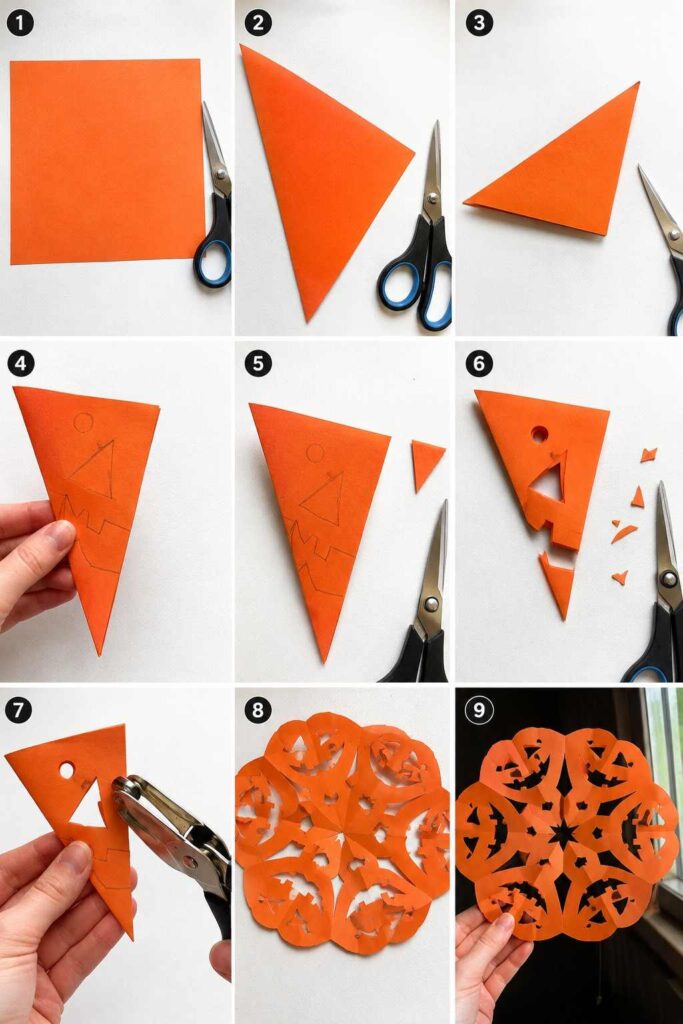
Start by folding your paper into a triangle, just like you would for a classic snowflake — begin with a square sheet, fold it in half diagonally, then fold it into thirds to create a smaller triangle.
On the folded edge, sketch half of a pumpkin face — a simple jagged mouth and a small triangle nose work perfectly. Carefully cut along your pencil lines, then use the hole punch to create a round little eye.
Now comes the fun part — slowly unfold the paper to reveal your finished jack-o’-lantern snowflake!
Tape a few of these onto your windows for a sunlit spooky silhouette effect, or string several together with thread to hang as a garland across a mantel or doorway.
2. DIY Halloween Painted Mason Jars
Celebrate the spooky season the not-so-scary way with these adorable painted mason jars — all you need is a jar you already have, some paint, and a bit of twine.
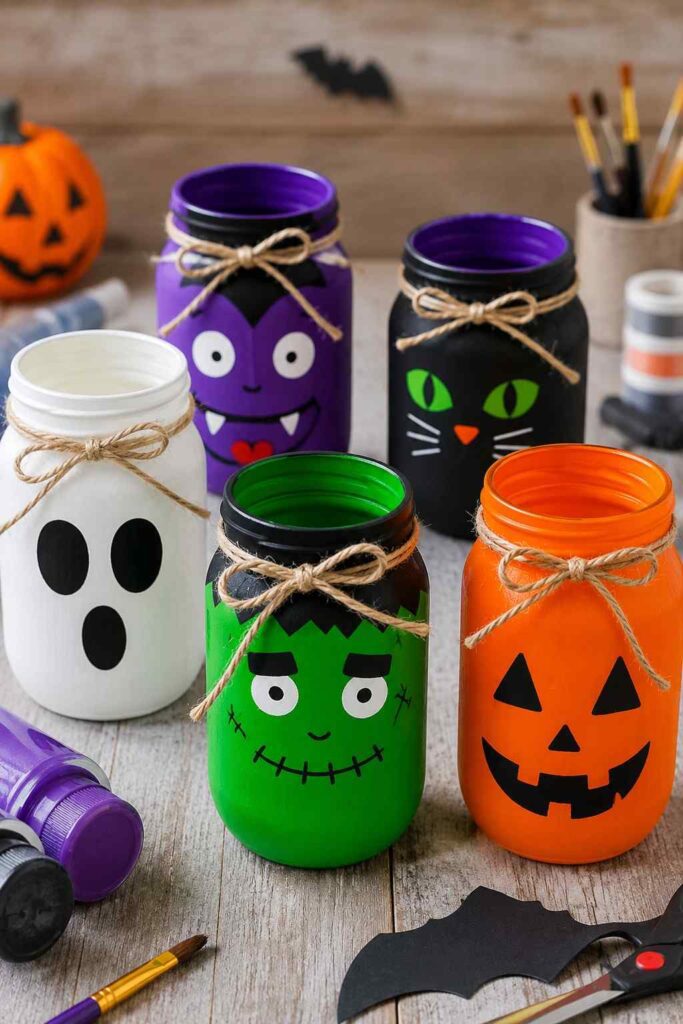
What you’ll need
An empty mason jar, multi-surface acrylic paint, a paintbrush, and a length of twine.
How to make it
Start by giving your jar a good clean with soap and water to remove any dirt or fingerprints — this helps the paint stick evenly. Paint the outside of the jar with your base colour, making sure to cover the neck as well. Let it dry completely, then add a second coat, and a third if needed for full coverage.
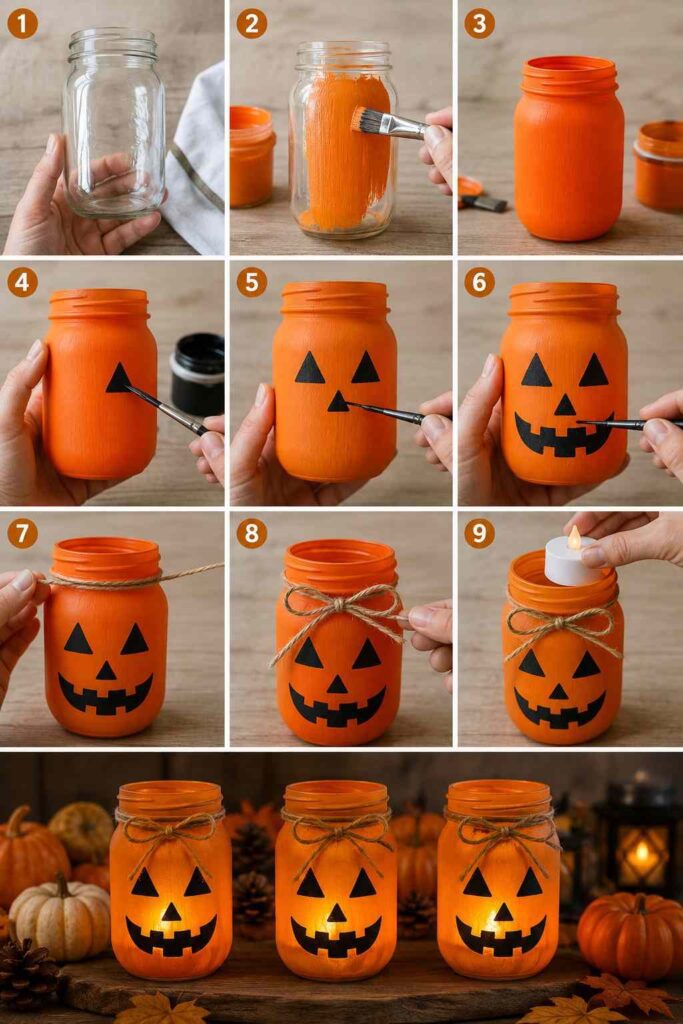
Once the base coat is fully dry, switch to a fine-tip brush and black paint to add a jack-o’-lantern face — two triangle eyes, a small triangle nose, and a toothy grin. If you’d rather sketch it out first, use a soft pencil so you don’t scrape the paint underneath.
Finish it off by wrapping a length of twine around the neck of the jar and tying it into a simple bow at the front.
Once it’s dry, your little painted pumpkin jar is ready to glow! Pop a battery tea light inside for a soft, flickering effect after dark, or line a few jars along your windowsill or mantel for an easy row of Halloween charm.
3. Halloween Perler Bead Jack-O’-Lantern
If your kids have a stash of Perler beads sitting in a drawer somewhere, this is the perfect way to put them to festive use. It’s a quick, satisfying little craft that mixes crafting with a bit of pixel-art fun.
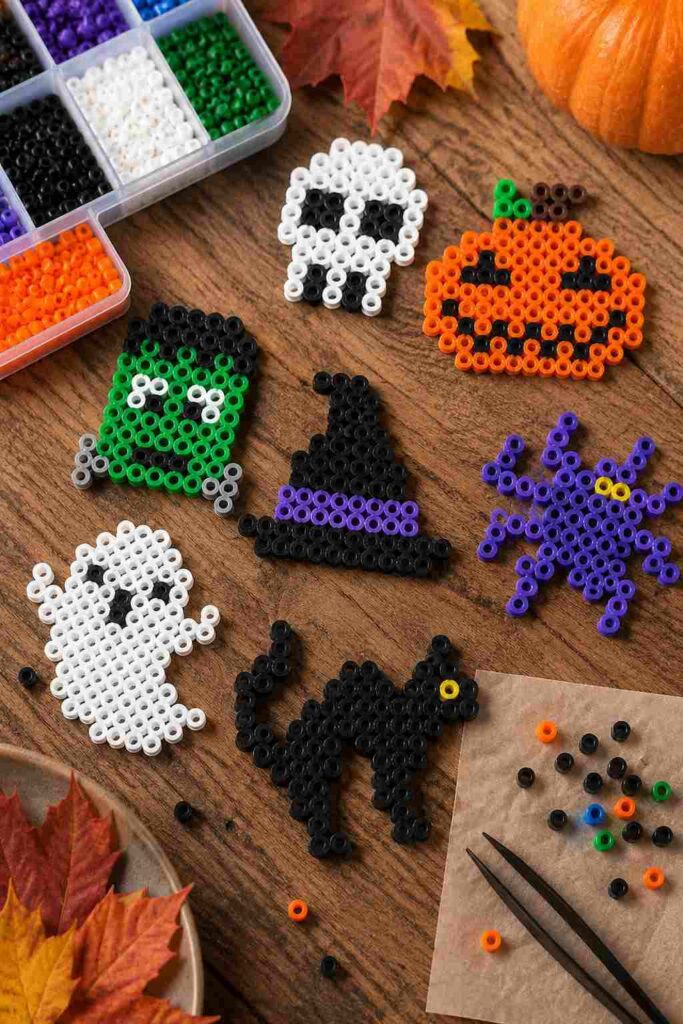
What you’ll need
A small square pegboard, orange and black Perler beads, parchment paper, and an iron.
How to make it
Start by sorting out the orange and black beads you’ll need — it makes the process much smoother once you get going. Using your fingers (or tweezers, if you want more precision), begin placing black beads to form the jack-o’-lantern’s eyes, nose, and mouth in the center of the board.
Switch to orange beads and build the outline of the pumpkin around your face design, then fill in the rest of the shape. Finish with a small brown or green bead detail at the top for the stem.
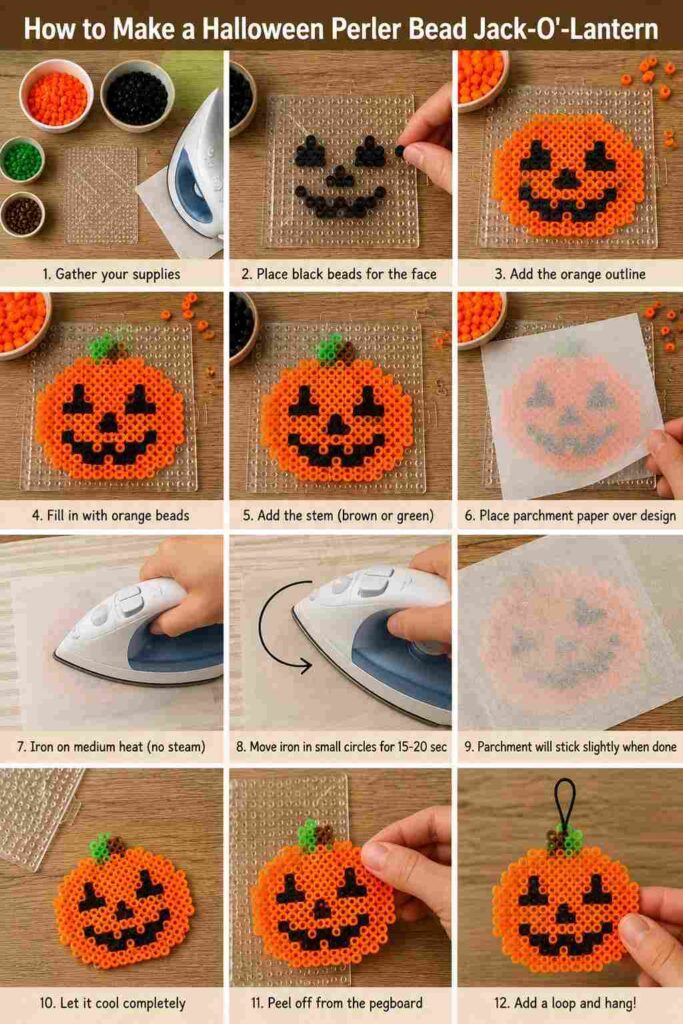
Once your design is complete, place the pegboard on an ironing board or a heat-safe surface and lay a sheet of parchment paper over the top. With your iron on medium heat (no steam), gently move it in small circles over the beads for about 15–20 seconds, until the beads fuse together — you’ll know it’s ready when the parchment paper sticks slightly to the surface.
Let it cool completely before peeling it off the pegboard. String a loop of thread through one of the top beads and you’ve got yourself a tiny hanging jack-o’-lantern ornament, perfect for a window, a mini Halloween tree, or even tied onto a gift bag.
4. DIY Painted Wooden Spoons for Halloween
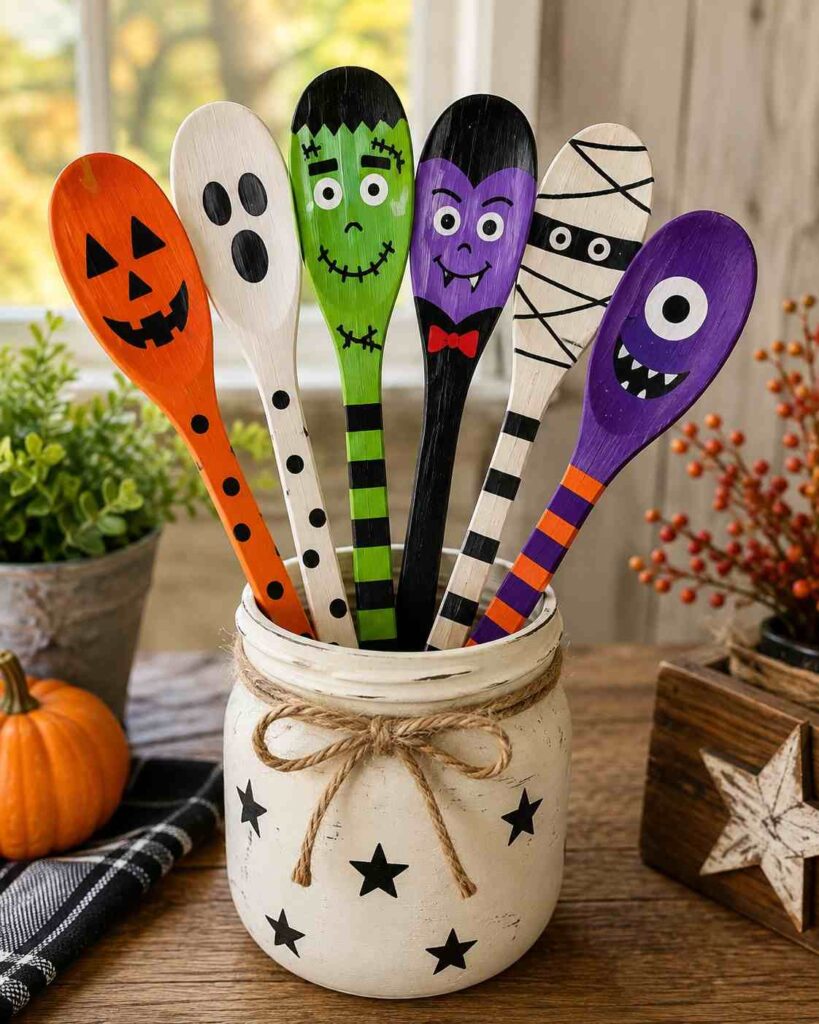
These little painted wooden spoons are almost too cute to be Halloween decor — they double as puppets, mantel decorations, or a fun little jar arrangement for your kitchen counter.
What you’ll need
A few wooden spoons and a wooden spatula, acrylic paint in black, orange, white, and green, a couple of paintbrushes (one small, one larger), a pencil, a mason jar, some raffia, and a length of ribbon.
How to make it
Start with your jack-o’-lantern spoon — paint the head of the spoon orange and let it dry fully. Once dry, lightly pencil in a jack-o’-lantern face on the back of the spoon: two triangle eyes, a small triangle nose, and a jagged, toothy grin. Fill in the pencil lines with black paint using your smaller brush.
For a “BOO” spoon, paint an entire spoon black, let it dry, then use white paint and a fine brush to write “BOO” vertically down the back.
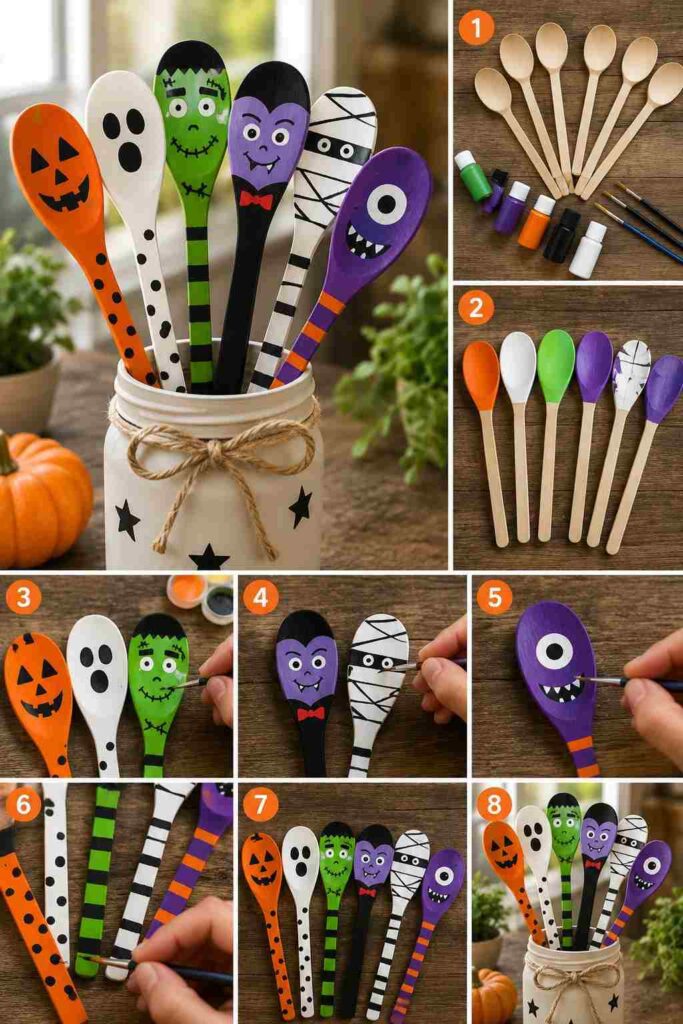
If you want to add a Frankenstein character, paint your spatula green and let it dry. Sketch in a zig-zag hairline, rectangular eyebrows, round eyes, a stitched mouth, and a few small scar lines. Fill in the hair, eyebrows, mouth, and scars with black, then paint the eyes white with tiny black pupils in the center. Feel free to get creative from here too — a black cat, a ghost, or a vampire spoon would all fit right in.
To display your spoon characters, paint a mason jar black with two coats, letting each layer dry fully. Once it’s dry, tuck a bit of raffia into the bottom of the jar to help the spoons stand upright, arrange your painted spoons inside, and let a little extra raffia peek out the top. Finish with a ribbon tied around the neck of the jar in a simple bow.
Set the finished jar on a kitchen counter, entryway table, or bookshelf for an instant, charming pop of Halloween character.
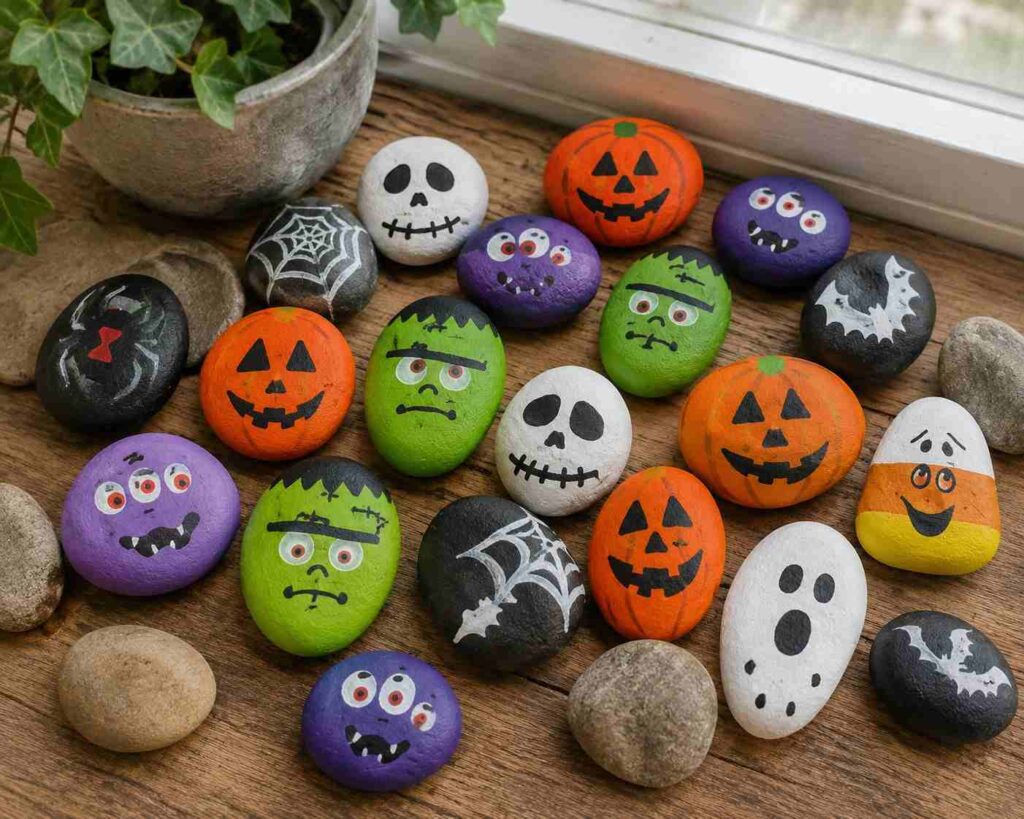
5. Halloween Painted Rocks
If you’ve got a handful of smooth rocks lying around the garden, this is one of the easiest ways to turn them into charming little Halloween characters — no fancy tools required.
What you’ll need
A few smooth rocks, acrylic paint in white, orange, and green, and a set of acrylic paint markers in black, white, and brown.
How to make it
For a jack-o’-lantern rock, start with a white base coat over the top and sides of your rock — this helps your orange paint show up more vibrantly with fewer coats needed. Once the white is fully dry, paint the rock orange, adding a second coat if needed, and let it dry completely between layers.
Once dry, use a black paint marker to draw a simple jack-o’-lantern face — two triangle eyes, a nose, and a jagged grin work perfectly. Add a few short, curved brown lines around the rock to mimic pumpkin ridges, then finish with a small green stem at the top.
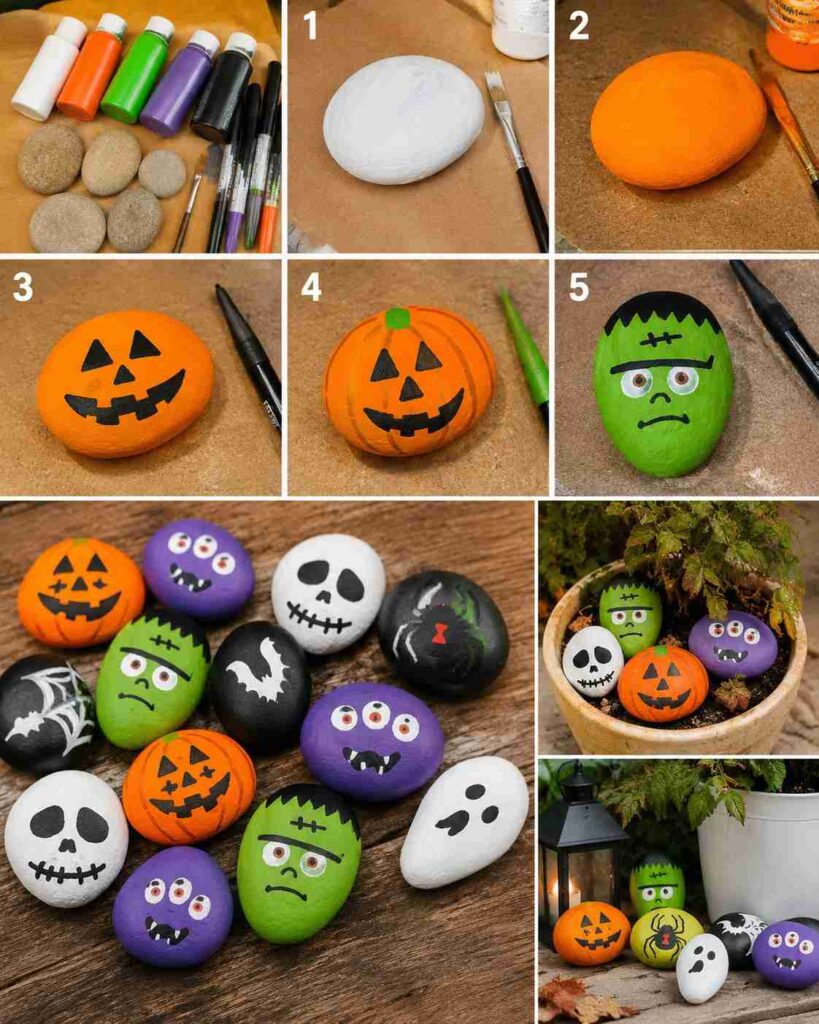
For a Frankenstein rock, paint a white base coat, let it dry, then cover the rock in green. Once dry, sketch in a spiky black hairline, a wide brow line, a simple nose, and an angled mouth, along with a couple of small stitch marks above one eyebrow. Fill in the hair with black, then add white eyes just beneath the brow line. Once the white dries, add a small brown iris in the center of each eye, then finish with a tiny black pupil on top.
Once your rocks are fully dry, arrange them along a windowsill, tuck them into a potted plant, or scatter a few near your front entryway for a playful, no-fuss touch of Halloween charm that costs almost nothing to make. Loved painting rocks? Check out our [35 Beautiful Painted Rock Ideas to Brighten Your Home and Garden] for even more inspiration year-round.
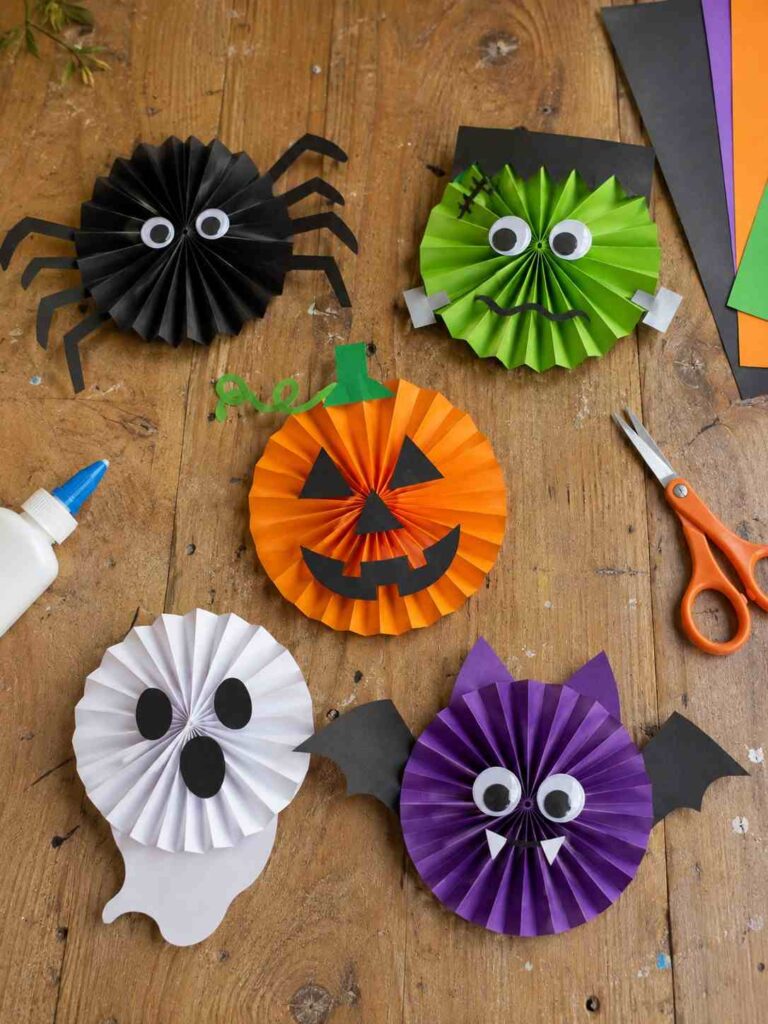
6. DIY Halloween Paper Rosettes
These accordion-style paper rosettes look far more impressive than the effort they actually take — a few folds, a bit of glue, and you’ve got an adorable jack-o’-lantern or Frankenstein character.
What you’ll need
Coloured printer paper in orange, green, and black, scissors, glue tape or a hot glue gun, and a pair of large googly eyes.
How to make it
Start by cutting a standard sheet of paper into three equal strips lengthwise. Take one strip and, holding the short end toward you, fold about a centimeter down, then fold it back on itself, continuing this accordion pattern all the way to the end. Repeat with the remaining two strips.
Join the three accordion strips together end to end using a strip of glue tape, lining up the edges neatly as you go, until you have one long folded piece. Add glue tape to the final end and connect it to the very first end to form a circle.
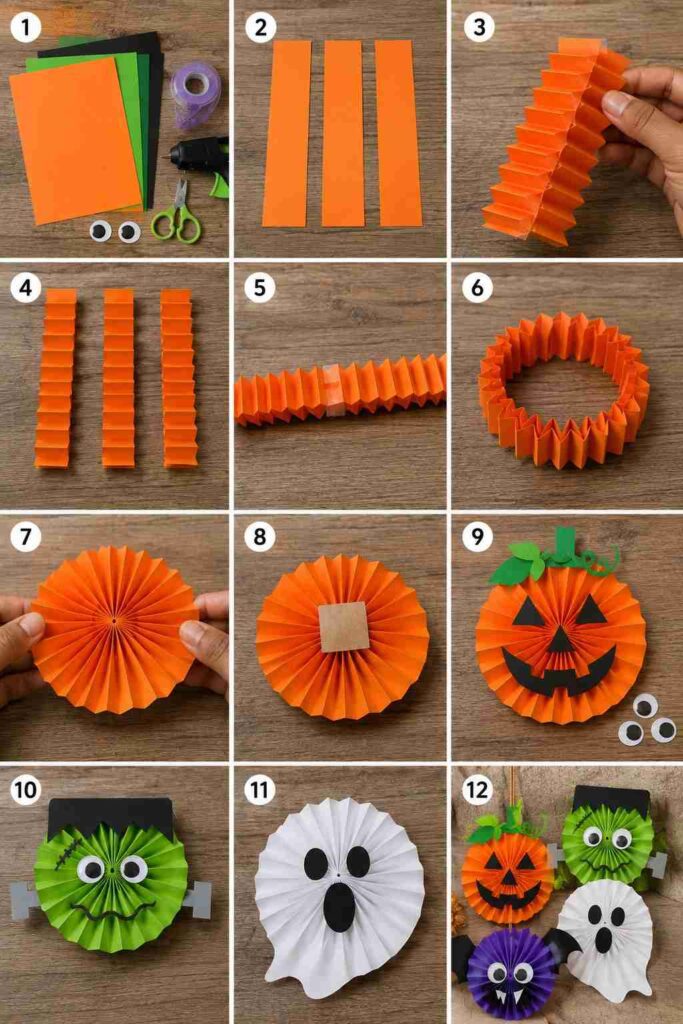
Gently press the top of the circle inward to shape it into a classic rosette. Cut a small square of cardstock or scrap cardboard, add a generous amount of hot glue, and press your rosette onto it, tucking the center in as tightly as possible.
Now bring your character to life — cut a stem and a couple of leaves from green paper, a simple mouth from black paper, and glue on a pair of googly eyes for a jack-o’-lantern, or swap in different colours and shapes to create Frankenstein or any other Halloween character you like.
Group a few finished rosettes together on a mantel, tuck them into a wreath, or hang them individually with a loop of thread for an easy, playful pop of handmade Halloween charm.
7. Halloween Painted Clay Pots
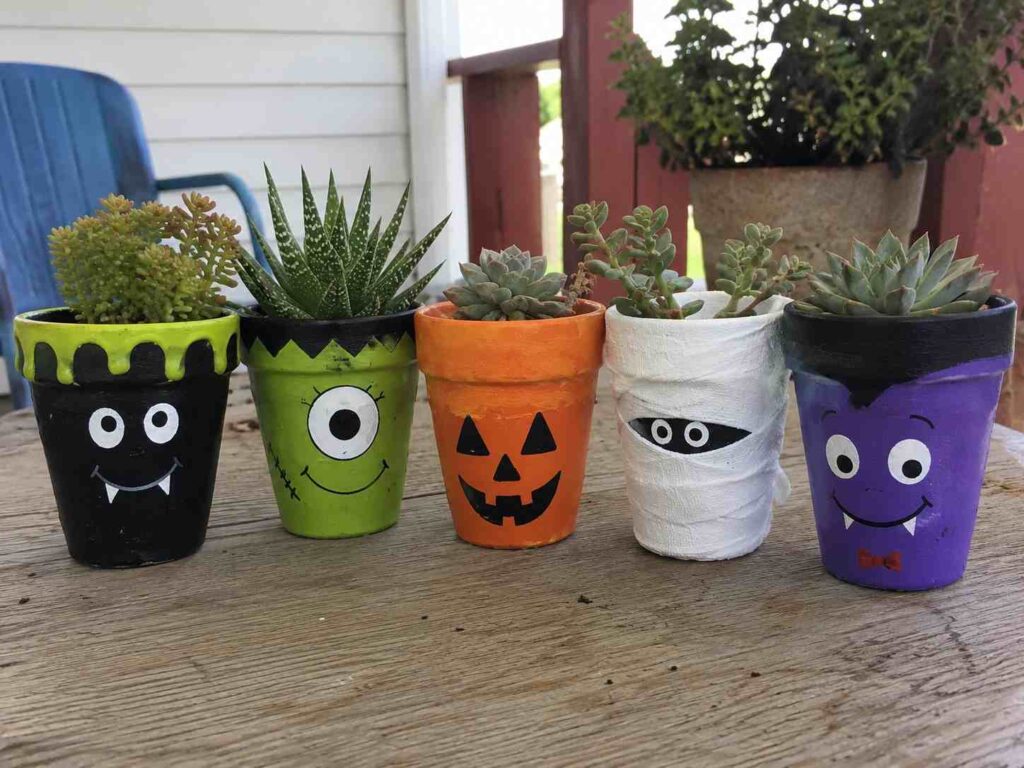
These little painted clay pots make an entire lineup of adorable Halloween characters — line them up on a shelf or use them to hold pens, candy, or small treats around the house.
What you’ll need
A few small clay pots, acrylic paint in orange, white, green, black, purple, yellow, and red, a couple of paintbrushes, a pencil, and a small piece of black craft foam.
How to make it
For a jack-o’-lantern pot, paint the entire outside orange, including the top edge and inside rim. Once dry, lightly pencil in a jack-o’-lantern face and fill in the lines with black paint using a small brush.
For a ghost pot, follow the same process with white paint, then add two simple black eyes and a small round mouth once it’s dry.
For a Frankenstein pot, paint the whole pot green and add a zig-zag black pattern along the outer and inner rim. Sketch in thick rectangular eyebrows, round eyes, a rounded nose, a mouth, and a few small stitch marks. Paint the eyes white with tiny black pupils, and fill in the remaining features with black.
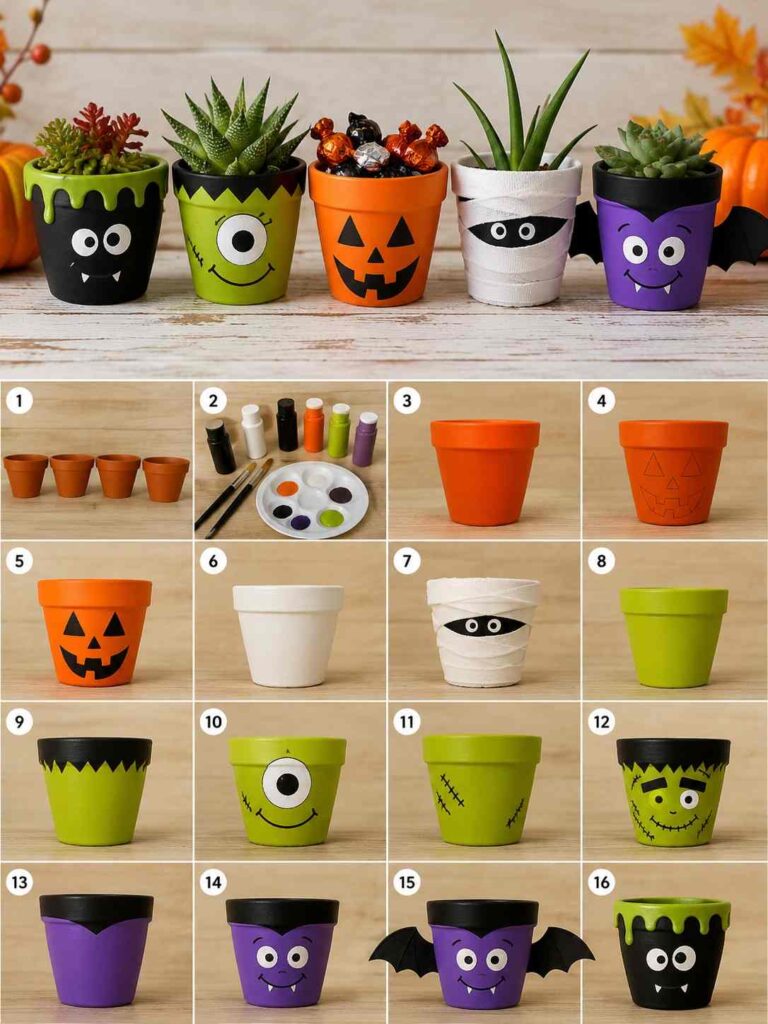
For a black cat pot, snip two small triangles from black craft foam for ears. Paint the pot black, then add cat eyes, a tiny triangle nose, a curved mouth, and a few simple whiskers — paint the eyes yellow, the nose purple, and the mouth and whiskers white, finishing with black pupils. Glue the foam ears just inside the rim once everything is dry.
For a vampire pot, paint the pot purple with a black rim, adding an upside-down triangle at the center for a widow’s peak. Draw round eyes, thin eyebrows, a curved nose, a mouth, and two small fangs, along with a tiny bowtie. Paint the eyes and fangs white with black pupils, keep the features black, and finish the bowtie in a bright red.
Line your finished characters up on a windowsill or shelf, or use them as tiny candy dishes for a Halloween gathering — either way, they’re a sweet, low-effort way to add personality to your fall decor.
8. Halloween Black Cat Tea Lights
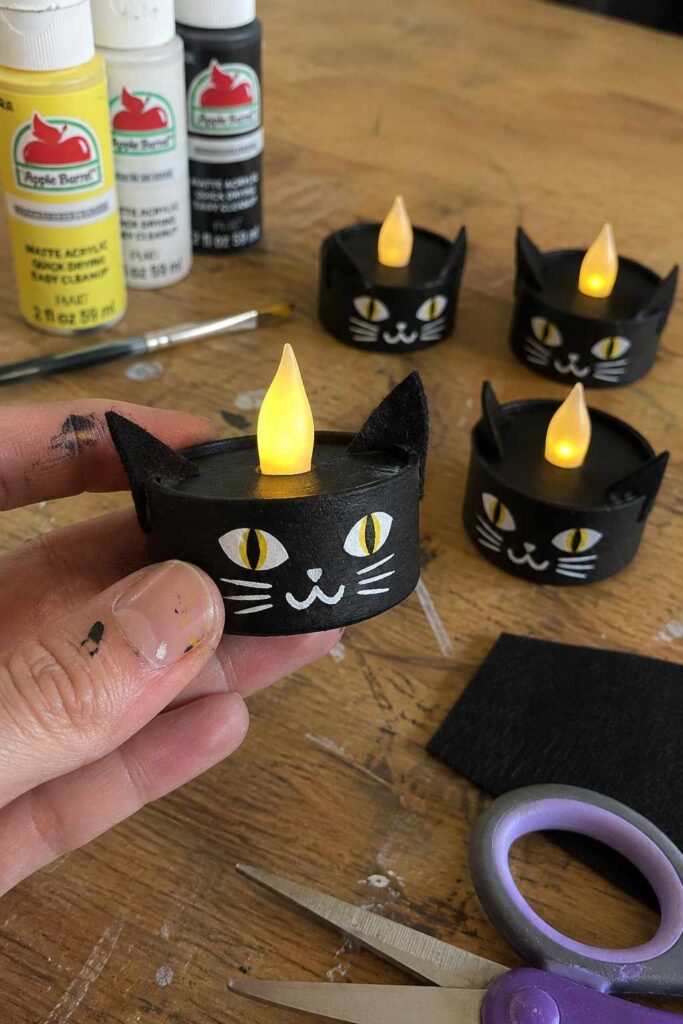
These little painted tea lights make the cutest glowing accents once the sun goes down — and since they run on batteries, they’re completely safe to scatter around the house or set out for a party.
What you’ll need
A battery-operated tea light candle, acrylic paint in black, white, and yellow, a small piece of black felt, scissors, and a glue gun.
How to make it
Start by painting the top and sides of the tea light black, covering the area around the flame completely. Let it dry, then add a second coat, and a third if needed for solid coverage.
Once your base coat is dry, use white paint to add two cat’s-eye shapes on the front, along with a small rounded mouth and a few simple whisker lines. Once the white paint has dried, go back in with yellow (or green, if you’d prefer) to add a thin pupil down the center of each eye.
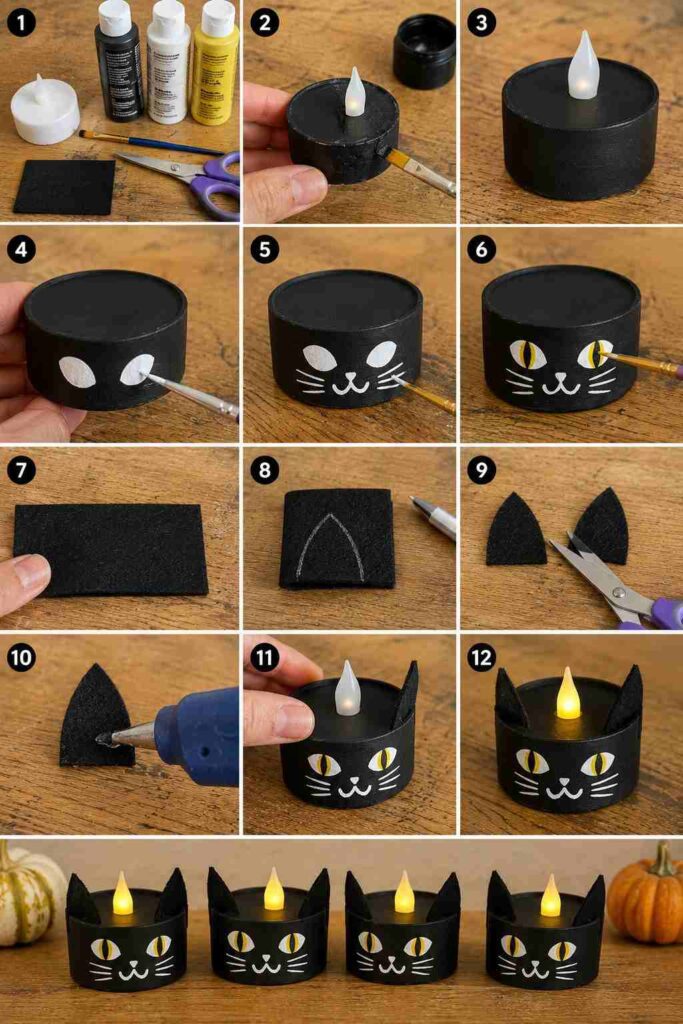
For the ears, fold a small rectangle of black felt in half and cut out a rounded triangle shape — this gives you two matching ears in one cut. Add a thin line of glue along the bottom edge of each ear and attach them to the top sides of the candle, just above the eyes.
Once your black cat tea light is complete, try the same technique with different colours to build out a whole little collection — a white ghost, a green Frankenstein, or a purple vampire all work beautifully with the same simple base.
Switch them on at dusk and line them up along a windowsill, mantel, or entryway table for a soft, flickering glow that feels cozy rather than spooky.
9. Halloween Q-Tip Painting
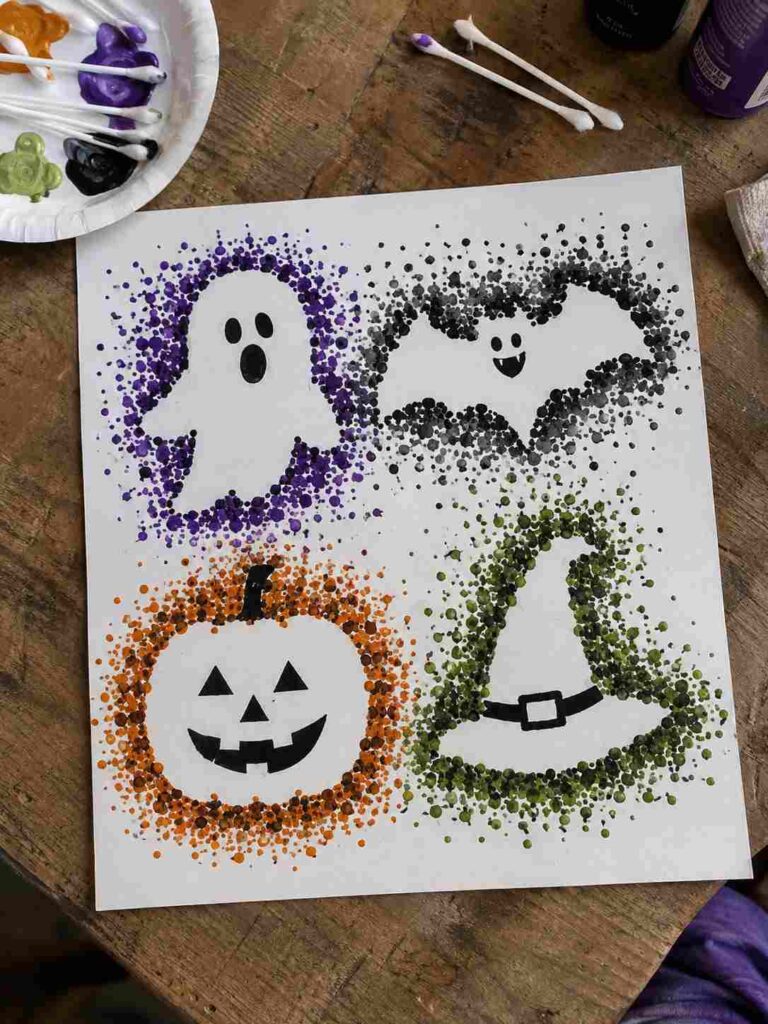
This one’s a bit different from your usual painting craft — instead of a brush, you’re using Q-tips to stamp soft, dotted outlines around Halloween shapes. It’s simple, satisfying, and works beautifully as framed wall art once it’s done.
What you’ll need
Printed Halloween shape templates (pumpkins, bats, ghosts — whatever you like), a piece of cardstock, acrylic paint in a few colours, Q-tips, painter’s tape, and a paper plate to use as a palette.
How to make it
Start by cutting out your printed templates and arranging them on your cardstock until you’re happy with the layout. Secure each one in place on the back with a small piece of painter’s tape so they don’t shift while you work.
Dip a Q-tip into black paint and begin stamping it around the edge of one of your shapes, letting the dots fade outward as the paint runs low — this creates a soft, speckled outline effect. Continue around each shape until you’re happy with the black outline.
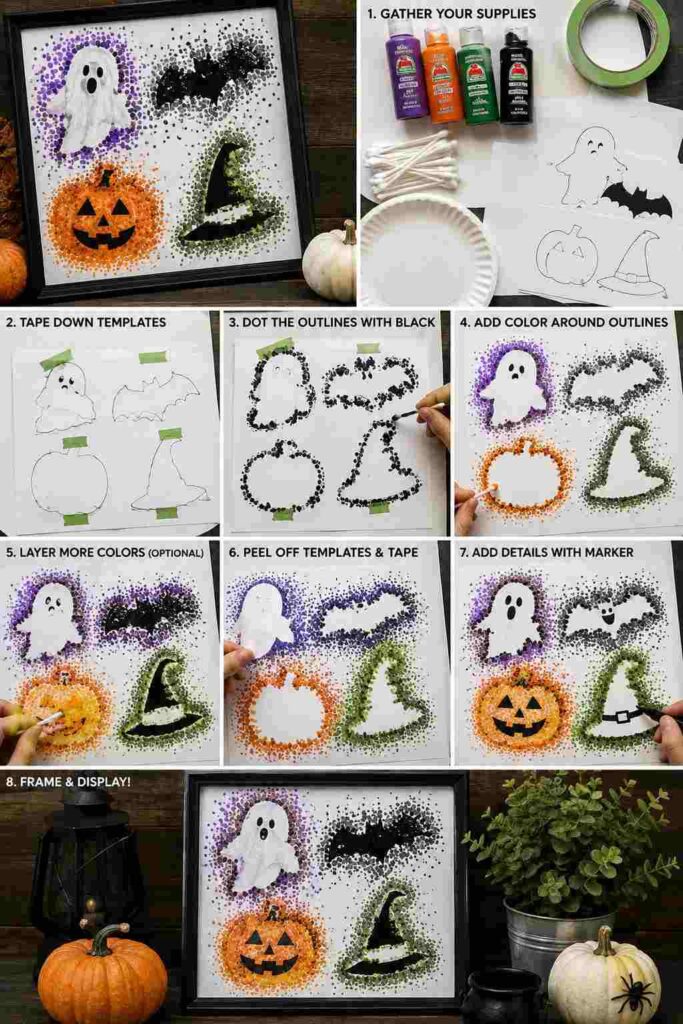
Switch to a new colour and a fresh Q-tip, and repeat the stamping process just outside your black outline, layering in colour around each shape. Feel free to mix more than one colour per shape for extra depth, especially on something like a pumpkin.
Let the paint set for a few minutes until it won’t smudge, then carefully peel away the templates and tape to reveal the crisp negative-space shapes underneath. Once everything is fully dry, use a black marker to add simple faces or details inside each shape if you’d like.
Frame your finished piece or pin it up as-is for an easy, textured piece of handmade Halloween wall art.
10. DIY Egg Carton Pumpkins
Before you toss your next empty egg carton, save a couple of cups for this one — it turns recycling into the cutest little glittery jack-o’-lantern.
What you’ll need
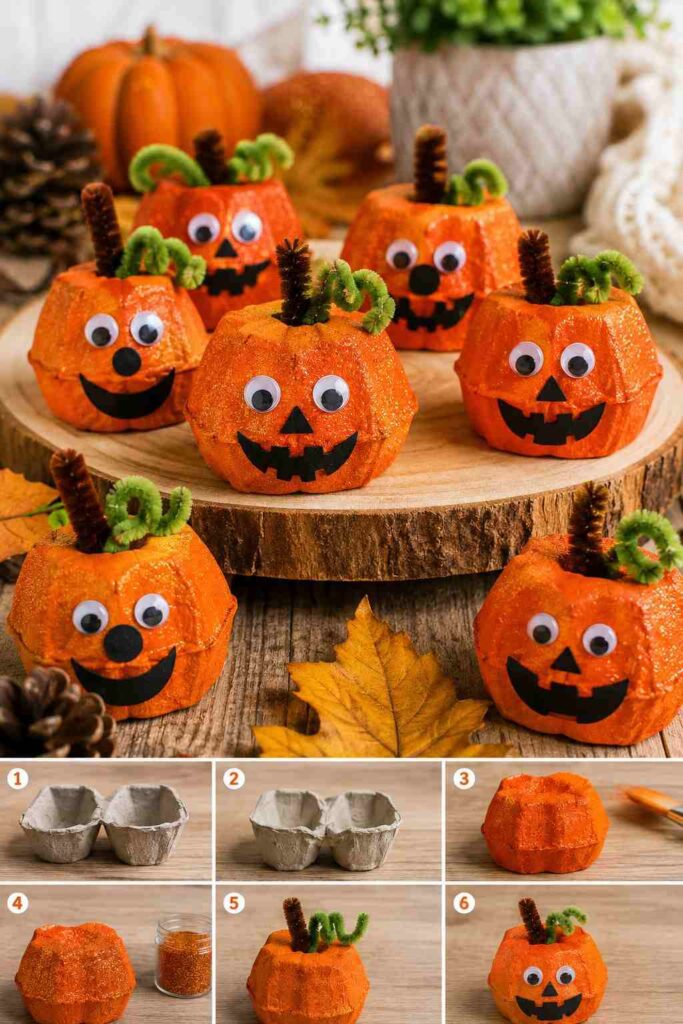
An egg carton, white glue, orange acrylic paint, fine glitter, brown and green pipe cleaners, a scrap of black cardstock, and googly eyes.
How to make it
Cut two egg cups from the carton, trim the edges even, and glue the open sides together to form a rounded pumpkin shape. Once dry, paint the whole thing orange and let it set.
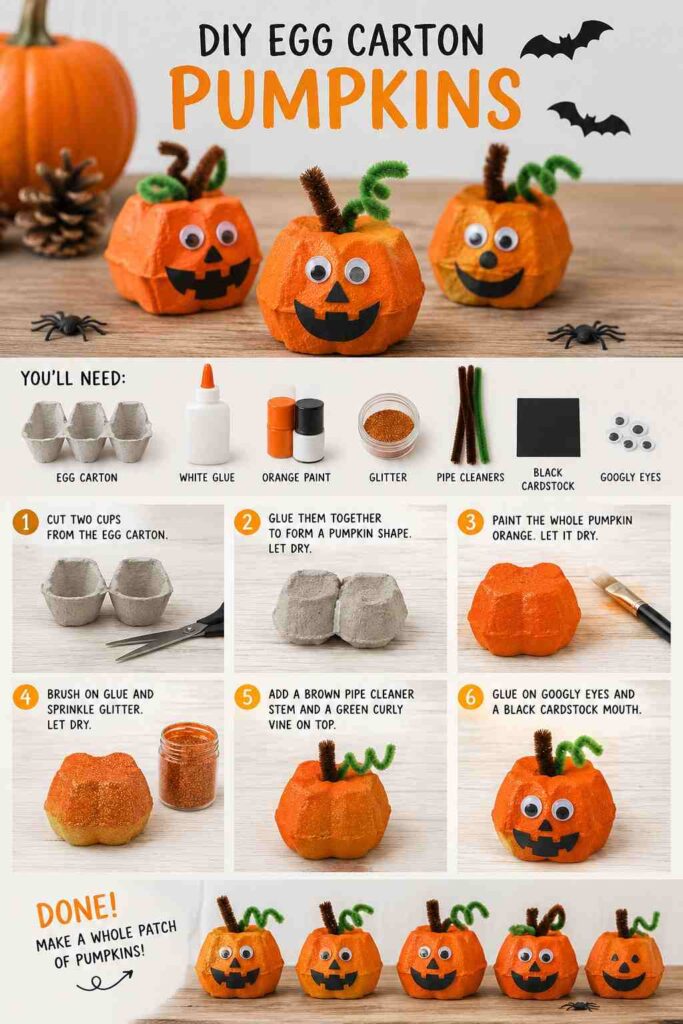
Brush on a thin layer of glue and sprinkle glitter over the surface for a little sparkle. While that dries, twist a small piece of brown pipe cleaner into a stem and coil a green one into a curly vine — tuck both into the top of the pumpkin.
Finish with a black cardstock mouth and two googly eyes glued on the front.
Cluster a few together in a bowl or along a shelf for an easy, sparkly touch of Halloween charm — and try the same base for a ghost, bat, or spider next.
Loved working with egg cartons? Don’t stop here — check out our 25 Genius Egg Carton Crafts That Look Surprisingly Beautiful for more creative ideas, or try our 15 Stunning Egg Carton Flowers That Look Like Real Blooms for a pretty, non-Halloween twist.
11. DIY String Art Halloween Cards
Skip the store-bought card this year and send something handmade instead — a bit of thread and cardstock turns into a beautiful pumpkin string art design.
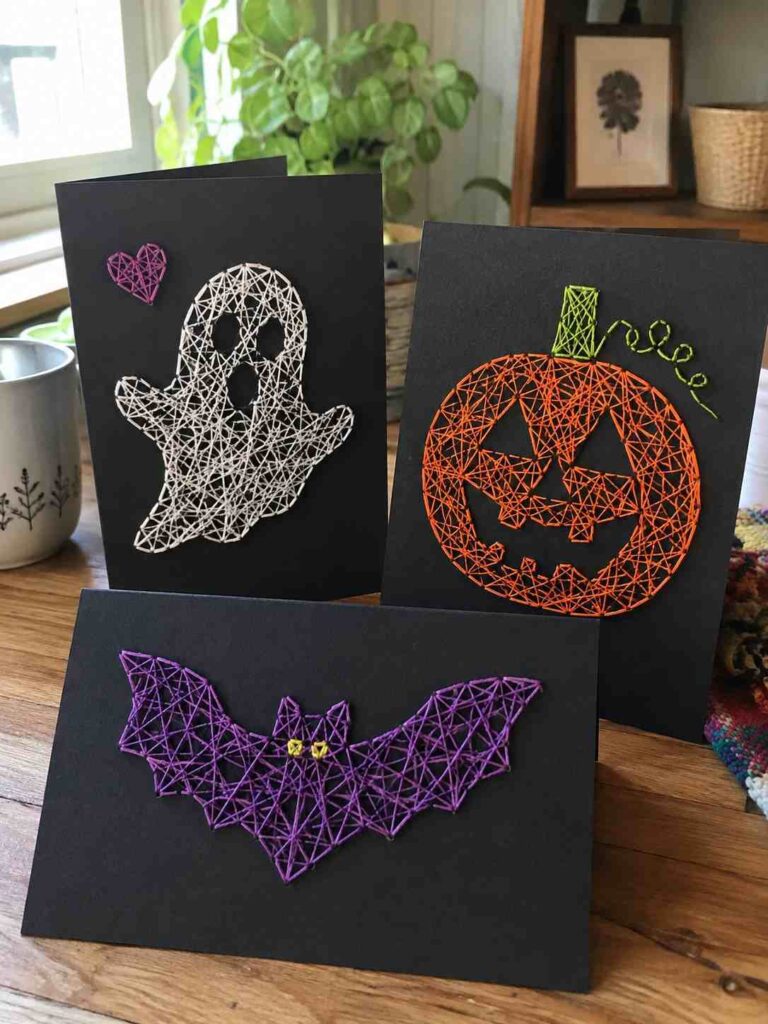
What you’ll need
Black cardstock folded into a card, a pumpkin template, orange and green embroidery floss, a needle, a corkboard, and painter’s tape.
How to make it
Tape a pumpkin template to the front of your card and, using a corkboard underneath, punch holes along the outline with a needle — spacing them about a quarter-inch apart. Remove the template once done.
Thread green floss through the top holes to outline a stem, crisscrossing it a few times for texture, then tape and trim the ends inside the card.
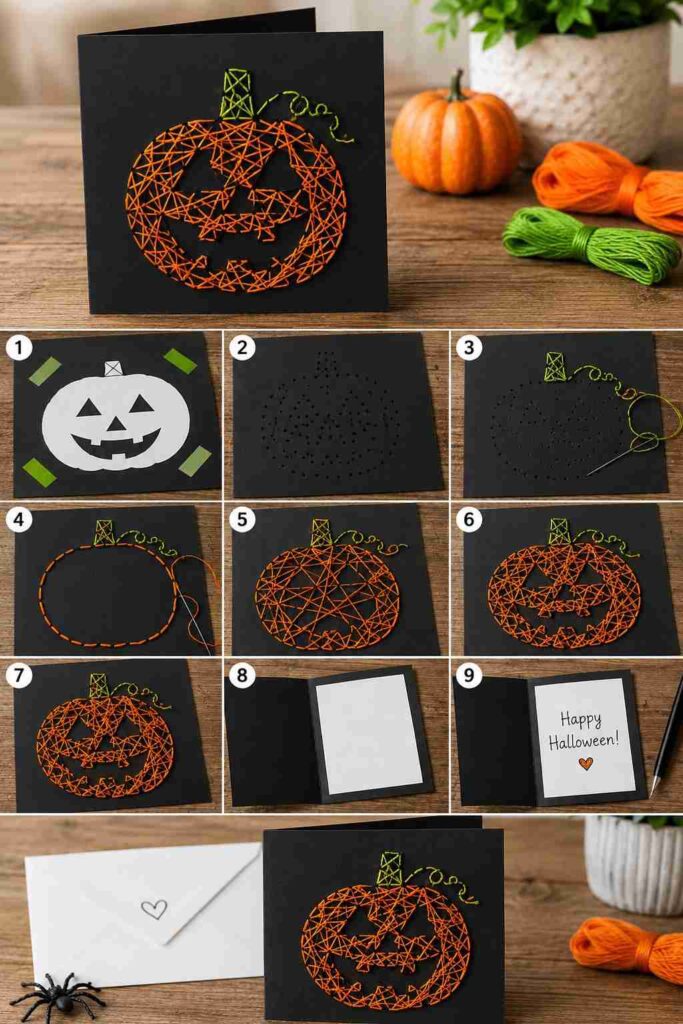
Switch to orange floss and repeat around the pumpkin shape — outline it first, then fill in with a crisscross pattern until it feels full. Take it slow here; holding the thread across the front before pulling it through helps you judge the pattern as you go.
Glue in a small paper insert, write your message, and your one-of-a-kind Halloween card is ready to send.
12. DIY Yarn Ghost
There’s something so satisfying about a simple tassel — and with just a bow and a felt face, it turns into the cutest little ghost you’ll want to make in every colour.
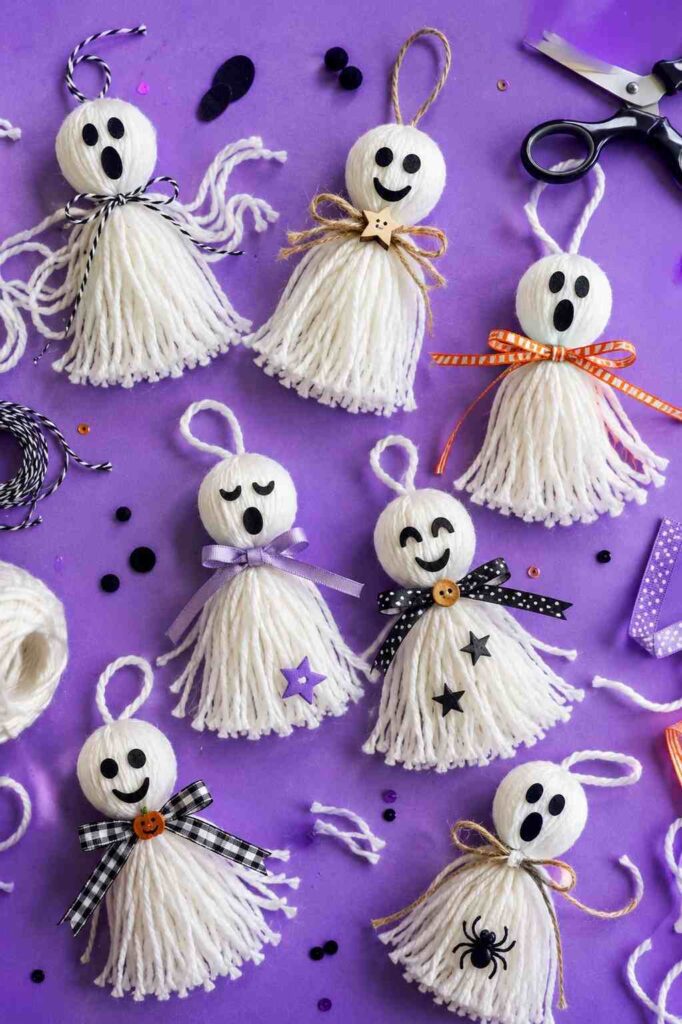
What you’ll need
White chunky yarn, a wooden skewer, a length of ribbon, and a small scrap of black felt.
How to make it
Cut about 30 strands of yarn, each roughly 15 inches long, and gather them into a bundle. Wrap one more strand across the middle, fold the bundle in half over it, then pull the ends up and tie a knot to hold everything together at the center.
Slide a skewer into the fold at the top for a bit of structure, then tie a length of ribbon around the bundle about a third of the way down, cinching it into a bow to form the ghost’s head. Trim the ribbon ends at an angle and even out the yarn below.
Snip two small circles and an oval from black felt for the eyes and mouth, and glue them onto the face.
Stand a few of these together in a jar or vase, or use them as sweet little place-card holders for a Halloween gathering.
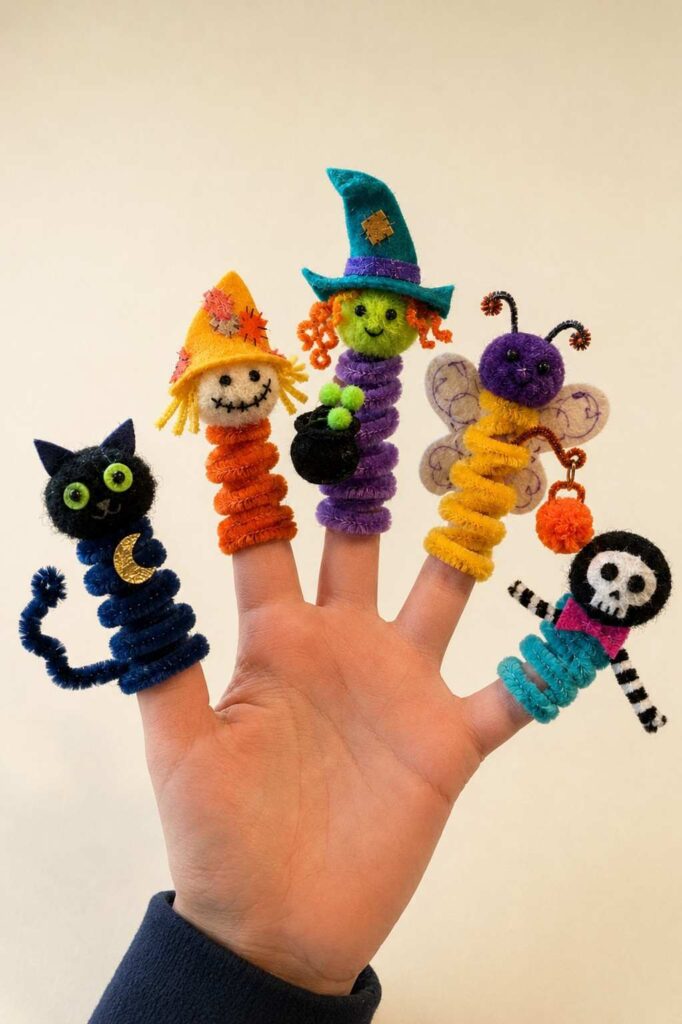
13. Pipe Cleaner Halloween Finger Puppets
These little finger puppets come together in just a few minutes each — perfect for keeping kids busy on a rainy fall afternoon, or for building a whole cast of Halloween characters to play with.
What you’ll need
Assorted pipe cleaners, small pom poms in a few colours, googly eyes, and a scrap of black felt.
How to make it
Start by wrapping a pipe cleaner around your finger to form a spiral base — this becomes the puppet’s “body” and slides right off to fit little fingers. For a pumpkin, use an orange pom pom on top, glue on a tiny felt face, and fold a small scrap of green pipe cleaner into a stem. For a ghost, glue a white pom pom onto the spiral and add googly eyes with a small felt mouth.
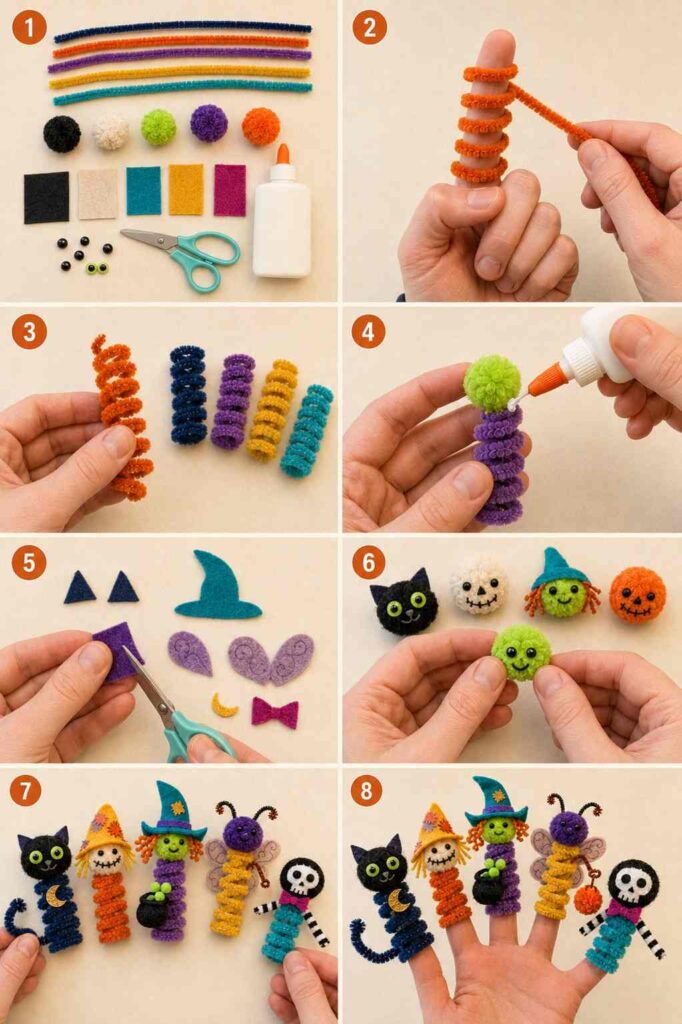
You can build endless variations from here — fold a second pipe cleaner into wings and attach it behind a black pom pom for a bat, or cut one into short legs for a spider. For anything with hair or a cape, like a vampire, cut small felt shapes for details and use a bent pipe cleaner for hair.
Once you’ve got a few puppets made, line them up on a windowsill or let the kids put on their own little Halloween puppet show — either way, it’s a craft that keeps giving well past the making of it.
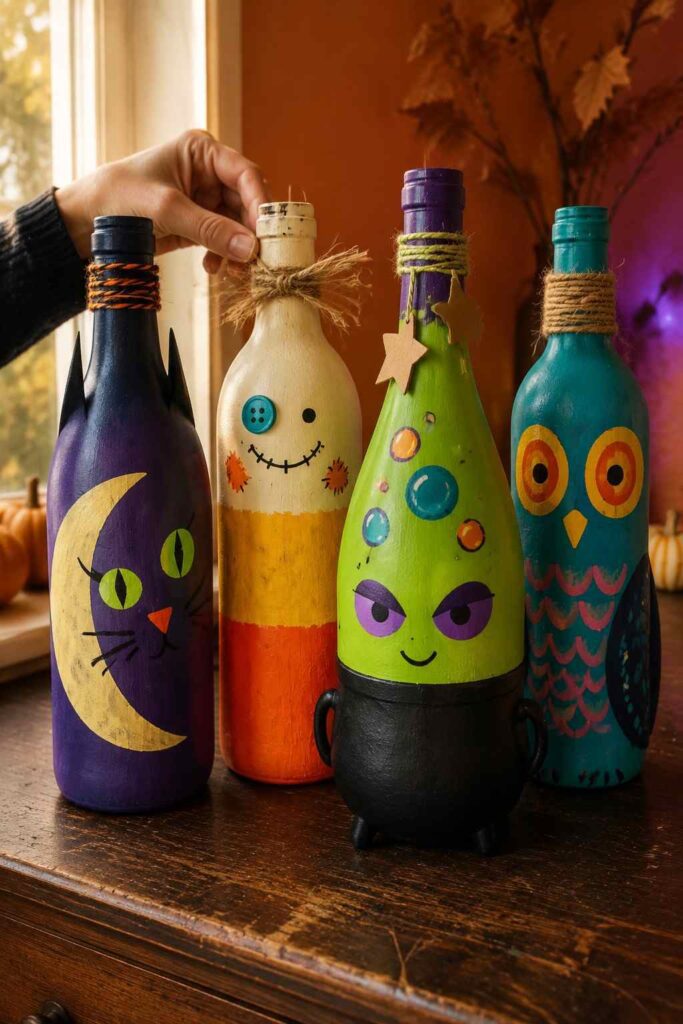
14. DIY Halloween Painted Wine Bottles
Empty wine bottles get a second life here — a few coats of paint and a bit of twine, and they turn into charming jack-o’-lantern accents for your entryway or party table.
What you’ll need
An empty wine bottle, orange and black multi-surface acrylic paint, and a length of twine.
How to make it
Start by giving your bottle a good clean and peeling off the label — rubbing alcohol or a good soak works well for stubborn glue. Paint the bottle orange, letting the first coat dry before adding a second (and a third, if needed) for even coverage.
Once the base coat is dry, use black paint to add a jack-o’-lantern face — eyes, a nose, and a mouth. If freehanding feels tricky, lightly sketch the face in pencil first, or cut a simple paper stencil to trace around.
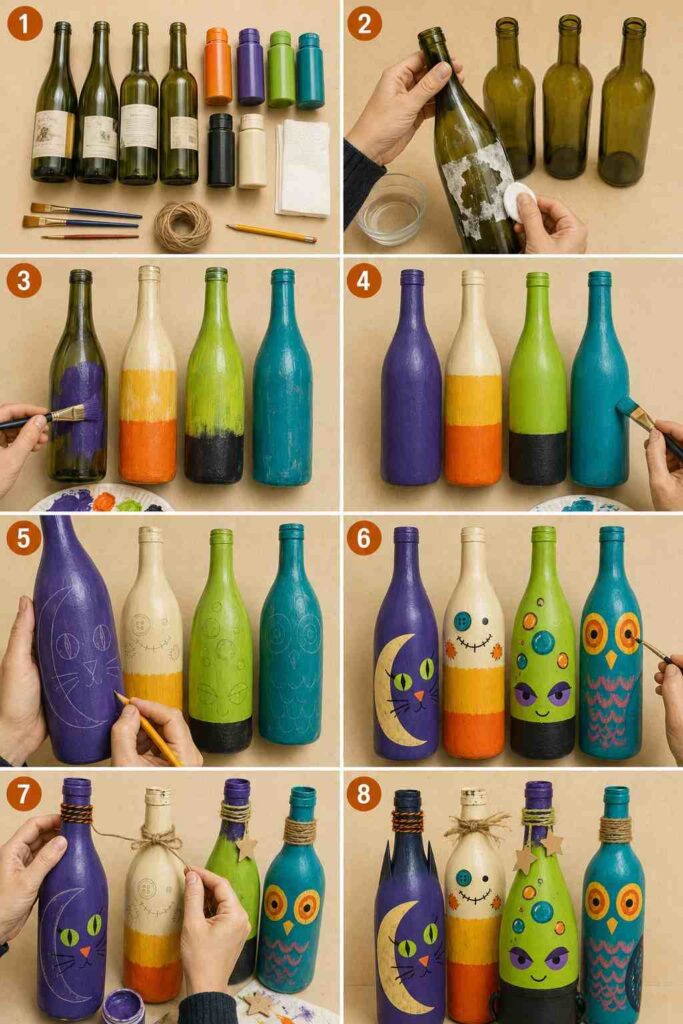
Let the face dry completely, then wrap a length of twine around the neck of the bottle a couple of times and tie it into a bow for a rustic finishing touch.
Group a few painted bottles together along a mantel or entryway table, and try different colours and faces — a ghost, a black cat, or Frankenstein all work just as well for an easy lineup of handmade Halloween characters.
15. DIY Resin Ghost
This one takes a little patience, but the result is stunning — a glowing, translucent little ghost figurine that looks like it belongs in a boutique home decor shop.
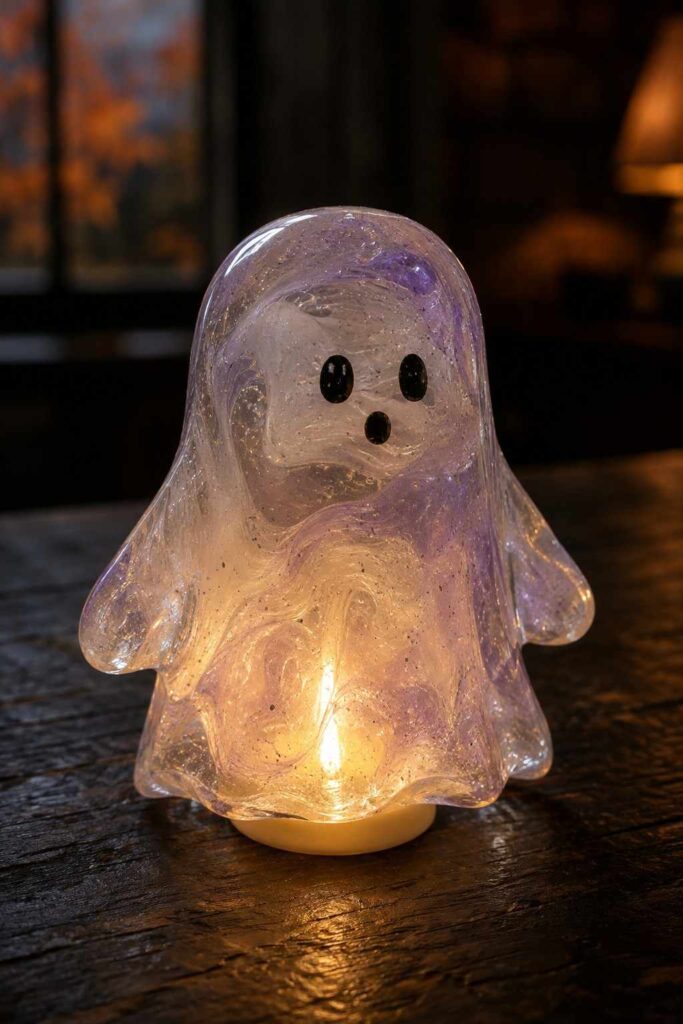
What you’ll need
Casting resin, mica powder in two shades, chunky silver glitter, a black marker, a Styrofoam ball, a small jar, plastic wrap, and basic resin safety gear (gloves, a well-ventilated space, and a silicone mat to protect your surface).
How to make it
Mix your resin according to the package instructions, then divide it into two cups and tint each with a different shade of mica powder — a lighter shade for one, a slightly darker shade for the other. Stir the glitter into the darker portion.
Pour the lighter resin into the center of a plastic-wrap-covered plate, then ring it with the darker glittery resin around the outside. Let it sit until it turns tacky and moldable, rather than liquid — this can take a few hours depending on the room’s temperature.
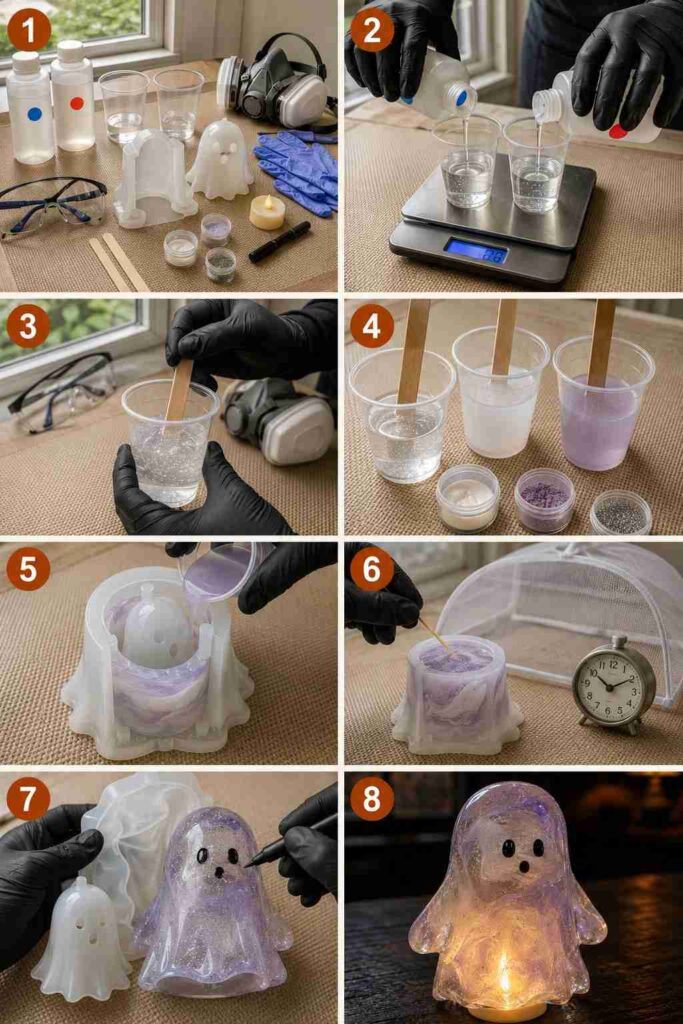
While you wait, tape a Styrofoam ball to the top of a small jar to create your ghost-shaped mold. Once the resin reaches the right consistency, lift the plastic wrap and drape it over the mold, letting the resin settle naturally into a ghost shape. Leave it to cure fully overnight.
The next day, remove the ghost from the mold and peel away the plastic wrap. Draw a simple face with a black marker, then set your finished ghost over a flameless tea light and dim the lights to watch it glow.
16. Paper Roll Ghost
This one’s a hit with kids, mostly because it doesn’t stay still — the fluttering tissue paper tail actually flies through the air when you spin it, or blows gently in the wind if you hang it up outside for the evening.
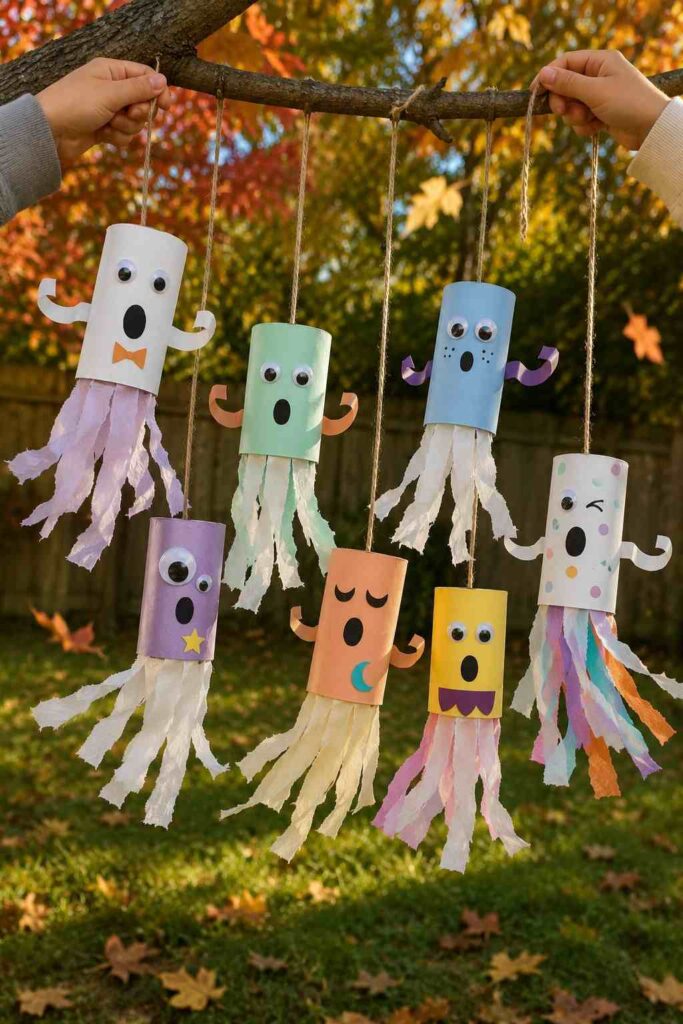
What you’ll need
An empty toilet paper roll (or a rolled piece of white cardstock), a sheet of printer paper, a scrap of black construction paper, white tissue paper, two large googly eyes, and some yarn or twine.
How to make it
Wrap a strip of white printer paper around the toilet paper roll and secure it with tape, just like wrapping a small gift — this covers the roll without needing any paint. Cut a small black oval for a mouth and tape it on, along with two googly eyes above it.
For the arms, fold a scrap of white paper in half and cut out a simple arm shape about an inch wide. Tape it to the back of the roll, centering it so the arms curl forward around the front.
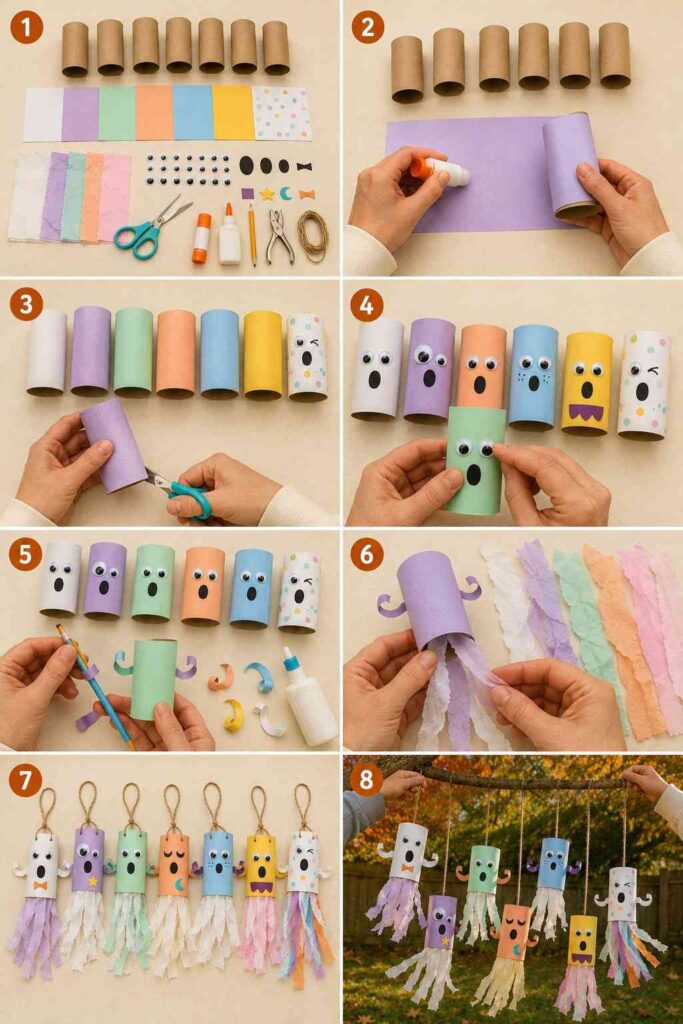
Punch two holes near the top of the roll — placing them at slightly different heights gives the ghost a fun, floaty tilt once it’s hanging. Thread a piece of yarn through both holes and tie the ends together to make a hanging loop.
For the tail, cut a couple of pieces of tissue paper into thin strips, leaving one edge uncut so they stay connected. Tape the uncut edge inside the bottom of the roll, layering a few strips around the inside edge until the whole bottom is covered.
Hang your finished ghost from a doorway, a porch, or a tree branch outside, and watch the tissue paper tail dance every time the wind (or a curious kid) catches it.
Got more empty toilet paper rolls saved up? Turn them into something completely different with our DIY Toilet Paper Roll Flower Crafts for Stunning Home Decor, or keep the kids crafting with our 10 Easy Ocean Animal Crafts Made from Toilet Paper Rolls for Kids.
From delicate paper snowflakes to glowing resin ghosts, there’s a little bit of everything on this list — quick five-minute crafts for a lazy afternoon, and slower, more involved projects for when you want to really sink into the season. That’s the beauty of a cozy Halloween: it doesn’t need to be perfect or polished, just made with a little care and a lot of warmth.
Pick one, or pick five, and turn on your favorite fall playlist while you go. And once your home is filled with handmade jack-o’-lanterns and flickering little ghosts, don’t forget to snap a photo — we’d love to see which one you tried first!
Pingback: 20 Free Printable Pumpkin Coloring Pages for Kids - satyajeetsingh.in
Pingback: DIY Glowing Ghost Lamp for Easy Halloween Decor - satyajeetsingh.in