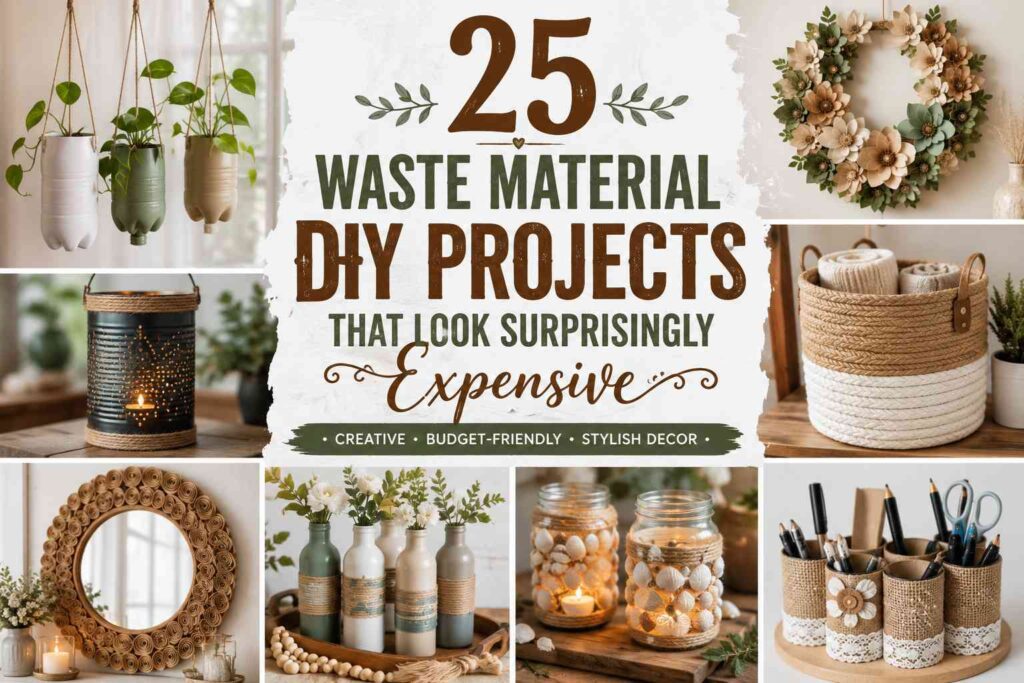
What if the items you normally throw away could become the most eye-catching decor in your home?
From empty egg cartons and cardboard boxes to old glass jars and tin cans, everyday household waste can be transformed into beautiful pieces that look surprisingly expensive. With a little creativity and a few affordable craft supplies, you can create stylish home decor that rivals store-bought designs.
Whether you love cozy farmhouse interiors, rustic accents, modern minimalism, or cottage-inspired spaces, these DIY projects are simple enough for beginners and budget-friendly for everyone. Best of all, you’ll be giving everyday materials a second life while creating something truly unique.
Let’s start with the first transformation!
15 Stunning Egg Carton Flowers That Look Like Real Blooms
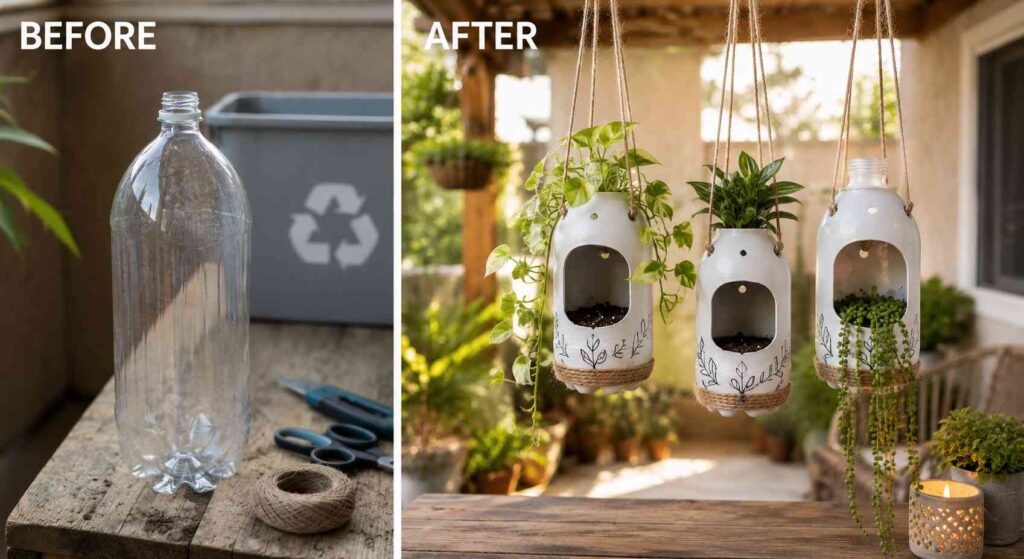
#1 Plastic Bottle → Luxury Hanging Planter
Why You’ll Love This DIY
- Budget-friendly
- Beginner-friendly
- Eco-friendly
- Perfect for indoor and outdoor spaces
- Looks store-bought
Materials Needed
- 1 large plastic bottle
- Craft knife or scissors
- Acrylic or spray paint
- Natural jute rope
- Hot glue gun
- Small drill or hole punch
- Potting soil
- Small trailing plant (Pothos, Ivy, or String of Pearls)
How to Make It
Step 1 – Wash the plastic bottle and remove the label.
Step 2 – Cut an opening large enough for your plant.
Step 3 – Paint the bottle in a matte white, black, sage green, or terracotta color.
Step 4 – Punch holes near the top and thread jute rope through them.
Step 5 – Fill the planter with soil and add your favorite plant.
Step 6 – Hang it near a sunny window, porch, or balcony.
Styling Tip
Hang three planters at different heights using neutral-colored ropes for a modern boho look that’s popular in USA homes.
25 Genius Egg Carton Crafts That Look Surprisingly Beautiful
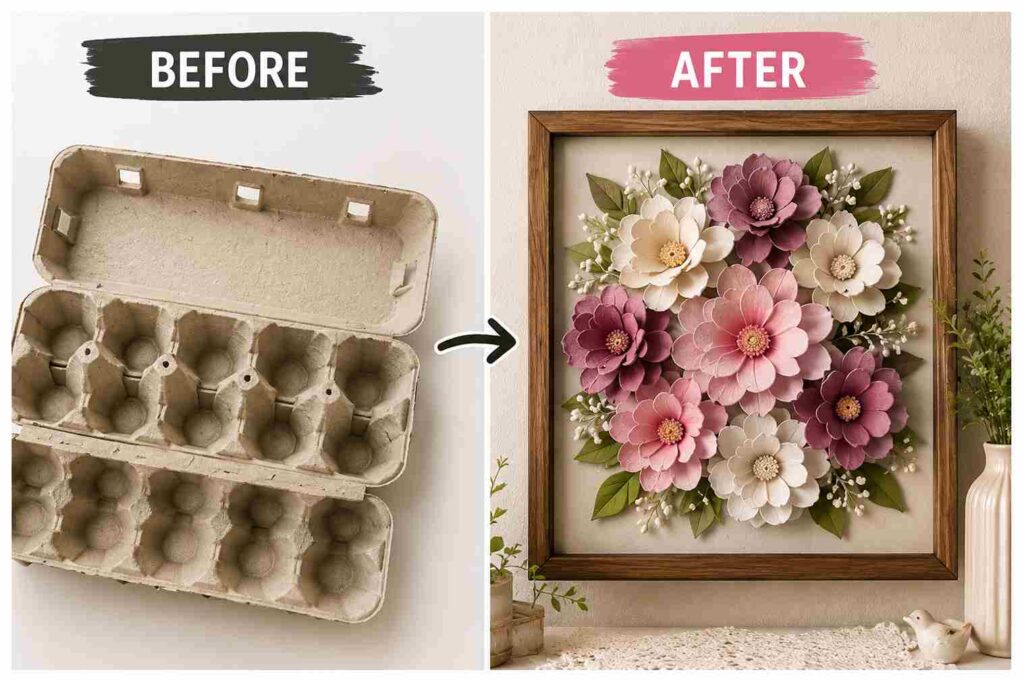
#2 Egg Carton → Elegant Flower Wall Decor
Why You’ll Love This DIY
- Budget-friendly
- Beginner-friendly
- Looks surprisingly expensive
- Perfect for farmhouse or modern homes
Materials Needed
- 2 empty egg cartons
- Acrylic paint
- Hot glue gun
- Scissors
- Paintbrush
- Faux leaves (optional)
How to Make It
Step 1 – Cut each egg cup apart using scissors.
Step 2 – Trim the edges into flower petals.
Step 3 – Paint each flower in your favorite color.
Step 4 – Glue two or three layers together.
Step 5 – Attach the flowers to a wooden board or canvas.
Styling Tip
Display it above a console table, fireplace mantel, or bedroom headboard for a cozy farmhouse look.
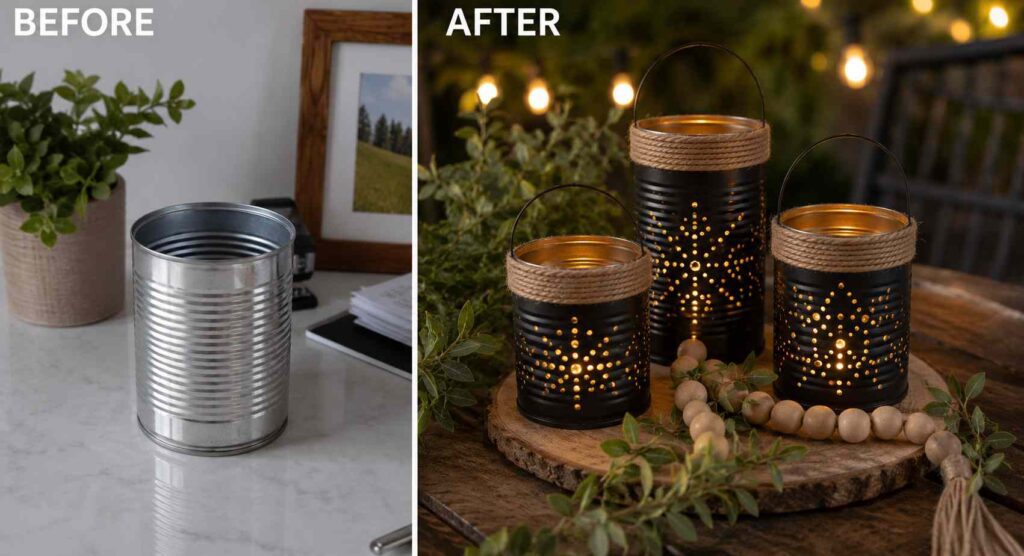
#3 Tin Can → Rustic Farmhouse Lantern
Why You’ll Love This DIY
- Budget-friendly
- Beginner-friendly
- Perfect for farmhouse decor
- Great for indoor and outdoor use
- Looks like expensive boutique decor
Materials Needed
- 1 empty tin can
- Hammer and nail
- Acrylic or spray paint
- Jute rope or twine
- Wire handle
- Hot glue gun
- Battery-operated LED tea light
- Sandpaper (optional)
How to Make It
Step 1 – Wash the tin can thoroughly and remove the label.
Step 2 – Fill the can with water and freeze it overnight to help prevent dents while punching holes.
Step 3 – Use a hammer and nail to create a decorative pattern of small holes around the can.
Step 4 – Paint the can with a matte black, white, bronze, or antique gold finish.
Step 5 – Wrap jute rope around the rim or attach a wire handle for a farmhouse touch.
Step 6 – Place an LED tea light inside and enjoy the warm glow.
Styling Tip
Group three lanterns of different heights on a wooden tray with faux greenery and candles to create a cozy farmhouse centerpiece.
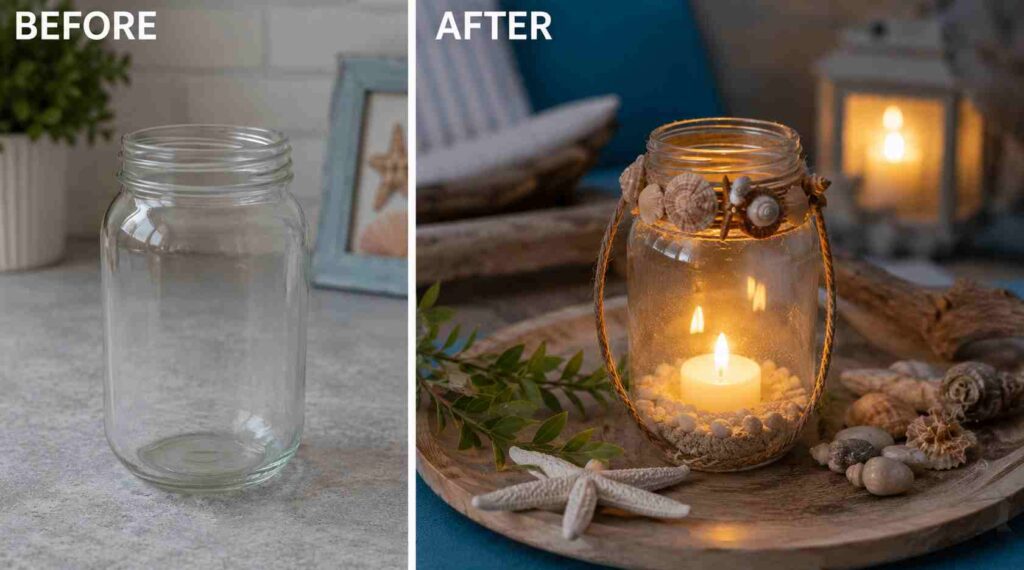
#4 Glass Jar → Cozy Coastal Lantern
Why You’ll Love This DIY
- Budget-friendly
- Beginner-friendly
- Perfect for cozy home decor
- Great for patios, shelves, and dining tables
- Looks like expensive boutique decor
Materials Needed
- 1 empty glass jar
- Jute rope or twine
- Hot glue gun
- White or beige acrylic paint (optional)
- Small seashells (optional)
- Battery-operated LED tea light
- Decorative sand (optional)
- Small pebbles (optional)
How to Make It
Step 1 – Wash the glass jar and remove the label completely.
Step 2 – Wrap jute rope around the neck of the jar and secure it with hot glue.
Step 3 – Add a thin layer of decorative sand or small pebbles to the bottom.
Step 4 – Place an LED tea light inside the jar.
Step 5 – Glue a few seashells around the rim if you want a coastal look.
Step 6 – Display it on a wooden tray, shelf, or outdoor table.
Styling Tip
Group two or three lanterns of different sizes with driftwood and greenery to create a cozy coastal centerpiece that’s perfect for summer decor.
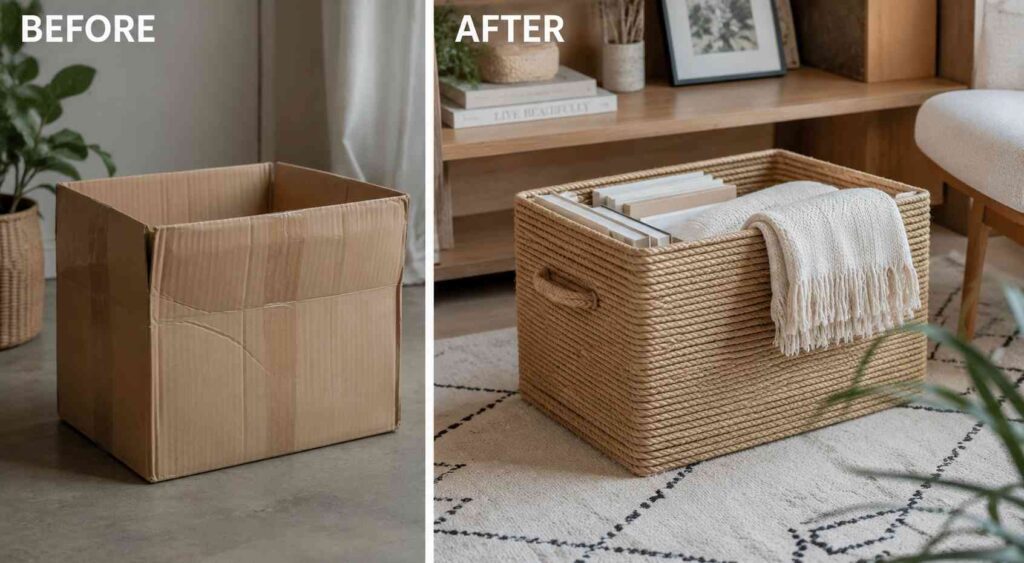
#5 Cardboard Box → Modern Woven Storage Basket
Why You’ll Love This DIY
- Budget-friendly
- Beginner-friendly
- Perfect for home organization
- Looks like a high-end woven basket
- Great for farmhouse and modern homes
Materials Needed
- 1 medium cardboard box
- Jute rope or cotton rope
- Hot glue gun and glue sticks
- Craft knife
- Scissors
- Fabric liner (optional)
- Leather strap handles (optional)
How to Make It
Step 1 – Trim the cardboard box to your desired basket height.
Step 2 – Strengthen the corners with extra cardboard if needed.
Step 3 – Apply hot glue in small sections and wrap the entire box with jute rope.
Step 4 – Attach rope or leather handles to both sides.
Step 5 – Add a soft fabric liner inside for a premium finish.
Step 6 – Place the basket on a shelf, console table, or closet for stylish storage.
Styling Tip
Pair two or three baskets in different sizes to organize blankets, toys, magazines, or towels while giving your home a warm modern farmhouse look.
#6 Newspaper → Handwoven Decorative Basket
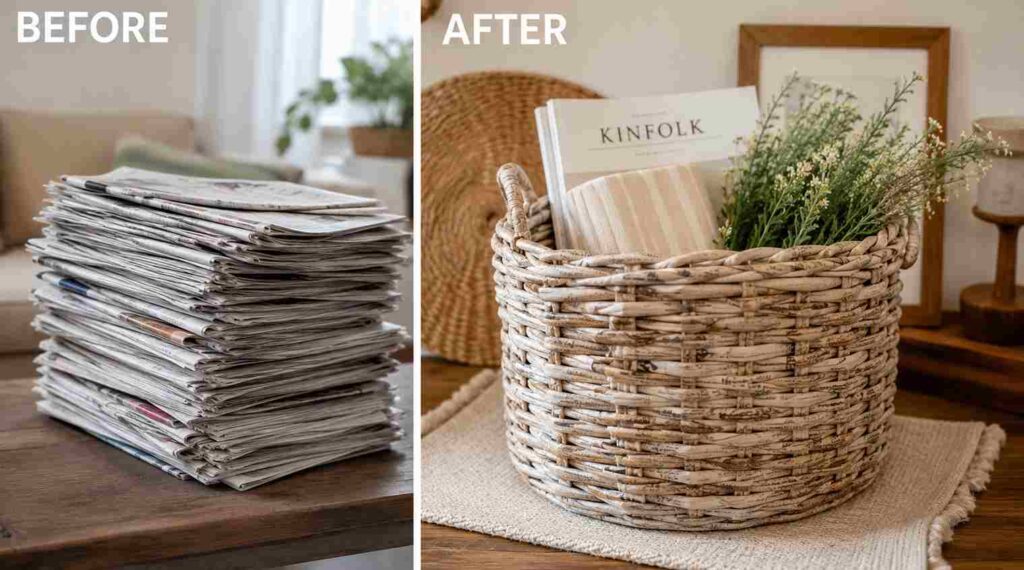
What You’ll Need
- Old newspapers
- White glue
- Wooden skewer
- Scissors
- Acrylic paint
- Matte sealer (optional)
Let’s Make It
Step 1 – Roll each newspaper into long paper tubes.
Step 2 – Weave the tubes together to create the basket shape.
Step 3 – Glue the edges and let everything dry.
Step 4 – Paint the basket in a natural wicker shade and seal it for durability.
Designer Tip
Dry-brush the basket with light brown paint for a realistic wicker finish that looks store-bought.
Perfect For
Living Room • Bathroom • Entryway • Bedroom
#7 Wooden Pallet → Rustic Coffee Bar Shelf
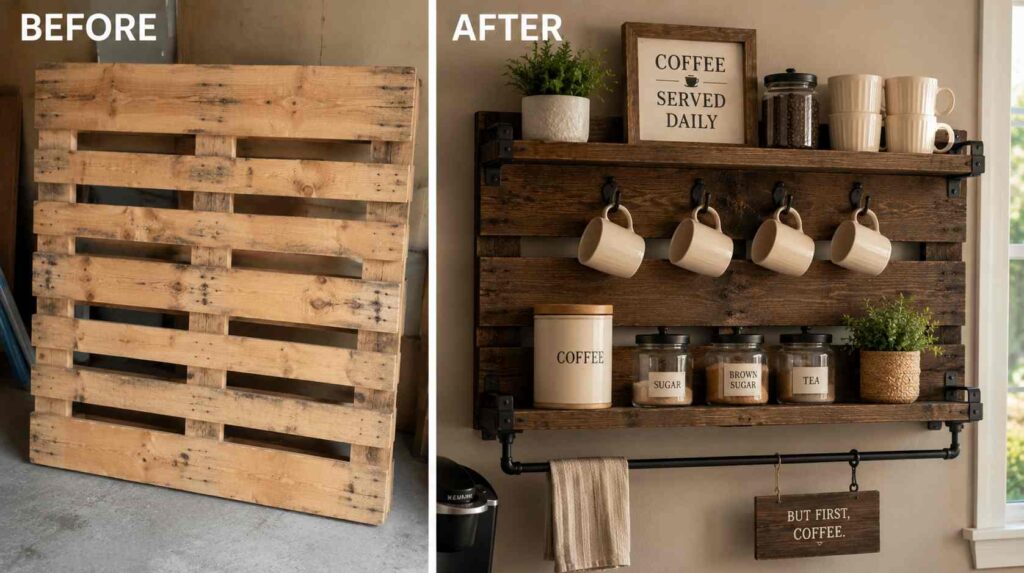
What You’ll Need
- 1 wooden pallet
- Sandpaper
- Wood stain or paint
- Screws
- Drill
- Wall anchors
- Matte clear sealer (optional)
How to Make It
Step 1 – Sand the pallet until the surface feels smooth.
Step 2 – Apply a wood stain or matte paint and let it dry completely.
Step 3 – Secure the pallet boards and add a small shelf if needed.
Step 4 – Mount it firmly on the wall using screws and anchors.
Step 5 – Style it with coffee mugs, glass jars, a small plant, and wooden signs.
Designer Tip
Choose a light oak or walnut finish with black metal accents for a modern farmhouse look that’s popular in many American homes.
Perfect For
Kitchen • Coffee Corner • Dining Room • Breakfast Nook
#8 Old Jeans → Stylish Rope Storage Basket
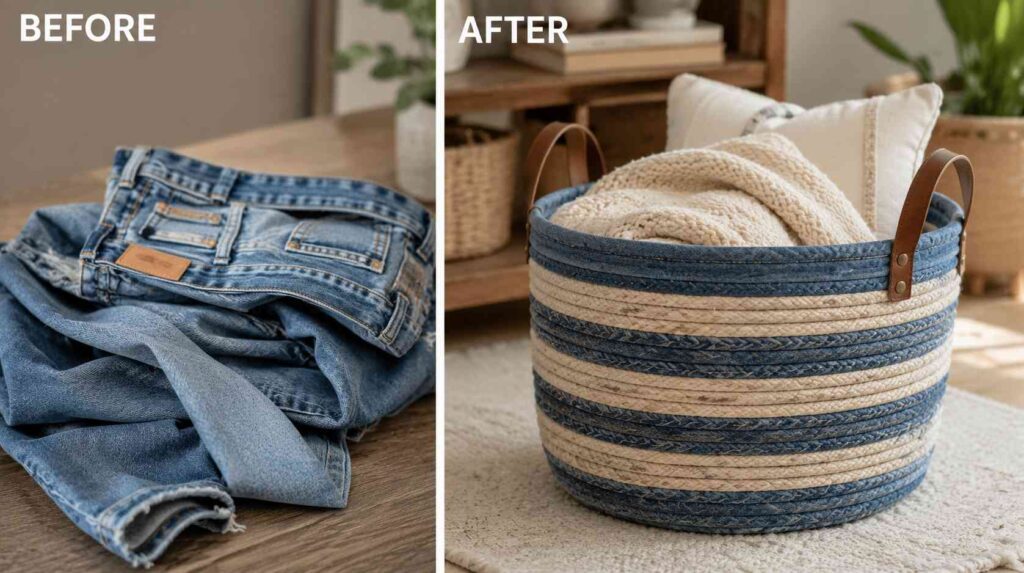
What You’ll Need
- Old jeans
- Cotton rope or jute rope
- Hot glue gun
- Scissors
- Fabric liner (optional)
- Leather handles (optional)
How to Make It
Step 1 – Cut the jeans into long strips or use the denim as a basket cover.
Step 2 – Wrap the rope into a spiral, gluing as you build the base.
Step 3 – Continue shaping the sides to form the basket.
Step 4 – Cover the outside with denim or weave denim strips into the design.
Step 5 – Add leather handles for a clean, designer finish.
Decor Tip
Pair it with cream blankets or rolled towels to create a cozy farmhouse look that feels both stylish and functional.
Perfect For
Bedroom • Living Room • Laundry Room • Nursery
#9 Toilet Paper Roll → Elegant Butterfly Wall Art
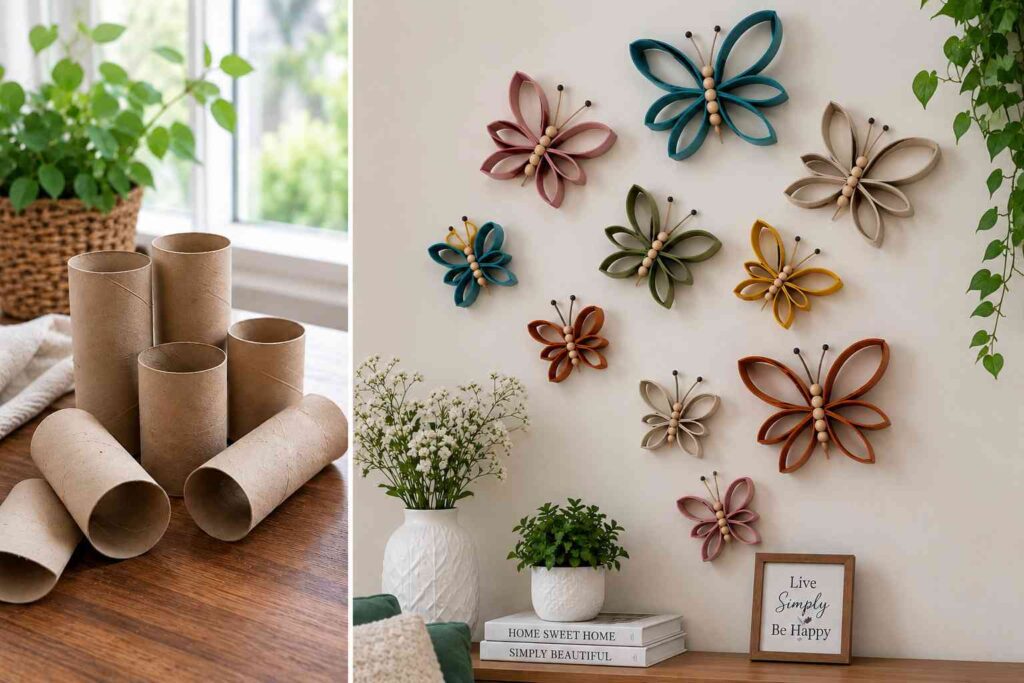
What You’ll Need
- 6–8 toilet paper rolls
- Acrylic paint
- Scissors
- Hot glue gun
- Small beads (optional)
- Hanging hook
How to Make It
Step 1 – Flatten each roll and cut it into even strips.
Step 2 – Shape and glue the strips into butterfly wings.
Step 3 – Paint the butterflies in soft pastel or vibrant colors.
Step 4 – Add beads to the center for extra detail.
Step 5 – Arrange multiple butterflies on the wall to create a stunning display.
Designer Tip
Mix different butterfly sizes and hang them in a flowing pattern for a high-end gallery wall that looks professionally designed.
#10 Glass Jar → Elegant Bathroom Organizer
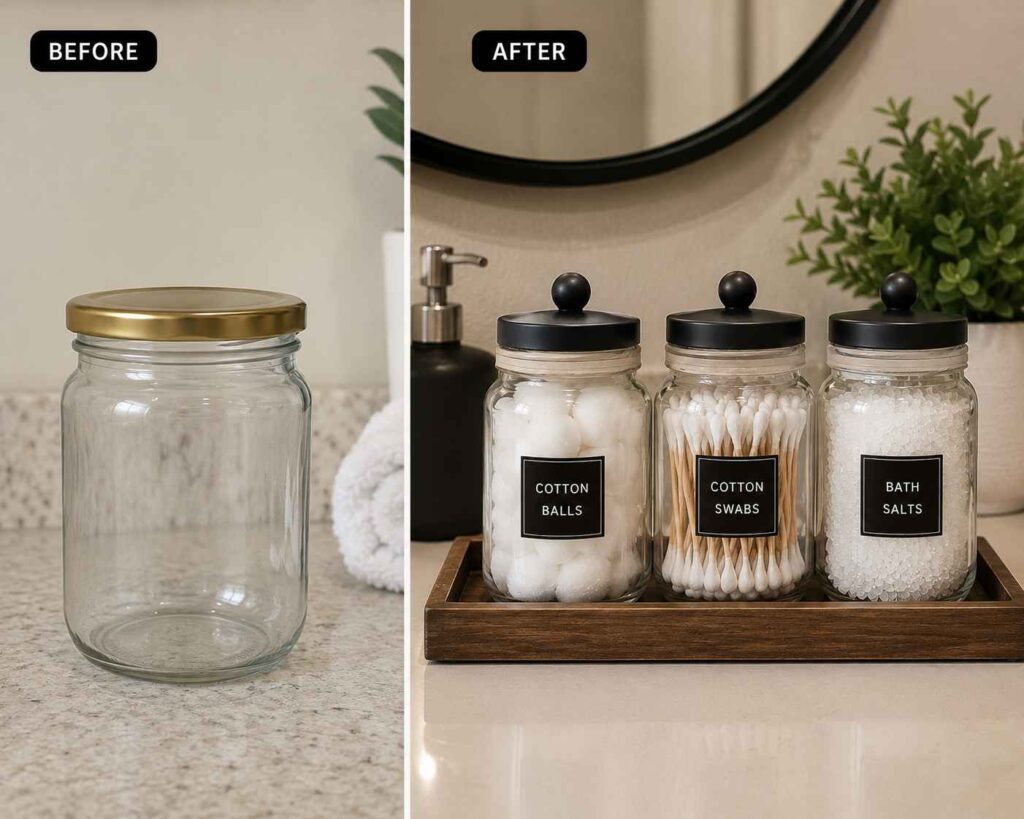
What You’ll Need
- 2–3 glass jars
- Matte spray paint (optional)
- Jute rope
- Hot glue gun
- Wooden tray (optional)
- Labels (optional)
How to Make It
Step 1 – Clean the jars and remove all labels.
Step 2 – Wrap jute rope around the neck of each jar.
Step 3 – Paint the lids in a matte black, white, or gold finish.
Step 4 – Place the jars on a wooden tray and fill them with cotton balls, cotton swabs, bath salts, or makeup brushes.
Step 5 – Add simple labels for a clean, spa-inspired look.
Designer Tip
Use matching jars with wooden accents and neutral colors to create a luxury hotel-style bathroom that’s both elegant and organized.
Perfect For
Bathroom • Vanity • Makeup Station • Guest Bathroom
#11 Plastic Bottle → Self-Watering Indoor Planter
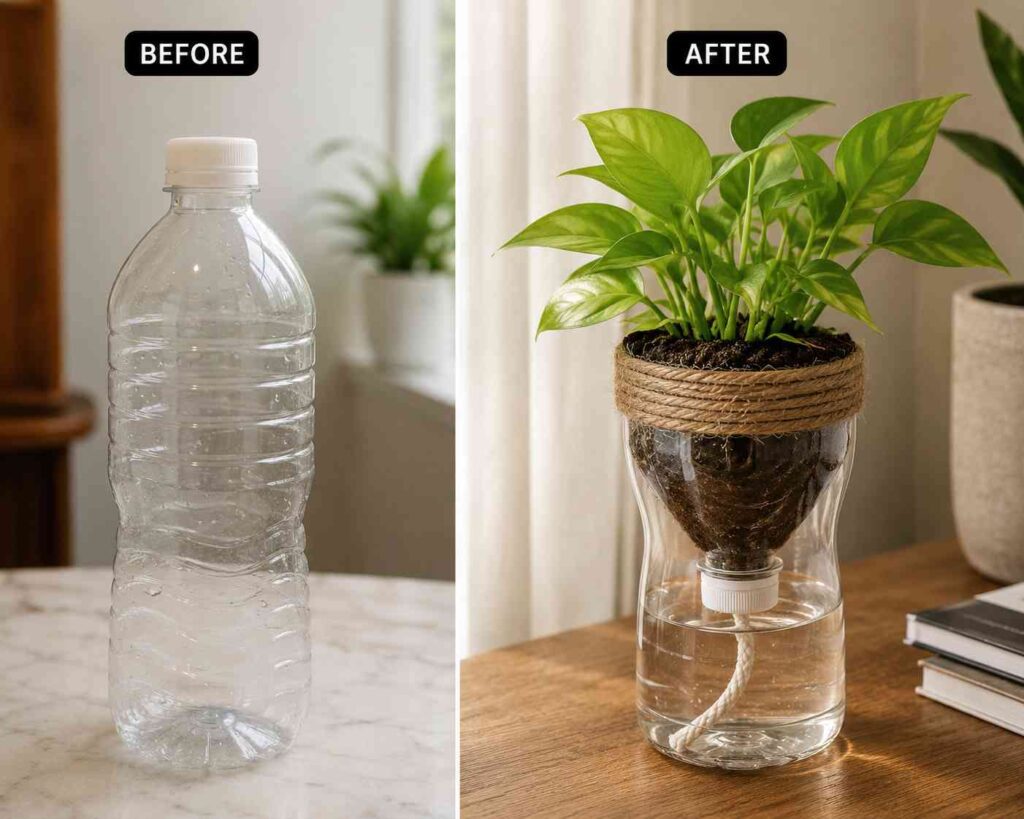
Supplies
- 1 large plastic bottle
- Craft knife
- Cotton rope or wick
- Potting soil
- Small indoor plant
- Acrylic paint (optional)
Create It
Step 1 – Cut the bottle into two equal halves.
Step 2 – Thread the cotton wick through the bottle cap.
Step 3 – Fill the bottom half with water.
Step 4 – Add soil and your plant to the top section, then place it upside down into the water reservoir.
Step 5 – Decorate the planter with paint or jute rope for a finished look.
Finishing Touch
Use matte white or sage green paint with natural jute wrapping to give the planter a premium Scandinavian look.
Great For
Kitchen Windowsill • Home Office • Bedroom • Apartment Balcony
#12 Paper → Elegant Giant Wall Flowers
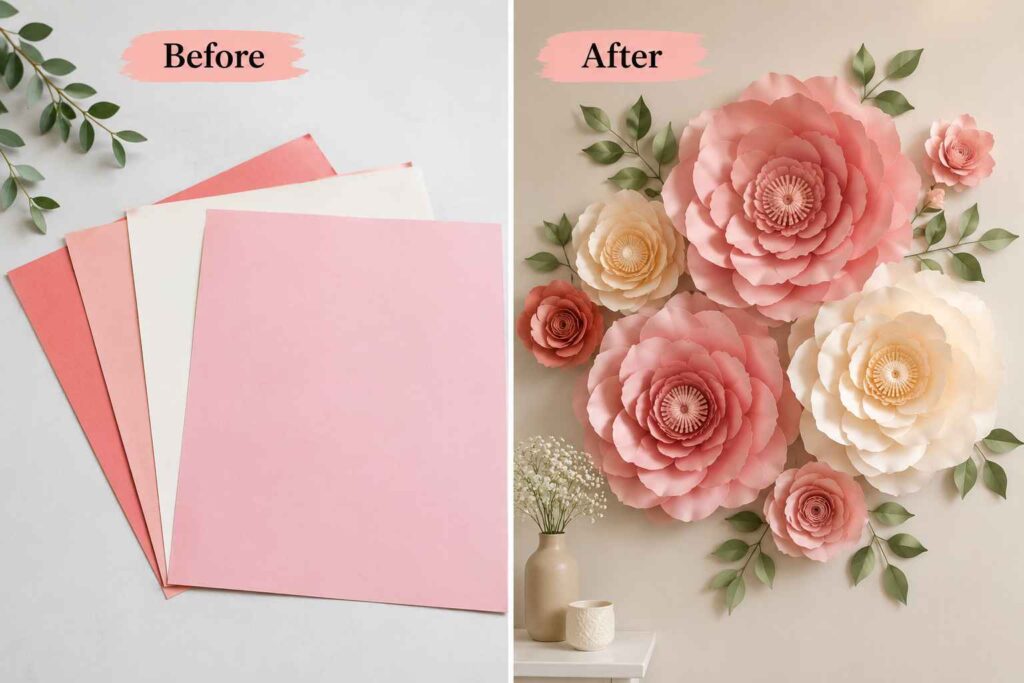
What You’ll Need
- Colored craft paper
- Pencil
- Scissors
- Hot glue gun
- Floral wire (optional)
- Double-sided tape
How to Make It
Step 1 – Draw petals in three different sizes and cut them out.
Step 2 – Gently curl each petal with a pencil to create a natural shape.
Step 3 – Glue the smallest petals together to form the flower center.
Step 4 – Attach the medium and large petals layer by layer until the flower looks full.
Step 5 – Finish by adding a rolled paper center and mount the flower on the wall using removable adhesive strips.
Designer Tip
Create three flowers in different sizes and shades of the same color for a boutique-style wall display that’s perfect for modern American homes.
Perfect For
Living Room • Bedroom • Nursery • Party Backdrop • Home Office
#13 Tin Can → Rustic Kitchen Utensil Holder
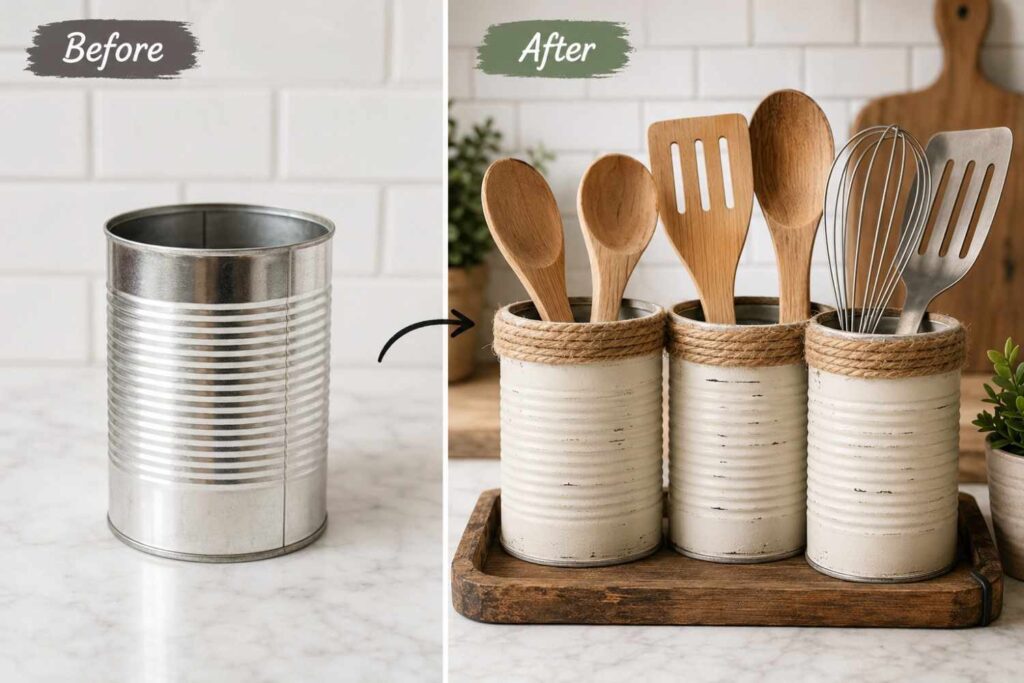
What You’ll Need
- 2–3 empty tin cans
- Sandpaper
- Chalk paint
- Jute rope
- Hot glue gun
- Clear matte sealer (optional)
How to Make It
Step 1 – Wash the cans thoroughly and sand any sharp edges until smooth.
Step 2 – Apply two thin coats of chalk paint, allowing each coat to dry completely.
Step 3 – Wrap jute rope around the top rim and secure it with hot glue.
Step 4 – Lightly distress the surface with sandpaper to create a rustic farmhouse finish.
Step 5 – Arrange the cans on a wooden tray and fill them with wooden spoons, spatulas, or cooking utensils.
Designer Tip
Use white, sage green, or matte black paint with natural wood accessories to create a kitchen display that looks straight out of a modern American farmhouse.
Perfect For
Kitchen Counter • Coffee Bar • Pantry • Open Shelves
#14 Glass Jar → Enchanting Fairy Light Lantern
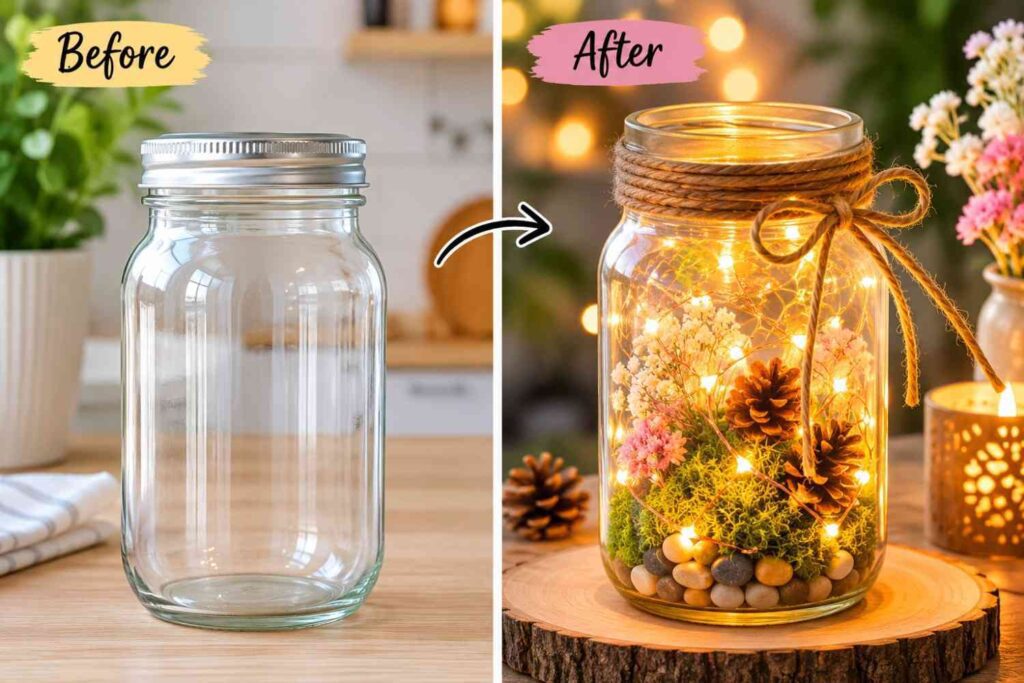
What You’ll Need
- 1 glass jar
- LED fairy lights
- Jute twine
- Small pebbles or decorative sand
- Faux moss (optional)
- Mini pinecones or dried flowers (optional)
- Hot glue gun
How to Make It
Step 1 – Clean the jar until it’s crystal clear and remove any labels.
Step 2 – Add a thin layer of pebbles or decorative sand to the bottom.
Step 3 – Arrange faux moss, pinecones, or dried flowers for a natural woodland look.
Step 4 – Coil the LED fairy lights inside the jar, hiding the battery pack behind the decorations.
Step 5 – Wrap jute twine around the neck of the jar and tie a simple bow for the finishing touch.
Designer Tip
Place three lanterns of different heights on a wooden tray to create a cozy centerpiece that looks straight from a boutique home decor store.
Perfect For
Living Room • Patio • Bedroom • Entryway • Dining Table
#15 Cardboard Box → Stylish Entryway Mail Organizer
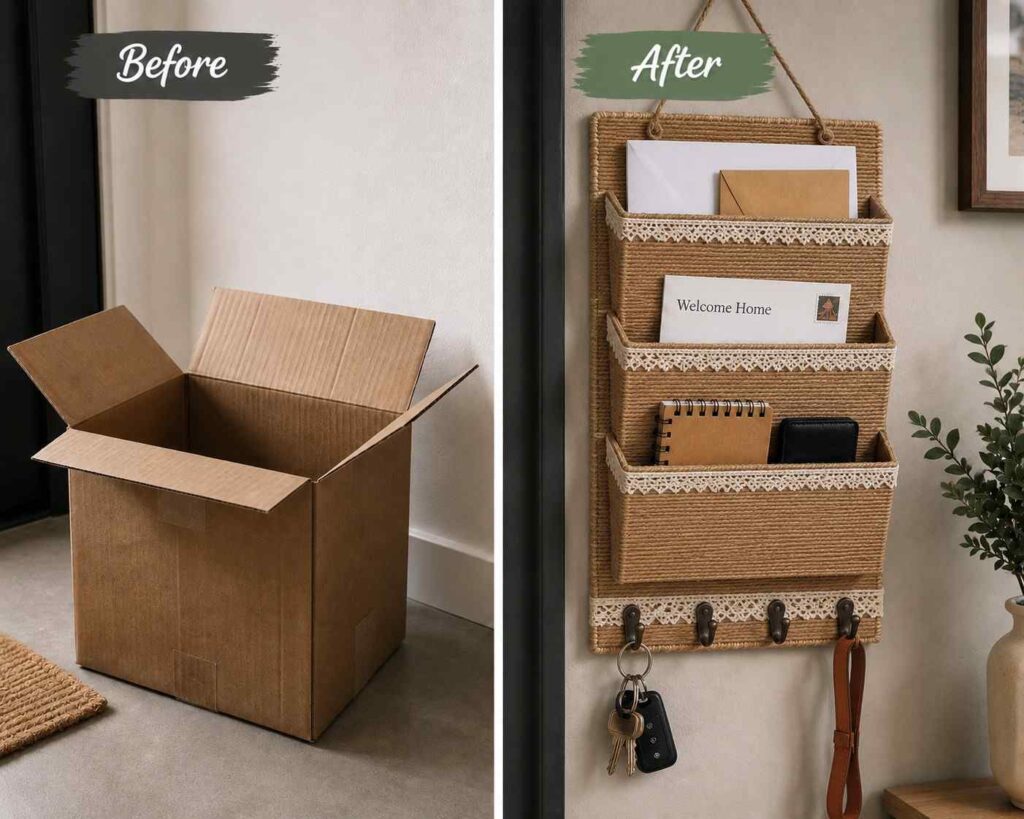
What You’ll Need
- Medium cardboard box
- Craft knife
- Ruler
- Hot glue gun
- Contact paper or peel-and-stick wallpaper
- Small hooks
- Double-sided tape or wall screws
How to Make It
Step 1 – Measure and cut the cardboard into a back panel and three storage pockets.
Step 2 – Fold and glue the pockets onto the back panel for a sturdy design.
Step 3 – Cover the organizer with wood-grain contact paper or a neutral fabric.
Step 4 – Attach small hooks to the bottom for keys or lanyards.
Step 5 – Mount it near your front door using strong adhesive strips or screws.
Designer Tip
Choose light oak, white, or matte black finishes with gold hooks for a modern entryway that looks professionally designed.
Perfect For
Entryway • Home Office • Mudroom • Apartment Entrance
#16 Egg Carton → Vintage Floral Mirror Frame
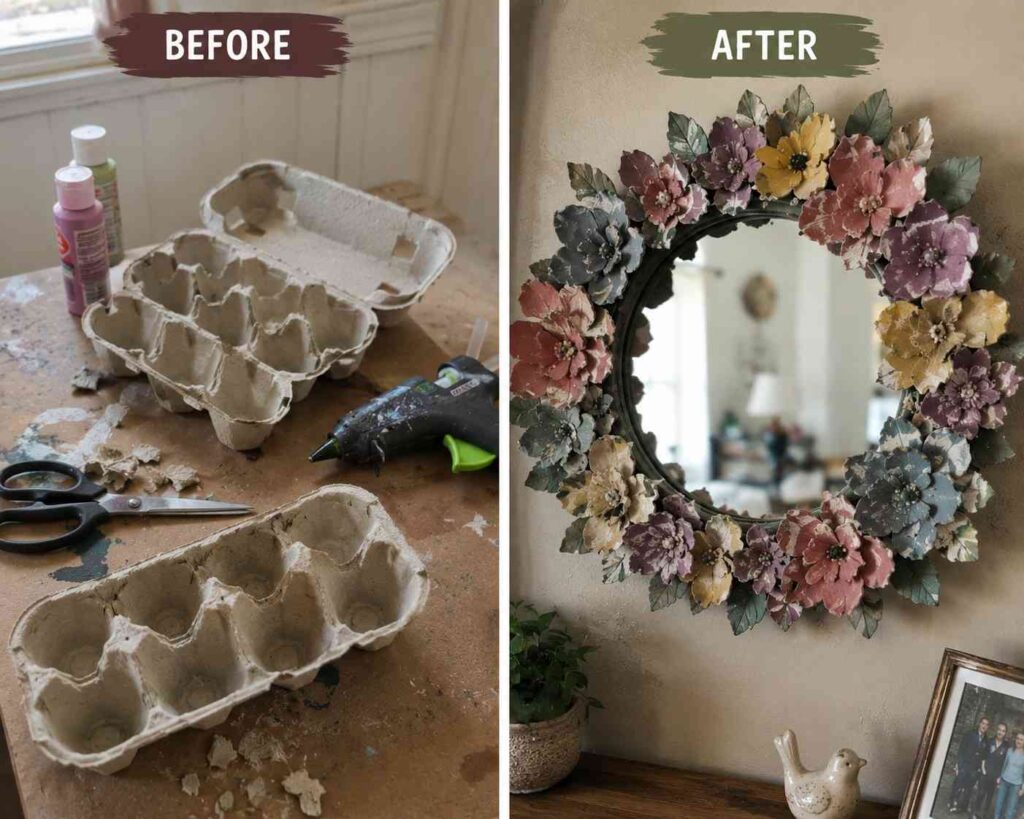
What You’ll Need
- Empty egg cartons
- Round or square mirror
- Acrylic paint
- Hot glue gun
- Scissors
- Pearl beads (optional)
How to Make It
Step 1 – Cut the egg cups apart and trim them into flower petals.
Step 2 – Paint the flowers in soft vintage shades like ivory, blush, or dusty rose.
Step 3 – Glue the flowers around the mirror, alternating large and small blooms.
Step 4 – Fill small gaps with tiny leaves or pearl beads for extra detail.
Step 5 – Let everything dry before hanging the mirror on the wall.
Designer Tip
A distressed white frame with layered flowers creates an elegant farmhouse look that appears much more expensive than it actually is.
Perfect For
Bedroom • Entryway • Bathroom • Vanity • Living Room
#17 Wooden Pallet → Vertical Herb Garden
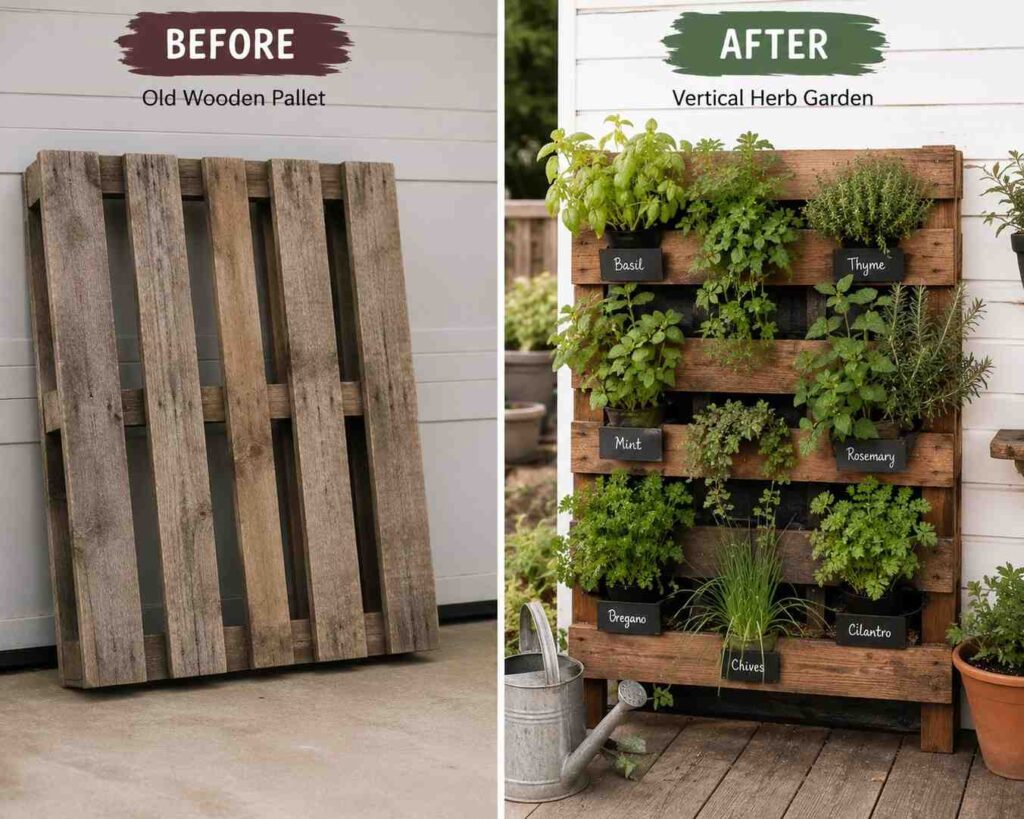
What You’ll Need
- Wooden pallet
- Sandpaper
- Wood stain or outdoor paint
- Landscape fabric
- Staple gun
- Potting soil
- Herb plants (Basil, Mint, Rosemary, etc.)
How to Make It
Step 1 – Sand the pallet and apply a weather-resistant stain or paint.
Step 2 – Staple landscape fabric to the back and bottom of each section to create planting pockets.
Step 3 – Fill each pocket with potting soil.
Step 4 – Plant your favorite herbs and water them lightly.
Step 5 – Lean the pallet against a wall or secure it upright in your garden.
Designer Tip
Mix different herbs with trailing plants for a lush, layered look that feels like a designer outdoor feature.
Perfect For
Patio • Balcony • Backyard • Kitchen Garden • Porch
#18 Plastic Bottle → Modern Hanging Herb Planter
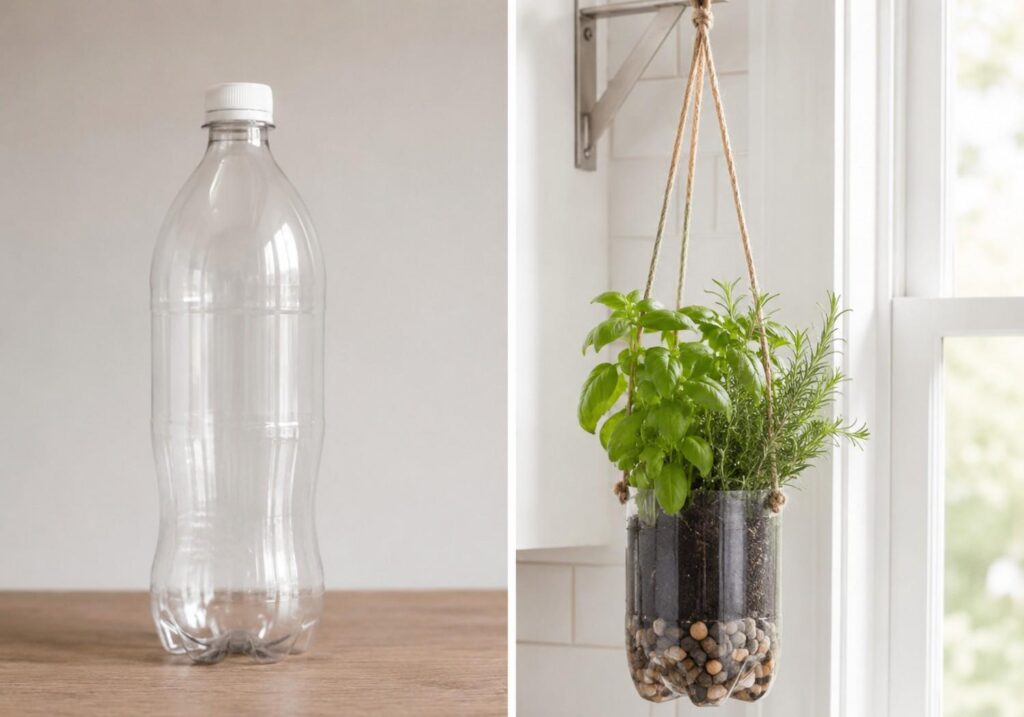
What You’ll Need
- 1 large plastic bottle
- Utility knife
- Drill or nail
- Jute rope
- Potting soil
- Herb plant
- Sandpaper
How to Make It
Step 1 – Draw a long planting window on one side of the bottle and carefully cut it out.
Step 2 – Smooth all cut edges with sandpaper to make the planter safe to handle.
Step 3 – Make several small drainage holes in the bottom and two larger holes near the top for hanging.
Step 4 – Thread jute rope through the top holes and tie secure knots.
Step 5 – Add a layer of small pebbles before filling the bottle with potting soil.
Step 6 – Plant your favorite herbs, water lightly, and hang the planter in a bright location.
Decor Tip
Hang two or three planters at different heights using matching ropes to create a stylish vertical herb garden.
Perfect For
Kitchen Window • Balcony • Patio • Apartment Garden
#19 Popsicle Sticks → Rustic Floating Wall Shelf
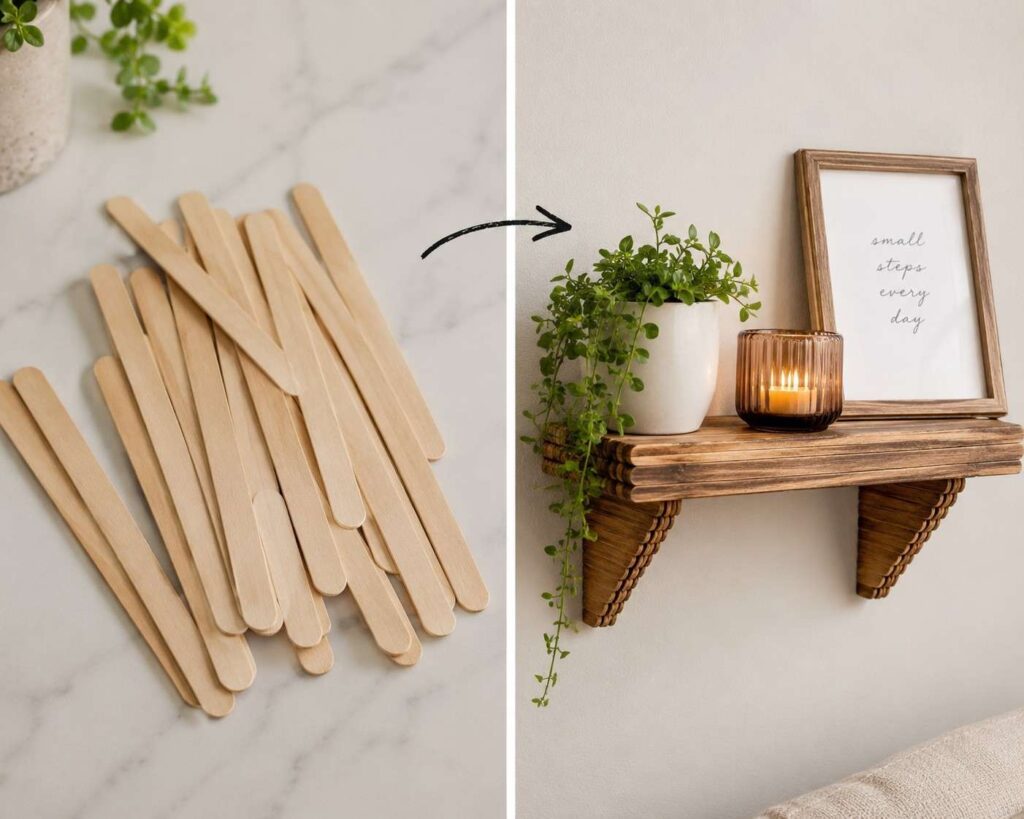
What You’ll Need
- 40–50 popsicle sticks
- Wood glue
- Craft knife
- Small clamps or clips
- Acrylic paint or wood stain
- Strong wall adhesive or mounting strips
How to Make It
Step 1 – Sort the sticks by size and trim any rough edges for a clean finish.
Step 2 – Glue several sticks side by side to create the shelf base, then let it dry completely.
Step 3 – Build two triangular side brackets using additional sticks and reinforce the joints with extra glue.
Step 4 – Attach the brackets beneath the shelf and leave it under a heavy book until fully set.
Step 5 – Stain the wood for a natural finish or paint it to match your room’s decor.
Step 6 – Mount the shelf and decorate it with a small plant, candle, or framed photo.
Style It Like a Designer
Keep the decor minimal—one trailing plant, a candle, and a tiny framed print will give it the clean, cozy look often seen in modern American farmhouse homes.
Perfect For
Bedroom • Bathroom • Entryway • Reading Corner • Home Office
#20 Thrift Store Picture Frame → Luxury Farmhouse Wall Decor
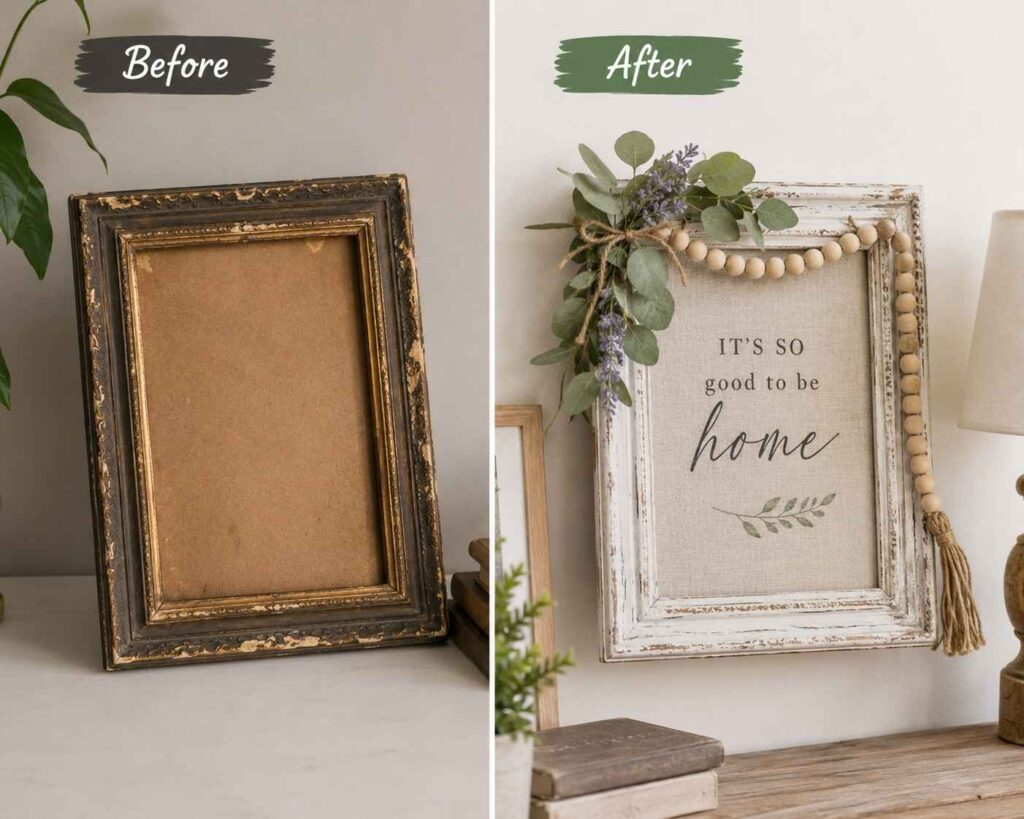
What You’ll Need
- Old picture frame
- Chalk paint
- Fine-grit sandpaper
- Small paintbrush
- Wood bead garland (optional)
- Faux eucalyptus or lavender
- Hot glue gun
How to Make It
Step 1 – Remove the old photo and clean the frame with a damp cloth.
Step 2 – Apply a coat of chalk paint, then lightly sand the edges to create a distressed vintage finish.
Step 3 – Glue a small bundle of faux eucalyptus or lavender to one corner of the frame.
Step 4 – Wrap a short wood bead garland around the top or attach it as a decorative accent.
Step 5 – Place a neutral botanical print, family quote, or linen fabric inside the frame instead of a photo.
Make It Look Expensive
Mix distressed white paint with natural wood beads and soft greenery for a timeless farmhouse look that’s popular in American homes.
Perfect For
Entryway • Living Room • Hallway • Bedroom • Gallery Wall
#21 Dollar Tree Tray → Luxury Coffee Table Centerpiece
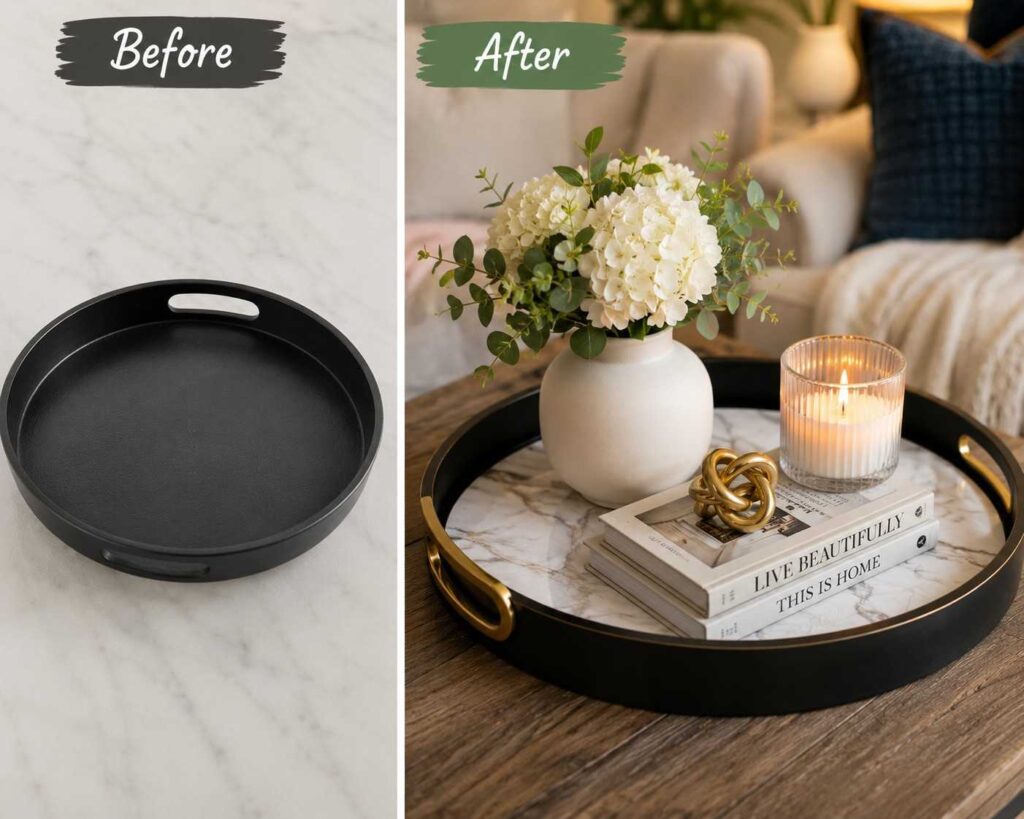
What You’ll Need
- Dollar Tree plastic tray
- Spray paint
- Decorative handles
- Strong adhesive
- Peel-and-stick marble or wood vinyl
- Clear protective sealer (optional)
How to Make It
Step 1 – Wash the tray with warm soapy water and let it dry completely.
Step 2 – Cover the base with marble or wood-look adhesive vinyl, smoothing out any air bubbles.
Step 3 – Attach decorative metal handles to each side using a strong adhesive.
Step 4 – Spray the outer edges in matte black, brushed gold, or soft white and allow them to cure.
Styling Tip
Complete the look with a candle, a small vase of fresh flowers, and two or three coffee table books for a designer-inspired display.
Perfect For
Coffee Table • Ottoman • Dining Table • Entryway Console • Living Room
#22 Old Sweater → Cozy Throw Pillow Cover
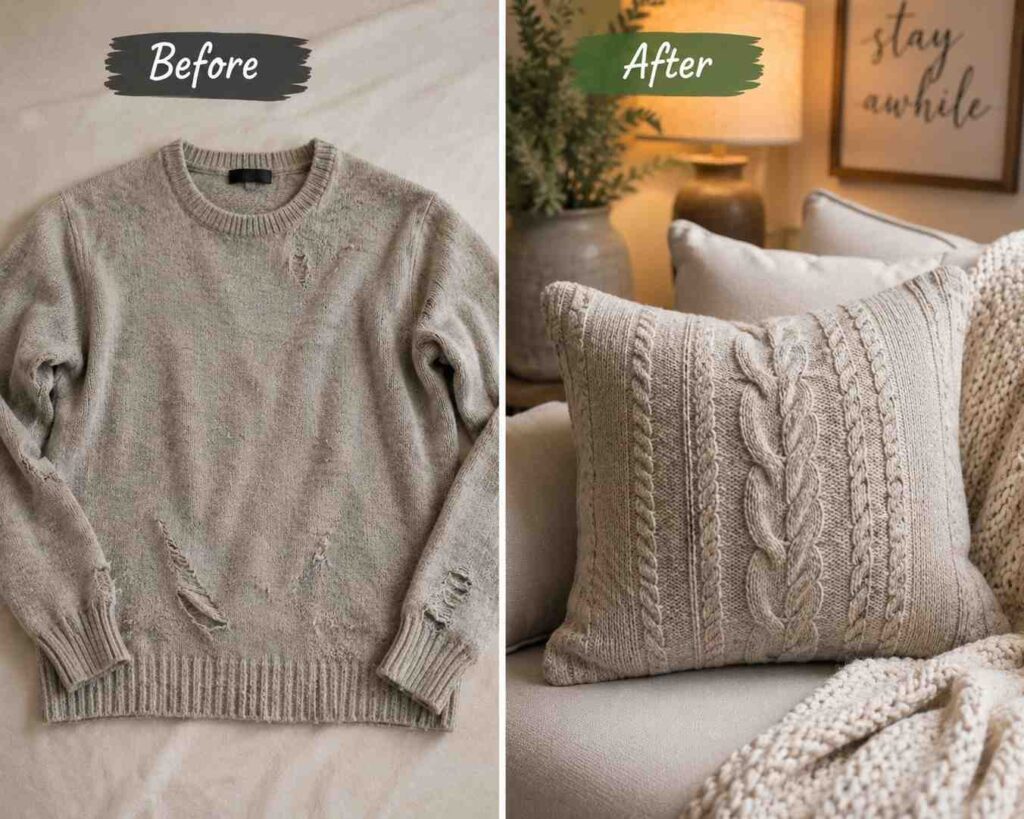
What You’ll Need
- Old sweater
- Throw pillow insert
- Fabric scissors
- Sewing machine or fabric glue
- Pins
- Measuring tape
How to Make It
Step 1 – Lay the sweater flat and place the pillow insert over it to measure the size.
Step 2 – Cut two matching fabric squares, leaving about an inch of extra fabric around the edges.
Step 3 – Place the pieces with the good sides facing each other and sew around three edges.
Step 4 – Turn the cover right-side out, insert the pillow, then sew or glue the final edge closed.
Cozy Decor Tip
Neutral knit textures like cream, oatmeal, or soft gray instantly create a cozy, high-end look that’s perfect for modern farmhouse interiors.
Perfect For
Living Room • Bedroom • Reading Nook • Guest Room
#23 Glass Jar → Farmhouse Kitchen Dry Food Storage
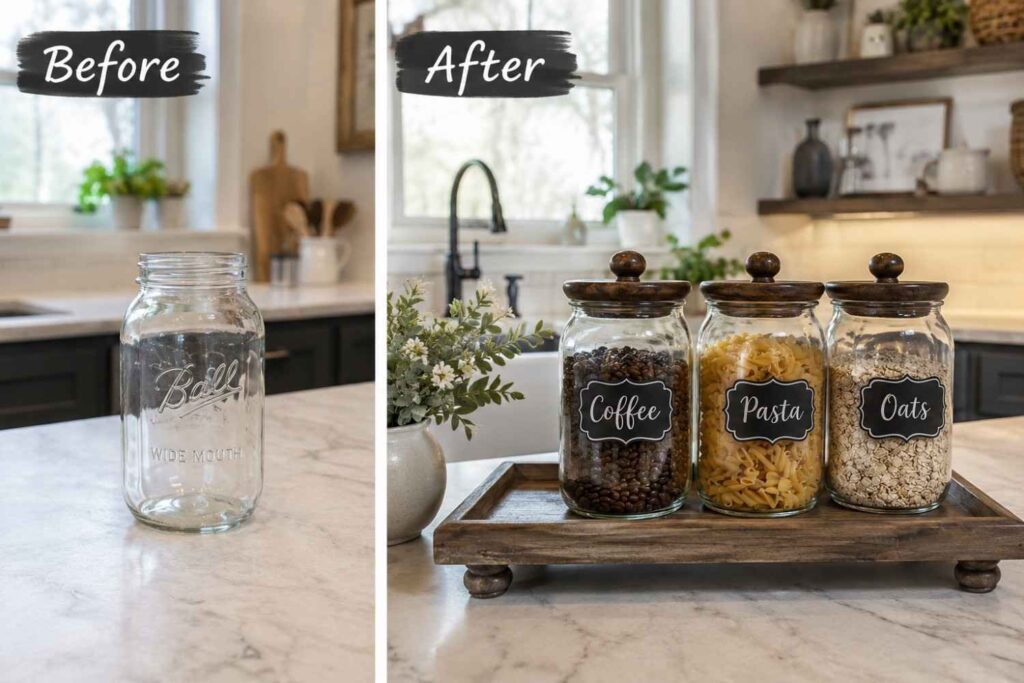
What You’ll Need
- Large glass jar
- Wooden lid or existing lid
- Matte spray paint
- Chalk marker or pantry label
- Fine sandpaper
- Clear sealer (optional)
How to Make It
Step 1 – Soak the jar in warm water to remove the label without leaving sticky residue.
Step 2 – Lightly sand and spray-paint the lid in a matte finish that matches your kitchen.
Step 3 – Fill the jar with coffee beans, pasta, rice, flour, or snacks.
Step 4 – Add a simple pantry label and arrange several matching jars together on an open shelf.
Step 5 (Optional) – Place the jars on a wooden riser or tray to create a clean, organized display.
Designer Tip
Use identical jars with matching labels and wooden accents for a custom pantry that looks straight out of a luxury home magazine.
Perfect For
Pantry • Kitchen Counter • Coffee Station • Open Shelves
#24 Tin Can → Industrial Desk Organizer
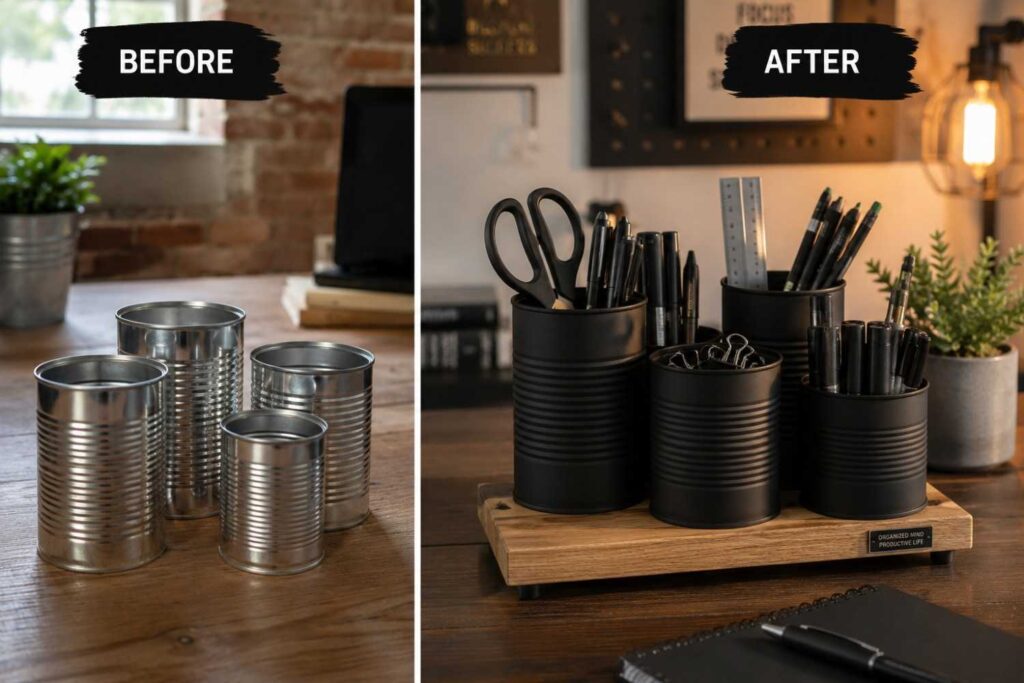
What You’ll Need
- 3–4 empty tin cans
- Wooden board
- Matte spray paint
- Strong adhesive
- Sandpaper
- Rubber feet (optional)
How to Make It
Step 1 – Clean the cans thoroughly and smooth any sharp edges with sandpaper.
Step 2 – Paint each can in different neutral shades like matte black, charcoal, or olive green.
Step 3 – Arrange the cans in different heights on a wooden board until you like the layout.
Step 4 – Glue them securely to the board and allow everything to cure before moving.
Step 5 – Add rubber feet underneath to keep the organizer stable and protect your desk.
Step 6 – Sort pens, scissors, rulers, markers, and small office supplies into separate compartments.
Make It Look Premium
Combine matte black cans with a natural oak base for a modern industrial look that feels custom-made rather than DIY.
Perfect For
Home Office • Study Desk • Craft Room • Kids’ Homework Station
#25 Toilet Paper Roll → Elegant Wall Flower Bouquet
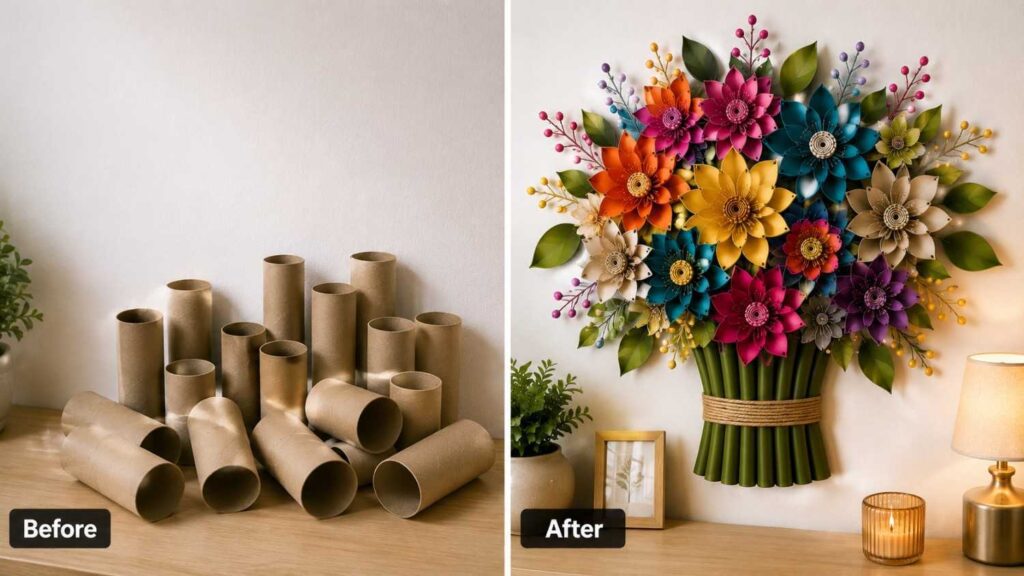
What You’ll Need
- 8–10 toilet paper rolls
- Acrylic paint
- Scissors
- Hot glue gun
- Wooden embroidery hoop (optional)
- Faux leaves (optional)
How to Make It
Step 1 – Flatten each toilet paper roll and cut it into thin equal strips.
Step 2 – Pinch and glue the strips into petal shapes.
Step 3 – Paint the petals in soft blush, ivory, sage green, lavender, or terracotta.
Step 4 – Glue the petals together to create large layered flowers.
Step 5 – Arrange multiple flowers on a wooden hoop or directly on the wall, then add leaves for a premium botanical look.
Designer Tip
Mix three flower sizes with neutral colors and place them above a console table or bed to create a high-end American farmhouse wall display.
Perfect For
Living Room • Bedroom • Entryway • Nursery • Gallery Wall
You don’t need expensive supplies to create a beautiful home. With a little creativity, everyday waste can become stylish decor that’s both practical and budget-friendly. Try your favorite project, personalize it with your own colors and style, and enjoy giving forgotten materials a brand-new purpose.
What is the best waste material for DIY home decor?
Egg cartons, cardboard boxes, glass jars, tin cans, plastic bottles, and wooden pallets are some of the easiest and most versatile materials to reuse.
Are these DIY projects beginner-friendly?
Yes. Most projects require only basic craft supplies and simple techniques, making them suitable for beginners.
Can recycled DIY decor really look expensive?
Absolutely. Using neutral colors, quality finishes, and thoughtful styling can make recycled projects look like designer home decor.
Which DIY projects are best for farmhouse-style homes?
Lanterns, woven baskets, pallet shelves, floral wall art, and glass jar organizers all work beautifully with farmhouse interiors.
What basic tools should I keep for DIY projects?
A hot glue gun, scissors, craft knife, ruler, paintbrushes, acrylic paint, sandpaper, and strong adhesive are enough for most beginner projects.