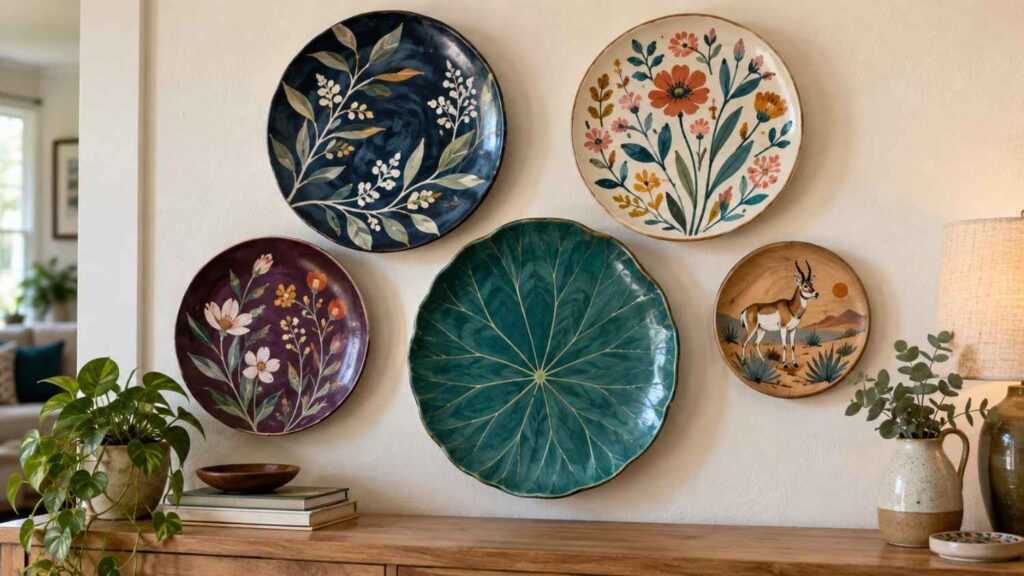
Decorative plates are an easy way to add color and personality to a blank wall, shelf, or kitchen nook. Instead of buying expensive wall art, you can give plain thrift-store plates a fresh look with paint pens, simple brushes, and colors you already love.
The ideas below include bold flowers, leafy patterns, folk-art details, and a few simpler designs for beginners. Use the pictures for inspiration, but change the colors and arrangement to make each plate your own.
If you enjoy painting small decorative pieces, explore these beautiful painted rock ideas for more colorful inspiration.
Before You Start
Choose paint pens or craft paint made for the surface you are decorating. Ceramic, wood, and metal may require different paints and preparation. Clean each item well and let it dry before painting.
Follow the paint manufacturer’s directions for drying and curing. Bake a plate only when both the paint instructions and the plate label confirm that it is oven-safe. Otherwise, choose an air-cure product.
These projects are intended for decoration. Unless every product you use is clearly labeled food-safe, do not serve or eat food from the painted surface. When hanging a finished piece, use hardware rated for its size and weight.
This post may contain affiliate links. As an Amazon Associate, I earn from qualifying purchases at no additional cost to you.
Helpful Supplies for This Project
- [Ceramic Paint Pens] — An easy choice for outlines, dots, leaves, and small floral details.
- [Porcelain Paint Set] — Useful for filling larger shapes and creating custom color combinations.
- [Fine Detail Paintbrushes] — Helpful for thin stems, petal lines, and small corrections.
- [Plate Display Stands] — A simple way to display finished plates without attaching them to the wall.
- [Plate Wall Hangers] — Choose hangers rated for the size and weight of your plates.
10 Hand-Painted Plate Ideas
1. Moody Folk-Art Painted Plates
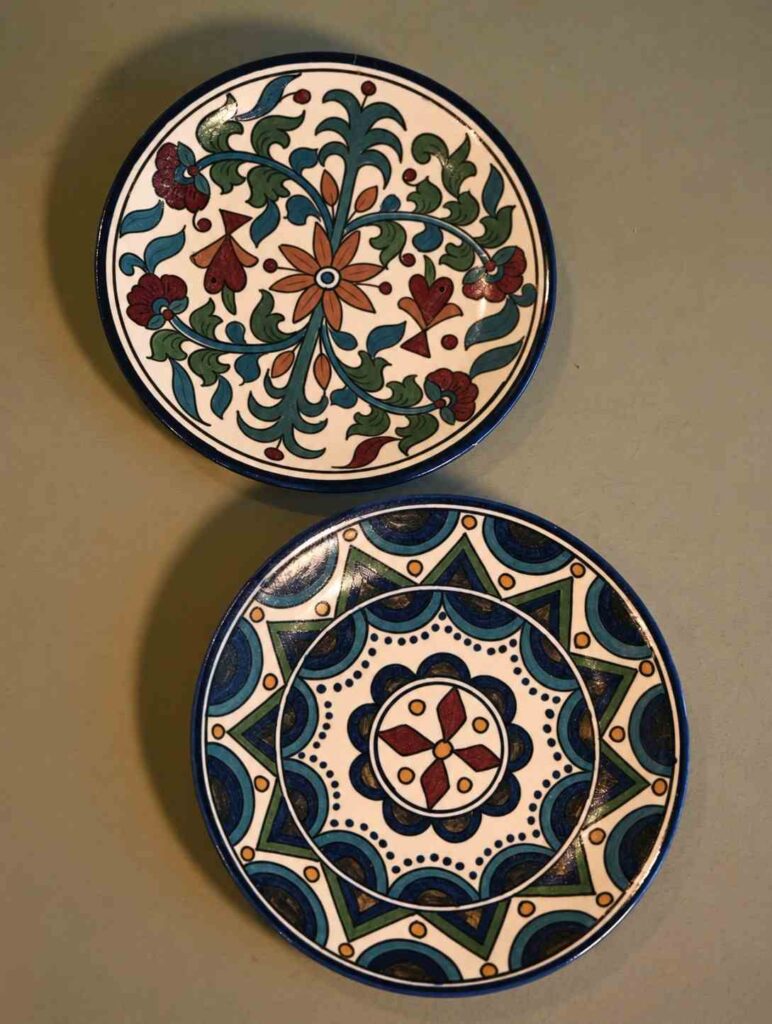
Turn two plain thrift-store plates into colorful wall art with a few simple painting supplies. Deep navy, forest green, burgundy, teal, and warm terracotta give the plates a rich, cozy look.
Paint loose flowers, leaves, and curved stems on one plate. Use circles, triangles, dots, and other simple geometric shapes on the second. The designs will be different, but the shared colors will make them look like a matching set.
Materials
- Two plain ceramic plates
- Ceramic paint pens
- Ceramic paint in navy, green, burgundy, teal, and terracotta
- Small paintbrushes
- Pencil
- Scrap paper
- Plate stands or wall hangers
How to Make Them
- Practice drawing a few flowers, leaves, curved lines, and geometric shapes on scrap paper.
- Lightly sketch flowers, leaves, and flowing stems on the first plate. Leave some open space so the design does not feel crowded.
- Create a different pattern on the second plate using circles, dots, curved lines, or triangles.
- Trace both designs with a navy ceramic paint pen. Work slowly and allow each section to dry before touching it.
- Fill the larger shapes with green, burgundy, teal, and terracotta paint. Add a second coat if any color looks too light.
- Finish each rim with a simple border of dots, short lines, or tiny leaves.
- Let the paint dry and cure it according to the manufacturer’s instructions. Display the finished plates on stands or attach them securely to the wall.
Tip: Don’t worry if your finished plates do not look exactly like the ones shown in this article. Every hand-painted flower, line, and shape will turn out a little differently. These small changes make your plates look naturally handmade and give them their own unique character.
2. Layered Botanical Painted Plate
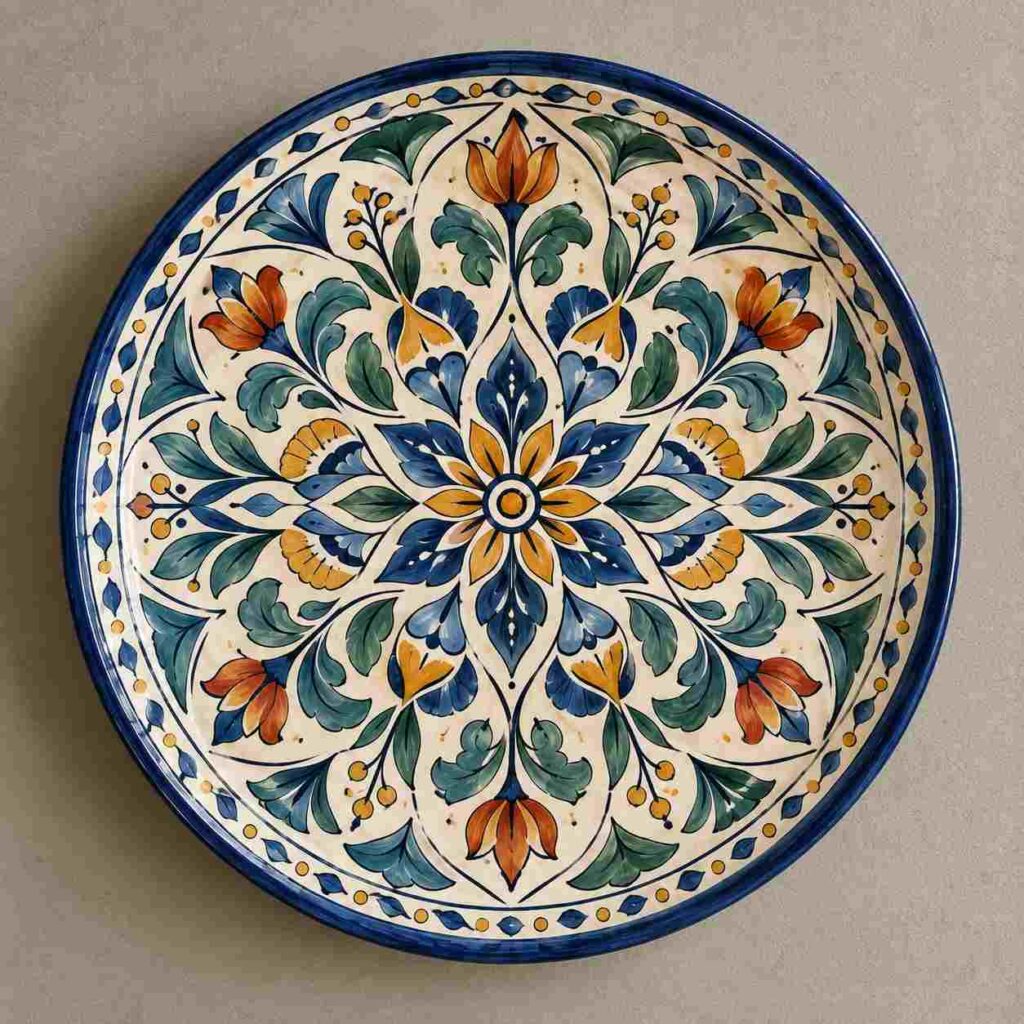
Create a bold botanical plate with one large flower in the center, leafy branches, and a few smaller blooms. Navy, teal, green, mustard, and burnt orange look warm and colorful against a cream plate. Display the finished piece on an open shelf or use it to brighten a plain wall.
Materials
- Plain ceramic plate
- Ceramic paint pens
- Ceramic paint in navy, teal, green, mustard, and burnt orange
- Fine and medium paintbrushes
- Pencil and eraser
- Scrap paper
- Plate stand or wall hanger
How to Make It
- Practice drawing a large flower, simple leaves, and a few small blooms on scrap paper.
- Lightly mark the center of the plate with a pencil. Draw one large flower around this point.
- Add several curved stems that move outward from the center. Draw leaves and a few smaller flowers along the stems.
- Trace the main shapes with a navy ceramic paint pen. Leave out some of the tiny details if you want an easier design.
- Fill the flowers and leaves with teal, green, mustard, blue, and burnt orange. Allow one color to dry before painting the area beside it.
- Add a narrow border of small leaves and dots near the rim.
- Let the paint dry and cure it according to the manufacturer’s instructions. Place the plate on a stand or attach it securely to the wall.
Tip: Work on one section at a time. Your arrangement does not need to match the image exactly. Change the number, size, and placement of the flowers and leaves to make the design your own.
For another easy floral project, try these construction paper flower ideas.
3. Colorful Garden Wheel Plate
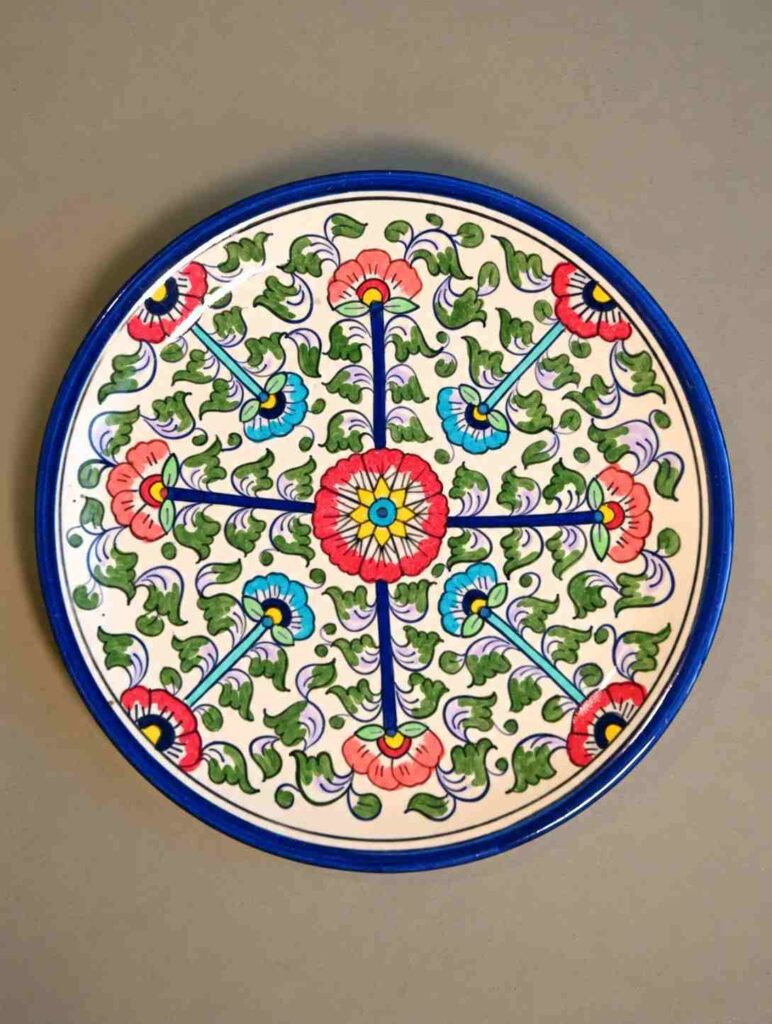
Bright coral flowers, turquoise accents, fresh green leaves, and a cobalt-blue rim give this plate a cheerful garden look. The design starts with one flower in the center and spreads outward through simple stems and smaller blooms. Display it in a kitchen, breakfast nook, craft room, or anywhere that needs a little more color.
Materials
- Plain ceramic plate
- Ceramic paint pens
- Ceramic paint in coral, turquoise, green, yellow, and cobalt blue
- Small paintbrushes
- Pencil
- Scrap paper
- Plate stand or wall hanger
How to Make It
- Practice drawing a simple flower, curved stems, and easy leaf shapes on scrap paper.
- Lightly sketch one flower in the center of the plate. Draw several curved stems moving toward the rim.
- Add a small flower near the end of each stem. Fill some of the open spaces with leaves, dots, or tiny buds.
- Trace the stems and main details with a cobalt-blue ceramic paint pen.
- Paint the flowers coral and turquoise. Add yellow centers and fill the leaves with different shades of green.
- Finish the rim with cobalt-blue paint. A slightly uneven brush-painted edge will help the plate look naturally handmade.
- Let the paint dry and cure it according to the manufacturer’s instructions. Display the plate on a stand or attach it securely to the wall.
4. Colorful Floral Medallion Plate
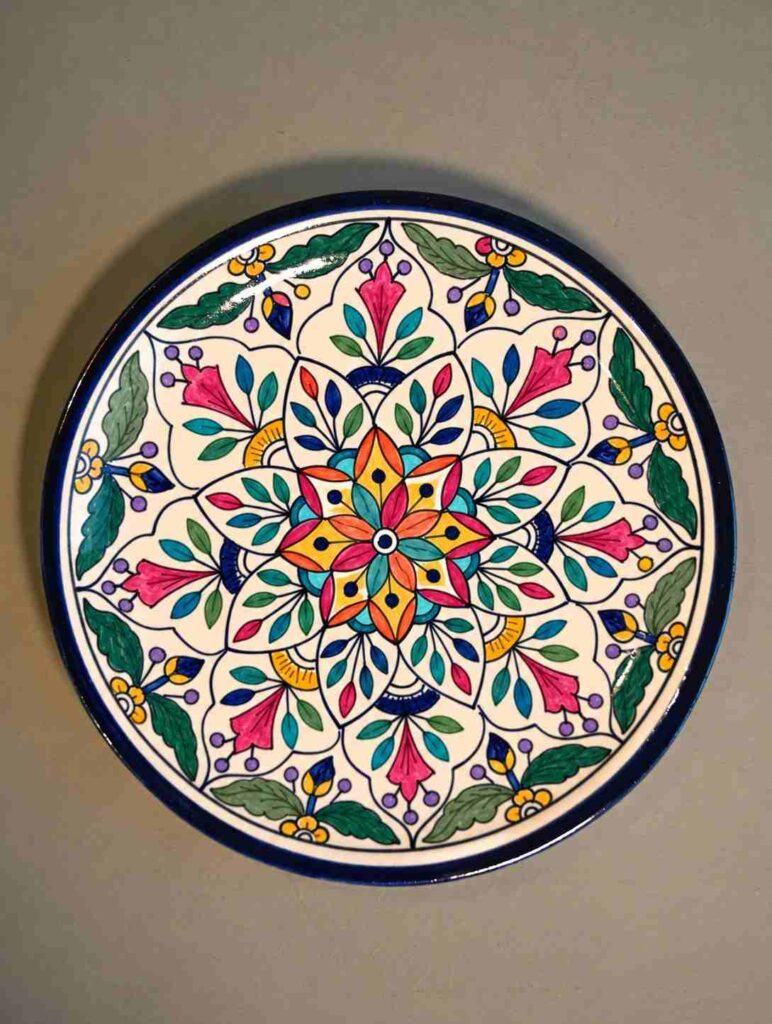
This cheerful plate combines a layered center flower with small leaves, branches, and bell-shaped blooms. Raspberry pink, coral, turquoise, marigold, and green stand out against the cream surface. Dark blue outlines keep the colors clear and give the plate a finished folk-art look.
Materials
- Plain ceramic plate
- Ceramic paint pens
- Ceramic paint in raspberry, coral, turquoise, marigold, green, and dark blue
- Small detail brush
- Pencil and eraser
- Scrap paper
- Plate stand or wall hanger
How to Make It
- Practice drawing a simple flower with two layers of petals on scrap paper.
- Lightly sketch a medium flower in the center of the plate. Add a second layer of pointed petals around it.
- Draw short branches between the outer petals. Add oval leaves and a few small bell-shaped flowers.
- Trace the main design with a dark blue ceramic paint pen. Keep some lines slightly thicker than others for a natural hand-painted look.
- Fill the center flower with coral, raspberry, turquoise, and marigold. Paint the smaller flowers pink and use different shades of green and blue for the leaves.
- Add a few dots or short brush marks in the open spaces, but leave enough cream showing so the design does not feel crowded.
- Let the paint dry and cure it according to the manufacturer’s instructions. Display the plate on a stand or attach it securely to the wall.
Tip: Choose where each color will go before you start painting. Keep a small color chart beside you so the bright shades feel balanced without making the plate look too busy.
5. Teal Floral Vine Plate
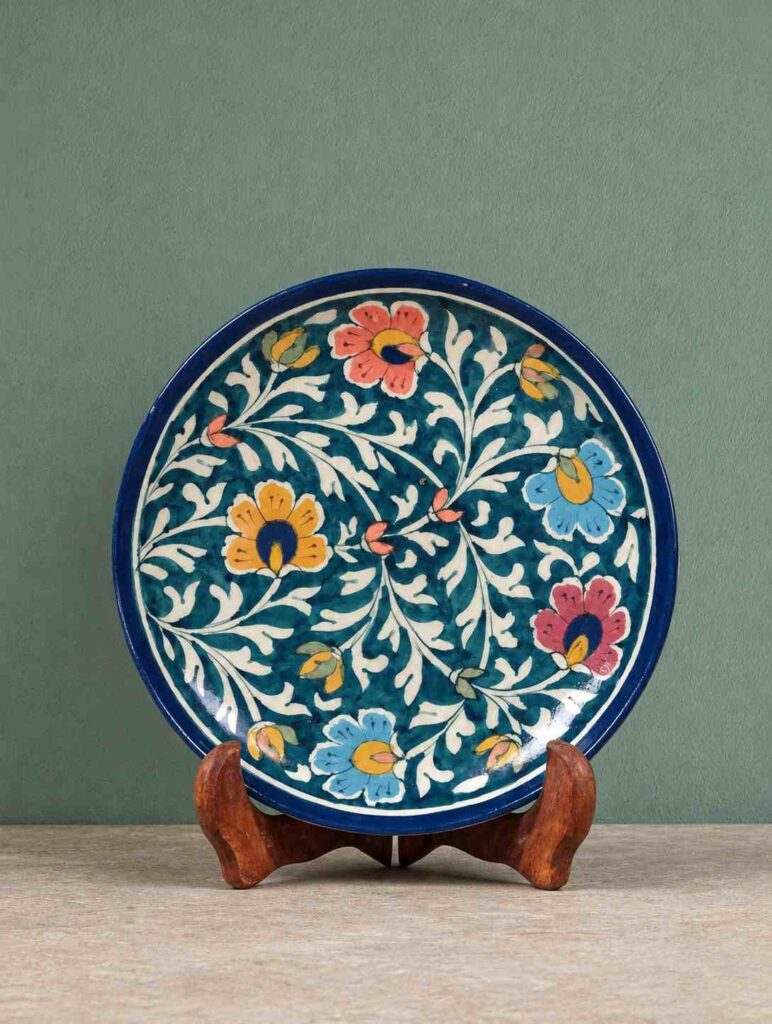
A deep teal background gives this decorative plate a rich and dramatic look. Cream vines make the pattern easy to see, while coral, mustard, dusty blue, and raspberry flowers add cheerful color. Place the finished plate on a mantel, console table, or open shelf.
Materials
- Plain ceramic plate
- Ceramic paint in deep teal, cream, coral, mustard, dusty blue, raspberry, and navy
- Fine and medium paintbrushes
- Pencil
- Tracing paper
- Plate stand
How to Make It
- Apply a thin coat of deep teal ceramic paint to the front of the plate. Let it dry, then add a second coat if needed.
- Draw three or four loose, curving vines on tracing paper. Transfer only the main lines to the plate.
- Paint the vines cream. Add simple leaves along the branches, changing their size and direction slightly.
- Place flowers in some of the open spaces. Vary their size so the design feels natural instead of perfectly repeated.
- Paint the flowers coral, mustard, dusty blue, and raspberry. Leave a few small areas open so the dark background remains visible.
- Add a narrow navy border around the rim. Allow a few brushstrokes and small differences in paint coverage to remain visible.
- Let the paint dry and cure it according to the manufacturer’s instructions. Display the finished plate on a sturdy stand.
Tip: Start near the center and work outward so your hand does not touch the wet paint. If the full vine design feels too detailed, use fewer branches and larger flowers.
6. Plum Garden Folk-Art Plate
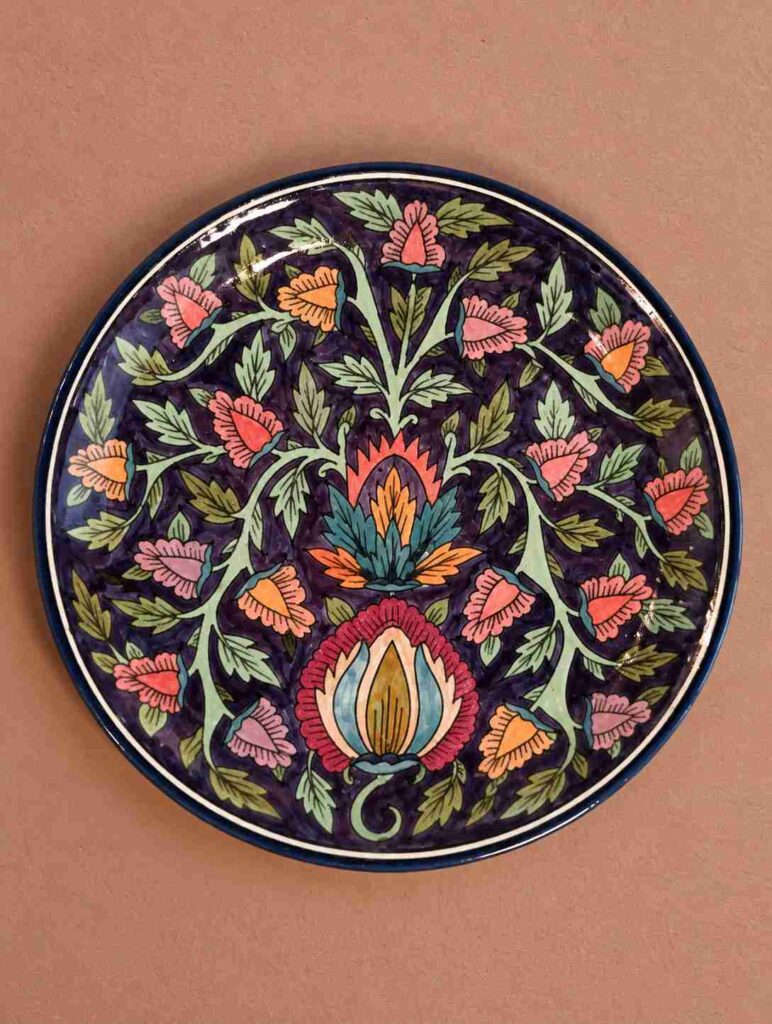
A deep plum background helps the soft green vines and colorful flowers stand out. Coral, apricot, raspberry, teal, and mustard add warmth without hiding the hand-painted details. Display this plate on an entryway wall or mix it with other artwork in an eclectic gallery display.
Materials
- Plain ceramic plate
- Ceramic paint in deep plum, coral, apricot, raspberry, teal, mustard, and green
- Fine and medium paintbrushes
- Navy ceramic paint pen
- Pencil
- Scrap paper
- Plate stand or wall hanger
How to Make It
- Cover the front of the plate with a thin coat of deep plum ceramic paint. Let it dry before adding a second coat.
- Practice drawing simple flowers, leaves, and curved vines on scrap paper.
- Lightly sketch two large flowers on the plate. Place one near the center and the other slightly below it.
- Draw loose vines around the main flowers. Add a few small blooms and leaves along the branches.
- Paint the vines and leaves in sage, mint, and olive green. Use coral, apricot, and soft pink for the smaller flowers.
- Fill the two main flowers with raspberry, teal, cream, mustard, and coral. Add fine navy lines to selected petals and leaves.
- Paint a narrow navy border around the rim. Let the finished plate dry and cure it according to the manufacturer’s instructions.
Tip: A dark background may need two thin coats. Let each coat dry fully to keep the surface smooth. Use fewer vines if you prefer a quicker design with more open space.
7. Painted Folk Flower Tray
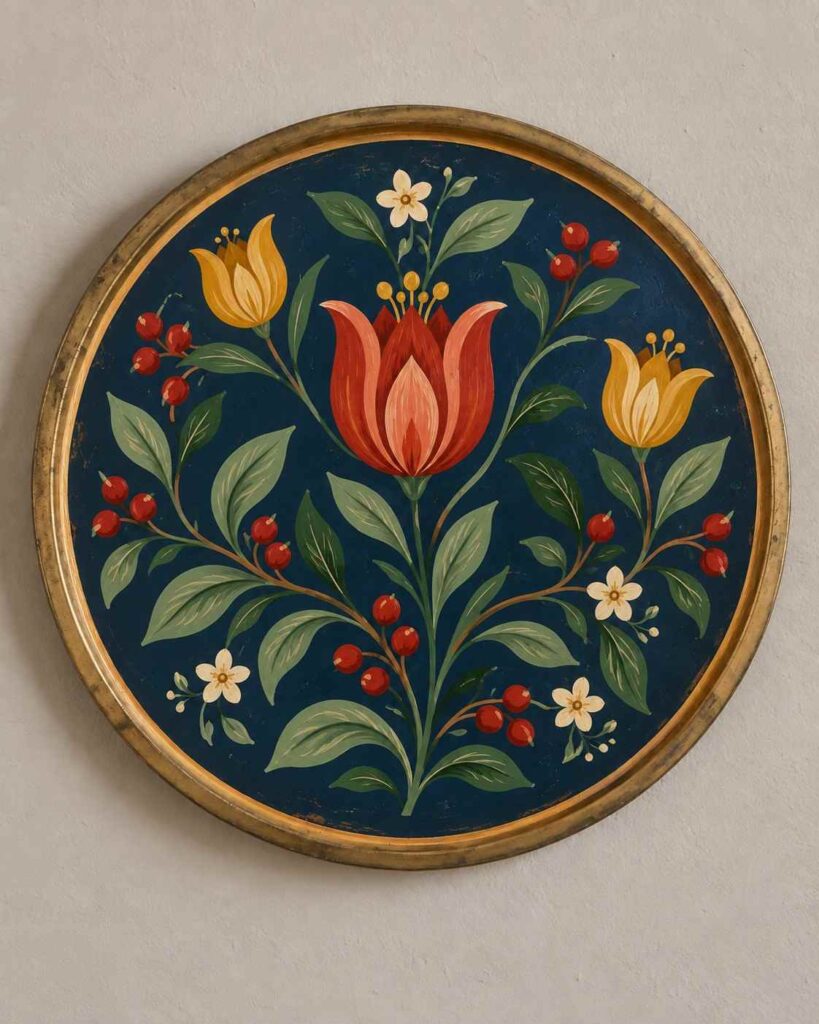
Turn an old round metal tray into colorful wall art instead of throwing it away. A large red tulip creates a strong focal point, while golden flowers, green leaves, red berries, and small cream blooms brighten the deep navy background. Leaving part of the aged metal rim visible adds warmth and character.
Materials
- Round metal tray
- Fine-grit sandpaper
- Metal primer
- Acrylic or enamel paint
- Small flat and detail brushes
- Pencil or chalk pencil
- Water-based clear sealer
- Picture-hanging hardware
How to Make It
- Clean the tray and lightly sand any rough or rusty areas. Wipe away the dust, then apply metal primer according to the product directions.
- Paint the inside of the tray deep navy. Leave the rim unpainted if you want to keep some of its aged metal finish.
- Lightly sketch one large tulip near the center. Add two smaller flowers and several loose, curved branches around it.
- Paint the main flower red and coral. Use mustard for the smaller flowers and different shades of green for the leaves.
- Fill a few open spaces with red berries and small cream flowers. Add short, uneven brushstrokes to selected leaves for a natural hand-painted look.
- Let the paint dry completely. Apply a water-based clear sealer according to the label directions.
- Attach hanging hardware suitable for the tray’s size and weight, or display it on a sturdy stand.
Tip: A chalk pencil is easier to see on a dark background and can be gently wiped away after painting. Keep the leaves and berries simple so the project remains easy to complete.
Looking for more ways to reuse old household items? These waste material DIY projects offer plenty of creative ideas.
8. Southwestern Pronghorn Painted Plate
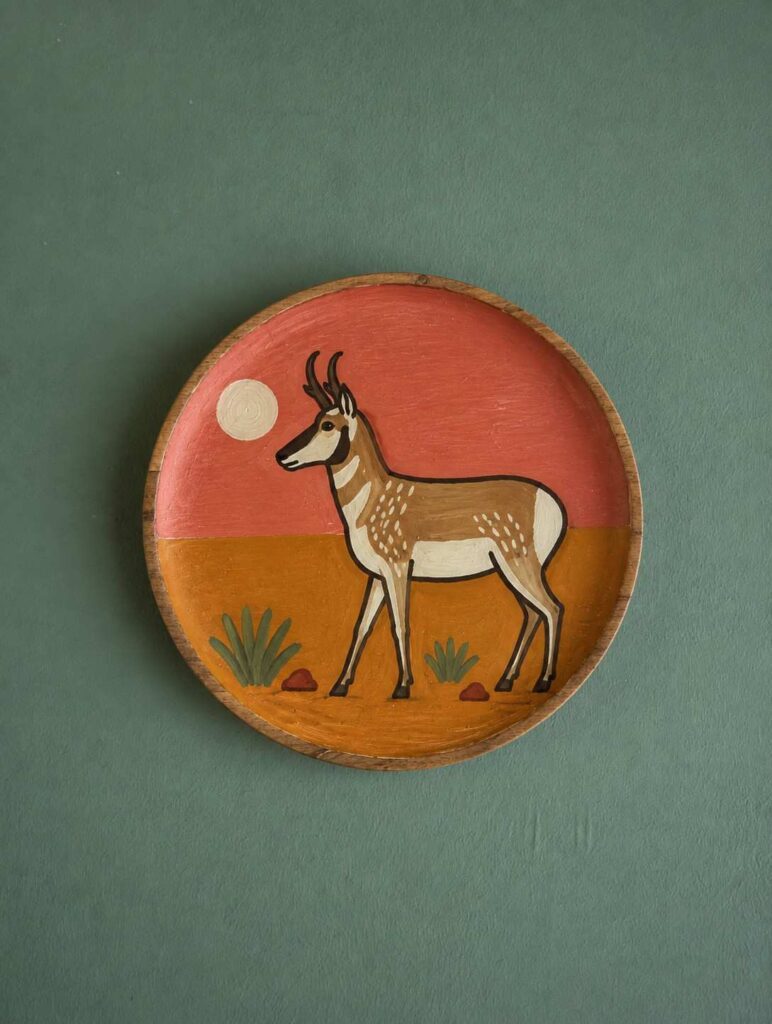
Bring a touch of the American West to a plain wooden plate with this simple pronghorn design. A muted coral sky, warm ochre ground, and touches of sage green create an earthy desert palette. The large animal in the center makes a strong focal point without requiring a complicated background.
Materials
- Round wooden plate
- Fine-grit sandpaper
- Acrylic craft paint
- Small flat and detail brushes
- Printed pronghorn outline
- Graphite transfer paper
- Pencil
- Water-based clear sealer
- Picture-hanging hardware
How to Make It
- Lightly sand the wooden plate and remove the dust. Paint the upper half muted coral and the lower half warm ochre. Let the dividing line curve slightly like a distant horizon.
- Place graphite transfer paper beneath the printed pronghorn outline. Trace the animal near the center of the plate.
- Paint the body warm tan. Add a cream belly, neck stripe, face marking, and rump patch.
- Use dark brown for the outline, hooves, facial details, and short forked horns. Add a few small cream dashes across the body for a hand-painted folk-art look.
- Complete the scene with a small cream sun, a few strokes of sage grass, and two simple stones. Keep these details loose and slightly uneven.
- Let the paint dry completely. Apply a water-based clear sealer according to the product directions.
- Attach suitable hanging hardware or display the finished plate on a sturdy stand.
Tip: Keep the animal large and the background details simple. If the legs or horns feel difficult, practice drawing them on paper before transferring the outline.
9. Oversized Lotus Leaf Plate
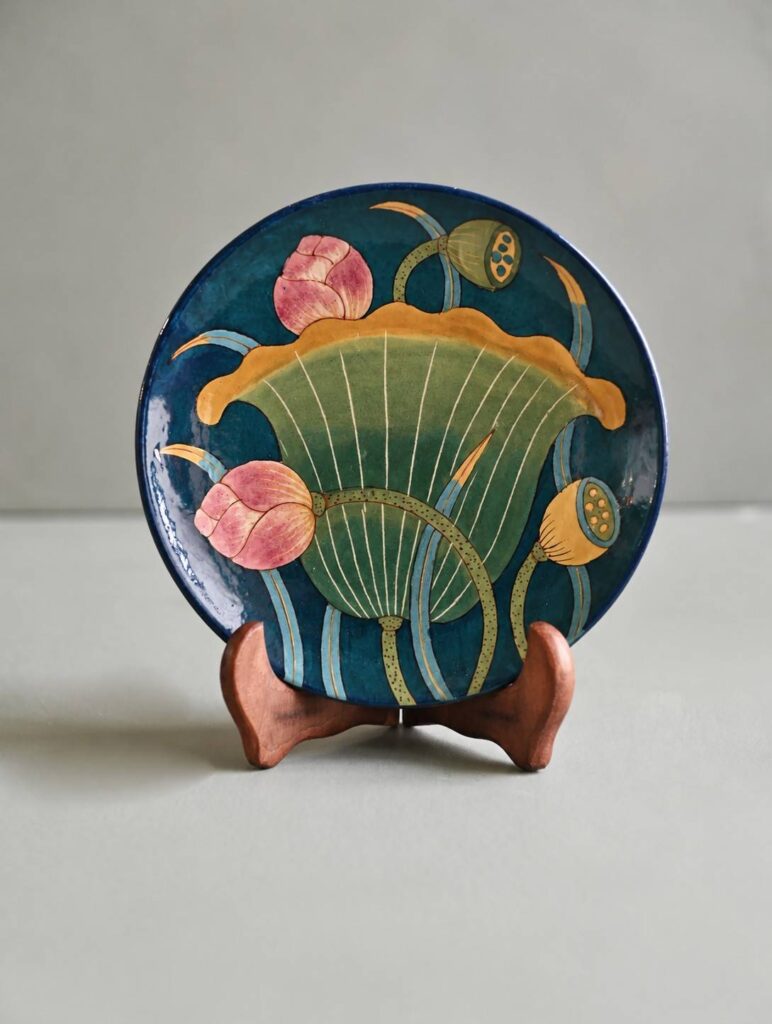
An oversized lotus leaf gives this decorative plate a bold botanical look. The deep teal background makes the green leaf, soft pink buds, and mustard details stand out clearly. Display it on a plate stand to add color to a mantel, bookshelf, or console table.
Materials
- Plain ceramic plate
- Ceramic paint in deep teal, forest green, sage, mustard, soft pink, and dusty blue
- Fine and medium paintbrushes
- Pencil
- Scrap paper
- Plate stand
How to Make It
- Apply a thin coat of deep teal ceramic paint to the front of the plate. Let it dry, then add a second coat if needed.
- Practice drawing a large lotus leaf and a few curved stems on scrap paper.
- Lightly sketch one oversized leaf in the center of the plate. Give its upper edge a loose, gently curved shape.
- Paint the leaf with forest green and sage. Add a narrow mustard border along the upper edge.
- Draw thin cream lines from the bottom of the leaf toward the top. Keep the spacing slightly uneven for a natural hand-painted look.
- Add a few curved stems around the leaf. Paint two or three soft pink buds and a couple of small seedpods.
- Finish with touches of dusty blue and mustard. Let the paint dry and cure it according to the manufacturer’s instructions.
10. Colorful Garden Medallion Plate
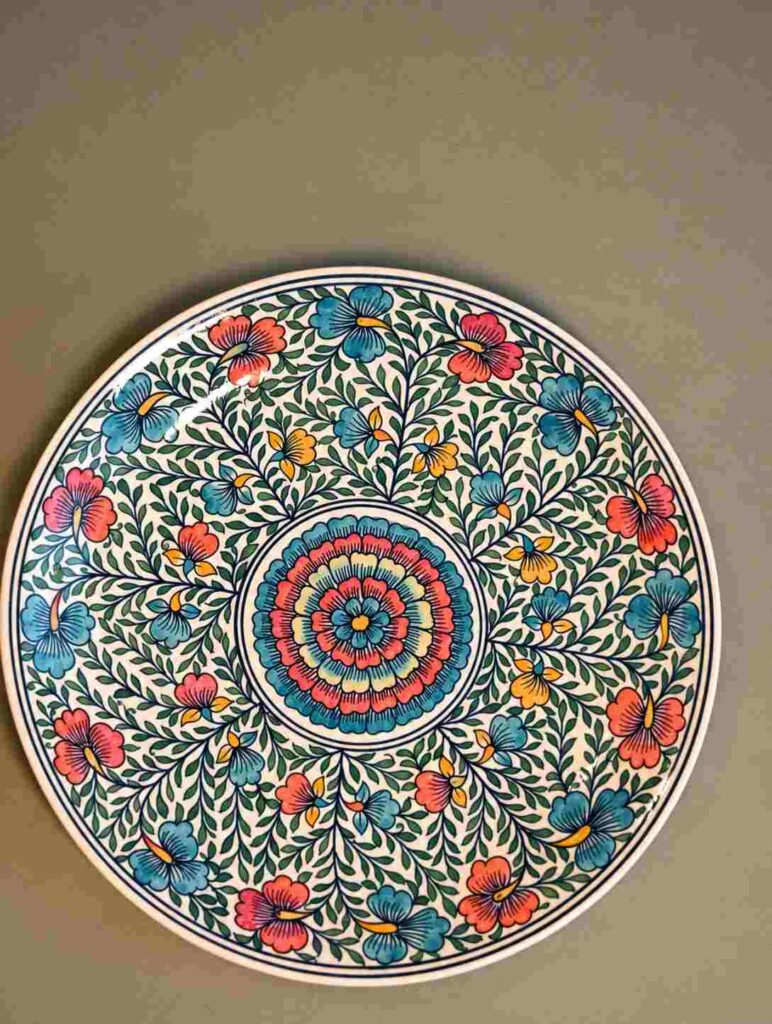
This decorative plate pairs a round floral medallion with delicate branches and small flowers. Coral, sky blue, soft pink, and leafy green bring cheerful color to the warm cream surface. Dark outlines help the tiny details remain visible when the plate is displayed on a wall.
Materials
- Plain ceramic plate
- Ceramic paint pens
- Ceramic paint in coral, sky blue, soft pink, green, and cream
- Fine paintbrush
- Pencil
- Tracing paper
- Plate stand or wall hanger
How to Make It
- Draw a round flower on tracing paper. Add two or three loose layers of rounded petals.
- Transfer the flower to the center of the plate. It does not need to form a perfectly even circle.
- Sketch thin branches spreading outward from the center. Add small leaves, buds, and open flowers along the branches.
- Trace the main design with a dark navy ceramic paint pen. Allow the outlines to vary slightly in thickness.
- Paint the center flower with coral and sky blue. Use soft pink and blue for the smaller flowers, then fill the leaves with different shades of green.
- Leave some cream space between the branches so the detailed pattern remains easy to see.
- Finish the rim with two narrow navy lines. Let the paint dry and cure it according to the manufacturer’s instructions.
Tip: Use the picture only as a guide. Fewer branches, larger leaves, or different flower colors will make the project easier and give your plate a more personal, handmade look.
Hand-painted plates are an affordable way to turn simple thrift-store finds into personal wall art. Start with the design that feels easiest, choose colors that work with your home, and make the pattern your own.
Your lines and flowers do not need to look perfect. Small differences in shape, spacing, and paint coverage are part of the handmade charm. Display one plate on a shelf or arrange several together to create a colorful gallery wall.
You can also pair your painted plates with these toilet paper roll flower crafts to create a colorful handmade wall display.
Which painted plate idea would you like to try first?